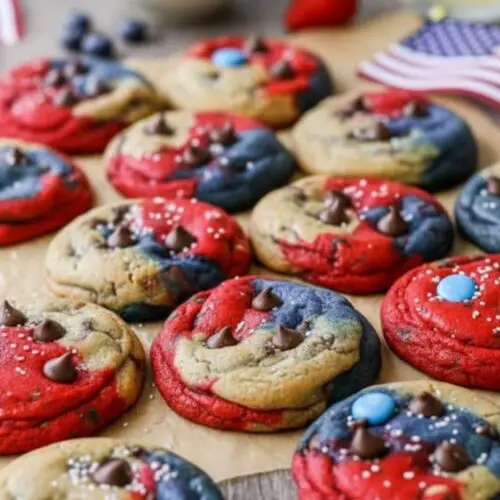
July 4th Cookies
As the unofficial kick-off to summer, the Fourth of July brings with it the excitement of barbecues, family reunions, and, let’s be honest, some pretty incredible desserts. July 4th cookies are the perfect way to celebrate with flair.
Print
Pin
Servings: 24
Calories: 200kcal
Equipment
- stand mixer
- Baking sheets
- Parchment paper
- Rubber spatula
- Scale
Ingredients
- For my July 4th cookies I like to keep the ingredients both classic and fun, ensuring they bring joy to every bite. Here’s what you’ll need:
- - 2 ½ cups of all-purpose flour
- - 1 cup of cake flour
- - 1 tsp of cornstarch
- - 1 tsp of baking soda
- - 1 tsp of baking powder
- - 1 tsp of salt
- - 1 cup of unsalted cold butter cubed
- - 1 cup of packed brown sugar dark or light
- - ½ cup of granulated sugar
- - 2 large eggs
- - 2 large egg yolks
- - 2 tsp of vanilla extract
- - 3 cups of milk chocolate chips add less if you prefer
- - Red gel food coloring
- - Blue gel food coloring
- - 1 tsp of almond extract a little extra flavor!
- - ½ cup of chopped pecans optional, but adds a lovely crunch
Instructions
Step 1: Prepare the Baking Sheets
- Start by lining two baking sheets with parchment paper or silicone baking mats. This prevents sticking and ensures even baking. Set them aside for now.
Step 2: Mix Dry Ingredients
- In a large mixing bowl, combine all-purpose flour, cake flour, cornstarch, baking soda, baking powder, and salt. Make sure to whisk the dry ingredients together well. This step is crucial as it evenly distributes the leavening agents throughout your flour.
Step 3: Cream Butter and Sugars
- In the bowl of your stand mixer, add the cubed butter, brown sugar, and granulated sugar. Attach the paddle attachment and set the mixer to medium speed. Cream these ingredients until smooth and fluffy, about 2-3 minutes. The texture should be light and airy at this stage.
Step 4: Add Eggs and Vanilla
- Next, crack in the eggs and egg yolks, and pour in the vanilla extract and almond extract. Mix again until everything is well incorporated. Use a rubber spatula to scrape down the sides to include any mixture clinging on the edges, then mix once more.
Step 5: Combine Dry Ingredients
- Slowly add the previously mixed dry ingredients into the wet mixture with the mixer on low speed. You want to combine them just until blended. Finally, fold in the milk chocolate chips (and pecans if you’re using them) with the spatula until evenly distributed.
Step 6: Preheat Oven
- Before shaping the dough, preheat your oven to 400°F.
Step 7: Divide Dough
- Once your dough is mixed, divide it into three equal sections. I genuinely suggest using a kitchen scale for this part; it helps achieve uniformity.
Step 8: Color the Dough
- Take one section of dough and mix in red food coloring until you get a rich color. Do the same for the second section with blue food coloring, leaving the third section plain. Aim for vibrant colors, but be careful; adding too little will produce a pastel look that won’t stand out.
Step 9: Chill Dough (if needed)
- If you find that the dough is getting too sticky and hard to handle, pop it in the fridge for a few minutes. It makes shaping the logs much easier.
Step 10: Shape the Cookies
- Roll each colored dough section into a long log, about 15 inches long. Place these logs side by side on plastic wrap or parchment paper. Wrap and roll them together to form one large uniform log. Depending on how big you want your cookies, slice sections of dough, roll them into balls, and place them on the prepared baking sheets. I usually do six per sheet.
Step 11: Bake
- Slide the baking sheets into your preheated oven. Bake for about 10 minutes or until the edges start turning golden brown. If you like, gently press more chocolate chips into the tops of the cookies as they come out of the oven for that extra touch.
Step 12: Cooling and Decorating
- Let the cookies sit on the baking sheet for about 5-10 minutes before transferring them to a cooling rack. When they’re completely cool, feel free to decorate with edible glitter stars for extra pizzazz!
Notes
- Chill the dough if you find it too sticky to handle; it makes working with it much smoother.
- If you don’t have a stand mixer, a hand mixer will do just fine—just be prepared for a good workout!
- Experiment with other colors if desired but make sure they fit the theme of red, white, and blue.
- Adjust the sweetness by reducing the chocolate chips if you prefer.
- Use high-quality ingredients for the best flavor—this makes a world of difference in your cookies!