Summer gatherings always call for something light, refreshing, and downright delectable. Picture yourself lounging with friends on a sunny afternoon, the scent of grilled burgers wafting through the air, and laughter filling the space.
What could elevate such a scene? That’s right – a slice of key lime pie with a crunchy, irresistible Biscoff crust. It’s the perfect balance of tart and sweet, with a delightful crunch that melts in your mouth. If you’re like me, this treat is sure to steal the spotlight at any gathering!

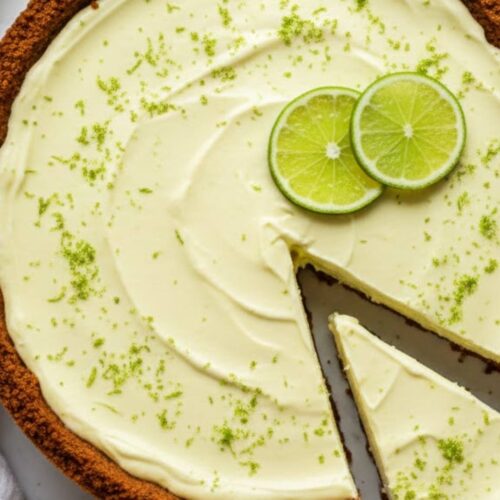
Key lime pie is akin to a sunny day on a dessert plate. With its bright, tangy flavors and creamy filling, it’s a dish that has secured a special place in the hearts of many. But let’s twist things up a bit – why not add a Biscoff cookie crust?
This crunchy base not only provides a delightful texture but also infuses the pie with a unique caramel-like flavor that pairs beautifully with the tanginess of the key limes. This recipe takes the classic pie to new heights, making it an irresistible choice for summer picnics, barbecues, or even post-dinner indulgence.
You Might Like These Recipes!
Raisin Sauce For Dessert Recipe
Jumbo Chocolate Muffins Recipe
What is Key Lime Pie with Biscoff Crust?
At its core, key lime pie is a dessert that originated in Florida, featuring a creamy filling made from key lime juice, eggs, and sweetened condensed milk. The true star, though, is the key lime itself. Small, yellow, and much tangier than regular limes, they offer a bright burst of flavor that’s simply refreshing. The addition of a Biscoff crust adds a new layer of complexity and richness. Made from crushed Biscoff cookies, this crust is sweet, slightly spiced, and sets the stage for the delightful filling.
Why This Recipe Works
This recipe works because it combines the perfectly balanced tartness of key limes with the sweet crunch of Biscoff cookies. The ingredients harmonize to create a dessert that’s not overly sweet, making it appealing to a variety of palates. The crust’s texture provides a satisfying contrast to the smooth silkiness of the pie, ensuring that each bite is a joyful experience. Additionally, the ingredients are accessible, and the steps are straightforward, making it an excellent choice for both novice and experienced bakers alike.
Ingredients You’ll Need To Make This Key Lime Pie with Biscoff Crust

For the Biscoff Cookie Crust:
– 1 package (8 oz) crushed Biscoff cookies
– 1 tablespoon granulated sugar
– A pinch of salt
– 6 tablespoons melted unsalted butter
– Optional: 1 teaspoon ground cinnamon (for added warmth)
For the Key Lime Filling:
– 14 ounces sweetened condensed milk
– 4 large egg yolks
– 5 ounces key lime juice (fresh or bottled)
– Zest of 2 key limes or 1 regular lime
For the Whipped Cream Topping:
– 1 cup heavy whipping cream
– ¼ cup powdered sugar
– 1 teaspoon vanilla extract
– Optional: 1 tablespoon lime zest (for garnish)
How to Make Key Lime Pie with Biscoff Crust
Get ready for a sweet journey as we whip up this creamy and tangy dessert. The steps are straightforward, and before you know it, you’ll be savoring a slice of this pie. Let’s dive into the details!
Step 1: Prepare the Biscoff Crust

Preheat your oven to 325°F (162°C). The first step is essential as it ensures a good bake on the crust. Once that’s out of the way, you can begin on the crust itself.
Combine the crushed Biscoff cookies, melted butter, sugar, and a pinch of salt in a mixing bowl. If you have a food processor, go ahead and toss the cookies in there for a quick blitz until they’re finely crushed. If you don’t, no worries! Grab a rolling pin or a rubber mallet and crush those cookies until you have a fine crumb – it’s a great way to relieve any stress from the day!
Once mixed, pour your crust mixture into a 9-inch pie dish or tart pan. Use the back of a measuring cup to press the crumbs firmly and evenly into the bottom and up the sides. This is key – a well-packed crust will hold together better once baked.
Place it in the oven to bake for about 10–12 minutes. You’re looking for that slight golden color. If you notice the crust puffing up at any point, gently press it back down with your measuring cup. Once done, let it cool slightly while you prepare the filling.
Step 2: Create the Key Lime Filling

In a separate bowl, whip together the egg yolks and sweetened condensed milk. Whisk them vigorously until smooth and well combined, which should take about a minute.
Now, add the freshly squeezed key lime juice and lime zest to the mixture. This is where you’ll start to see that beautiful key lime flavor come to life. Mix until everything is just combined.
Step 3: Bake the Pie

Pour the filling into the cooled Biscoff crust. For even baking, make sure you pour it in gently and evenly distribute it.
Place the pie back into the oven. You’ll want to bake it for about 20 minutes. Look for the edges to be set, while the center should still have a slight jiggle. This jiggle ensures that your filling will be creamy and not overcooked.
Step 4: Chill the Pie

Once it’s done, take the pie out and let it cool at room temperature for about an hour. After that, transfer it to the refrigerator and let it chill for at least 3 hours – this step is non-negotiable for achieving the best flavor and texture.
Step 5: Make the Whipped Cream Topping
When you’re ready to serve, whip the heavy cream with powdered sugar and vanilla in a mixing bowl at high speed until stiff peaks form. This is the fluffy cloud that will sit atop your pie, and trust me, it’s the perfect finishing touch.
Spread or pipe the whipped cream over the cooled pie and if you’re feeling fancy, sprinkle some additional lime zest on top for that vibrant pop of color.
Tips
– Use fresh key limes if you can find them; they provide a brighter flavor than bottled juice.
– Don’t skip the zest! It adds depth of flavor that complements the pie perfectly.
– Chill the pie overnight for the best texture and flavor; letting it sit allows the filling to set beautifully.
– Experiment with flavors! Try adding a teaspoon of coconut extract to the filling for a tropical twist.
– For an extra crunch, top the whipped cream with crushed Biscoff cookies before serving.
How to Store the Leftovers?
If you have leftovers (which can be rare with this delicious pie), store them in the refrigerator. Make sure to cover the pie with plastic wrap or aluminum foil to keep it fresh. It will stay good for about 3 to 4 days. Note that the crust may soften a bit as it sits, but I promise it will still taste wonderful!
What are Some Recommended Side Dishes for Key Lime Pie with Biscoff Crust?
– Fresh Fruit Salad: A mix of seasonal fruits is a perfect, refreshing complement to the tangy pie.
– Grilled Pineapple Slices: This adds a caramelized sweetness that pairs beautifully with the citrus notes of the pie.
– Tropical Coleslaw: A crunchy slaw with a hint of sweetness ties in perfectly with the light flavors of key lime.
– Shrimp Tacos with Mango Salsa: The combination of savory and refreshing ingredients from the tacos balances the dessert well.
– Coconut Macaroons: A chewy coconut treat enhances the tropical feel and complements the flavors of the pie.
If the Items Are Not Available in Your Pantry, What Are Some Substitute Options for the Ingredients?
– Biscoff Cookies: Try using graham crackers or ginger snaps for a similar crust.
– Unsalted Butter: You can substitute with coconut oil for a dairy-free version.
– Egg Yolks: If you want to make it vegan, use a commercial egg replacer or silken tofu.
– Heavy Whipping Cream: Coconut cream is a great dairy-free alternative that pairs wonderfully with this pie.
– Key Lime Juice: Regular lime juice can be used if key limes aren’t available, though it won’t have the exact same flavor profile.
Key Lime Pie With Biscoff Crust
Equipment
- Whisk
- 9-inch pie dish
- food processor (optional)
- Spoons
Ingredients
For the Biscoff Cookie Crust:
- – 1 package 8 oz crushed Biscoff cookies
- – 1 tablespoon granulated sugar
- – A pinch of salt
- – 6 tablespoons melted unsalted butter
- – Optional: 1 teaspoon ground cinnamon for added warmth
For the Key Lime Filling:
- – 14 ounces sweetened condensed milk
- – 4 large egg yolks
- – 5 ounces key lime juice fresh or bottled
- – Zest of 2 key limes or 1 regular lime
- For the Whipped Cream Topping:
- – 1 cup heavy whipping cream
- – ¼ cup powdered sugar
- – 1 teaspoon vanilla extract
– Optional: 1 tablespoon lime zest (for garnish)
Instructions
Step 1: Prepare the Biscoff Crust
- Preheat your oven to 325°F (162°C). The first step is essential as it ensures a good bake on the crust. Once that’s out of the way, you can begin on the crust itself.
- Combine the crushed Biscoff cookies, melted butter, sugar, and a pinch of salt in a mixing bowl. If you have a food processor, go ahead and toss the cookies in there for a quick blitz until they’re finely crushed. If you don’t, no worries! Grab a rolling pin or a rubber mallet and crush those cookies until you have a fine crumb – it’s a great way to relieve any stress from the day!
- Once mixed, pour your crust mixture into a 9-inch pie dish or tart pan. Use the back of a measuring cup to press the crumbs firmly and evenly into the bottom and up the sides. This is key – a well-packed crust will hold together better once baked.
- Place it in the oven to bake for about 10–12 minutes. You’re looking for that slight golden color. If you notice the crust puffing up at any point, gently press it back down with your measuring cup. Once done, let it cool slightly while you prepare the filling.
Step 2: Create the Key Lime Filling
- In a separate bowl, whip together the egg yolks and sweetened condensed milk. Whisk them vigorously until smooth and well combined, which should take about a minute.
- Now, add the freshly squeezed key lime juice and lime zest to the mixture. This is where you’ll start to see that beautiful key lime flavor come to life. Mix until everything is just combined.
Step 3: Bake the Pie
- Pour the filling into the cooled Biscoff crust. For even baking, make sure you pour it in gently and evenly distribute it.
- Place the pie back into the oven. You’ll want to bake it for about 20 minutes. Look for the edges to be set, while the center should still have a slight jiggle. This jiggle ensures that your filling will be creamy and not overcooked.
Step 4: Chill the Pie
- Once it’s done, take the pie out and let it cool at room temperature for about an hour. After that, transfer it to the refrigerator and let it chill for at least 3 hours – this step is non-negotiable for achieving the best flavor and texture.
- Step 5: Make the Whipped Cream Topping
- When you’re ready to serve, whip the heavy cream with powdered sugar and vanilla in a mixing bowl at high speed until stiff peaks form. This is the fluffy cloud that will sit atop your pie, and trust me, it’s the perfect finishing touch.
- Spread or pipe the whipped cream over the cooled pie and if you’re feeling fancy, sprinkle some additional lime zest on top for that vibrant pop of color.
Notes
FAQs
1. Can I make this pie ahead of time?
Absolutely! This pie is perfect for making ahead. Just store it in the refrigerator once it’s cooled. You can make it up to a day in advance, allowing it to set overnight.
2. Can I freeze key lime pie?
Yes! If you have leftovers or want to prepare it ahead of time, key lime pie can be frozen. Wrap it tightly in plastic wrap to prevent freezer burn and consume within a month for best results.
3. What can I use instead of key limes?
Regular limes can be used in place of key limes. The flavor will be slightly different; however, it will still be delicious.
4. Do I have to use a tart pan?
Nope! While a tart pan is lovely for presentation, a regular pie dish or even a square baking dish works perfectly.
5. Can I make this gluten-free?
Sure! Just use gluten-free Biscoff cookies or any gluten-free cookie of your choice for the crust.
Conclusion
Making key lime pie with a Biscoff crust is not only a breeze but also a delightful way to impress your friends and family. Each bite takes you on a flavor journey that’s both classic and innovative. As you enjoy the tartness of the key lime filling mingled with the sweet, unique crunch of the Biscoff crust, you’ll understand why this dessert is a hit year-round.
So, what are you waiting for? Gather your ingredients and make your kitchen the place everyone wants to be this summer! Happy baking!
You Might Also Like These Latest Recipes!
Jumbo Chocolate Muffins Recipe

My name is Lori Walker. I’m a registered dietitian, food blogger and food enthusiast. I share easy healthy, delicious recipes on my blog and review necessary kitchen items. The recipes I share take less… Read more