
Fourth of July celebrations are all about festive gatherings, vibrant fireworks, and, of course, good food! What’s a better treat to serve after a hot summer BBQ than a plate full of freshly baked July 4th cookies?
These cookies are not only visually striking with their red, white, and blue hues, but they’re also incredibly tasty. Pair these treats with classic summer drinks like lemonade or iced tea, and you’ve got yourself a winning combo that everyone will love.

As the unofficial kick-off to summer, the Fourth of July brings with it the excitement of barbecues, family reunions, and, let’s be honest, some pretty incredible desserts. July 4th cookies are the perfect way to celebrate with flair.
Whether you’re inviting your friends over for a backyard bash, planning a picnic at the local park, or simply celebrating at home, these cookies are sure to impress. They’re fun, colorful, and best of all, easily made ahead of time.
You Might Like These Recipes!
Raisin Sauce For Dessert Recipe
Jar Cookies For Christmas Recipe
Instant Pot Pumpkin Cheesecake Recipe
What is July 4th Cookies?
These delightful cookies are a festive twist on classic chocolate chips, featuring vibrant red and blue colors that echo the flag. With a soft, chewy texture and rich flavors, they’re a hit for any occasion. Whether you’re making them for a crowd or just for your family, they are easy to whip up and will bring smiles all around.
The Ingredients

For my July 4th cookies, I like to keep the ingredients both classic and fun, ensuring they bring joy to every bite. Here’s what you’ll need:
– 2 ½ cups of all-purpose flour
– 1 cup of cake flour
– 1 tsp of cornstarch
– 1 tsp of baking soda
– 1 tsp of baking powder
– 1 tsp of salt
– 1 cup of unsalted cold butter, cubed
– 1 cup of packed brown sugar (dark or light)
– ½ cup of granulated sugar
– 2 large eggs
– 2 large egg yolks
– 2 tsp of vanilla extract
– 3 cups of milk chocolate chips (add less if you prefer)
– Red gel food coloring
– Blue gel food coloring
– 1 tsp of almond extract (a little extra flavor!)
– ½ cup of chopped pecans (optional, but adds a lovely crunch)
Ingredients From : krollskorner.com
How to make July 4th Cookies?
Making July 4th cookies is a joyous activity that gets everyone involved. Children can help add the food coloring, and the aroma that wafts through your kitchen will have everyone asking for a cookie before they’re even out of the oven. Let’s dive into the steps!
Step-by-step directions
Step 1: Prepare the Baking Sheets

Start by lining two baking sheets with parchment paper or silicone baking mats. This prevents sticking and ensures even baking. Set them aside for now.
Step 2: Mix Dry Ingredients

In a large mixing bowl, combine all-purpose flour, cake flour, cornstarch, baking soda, baking powder, and salt. Make sure to whisk the dry ingredients together well. This step is crucial as it evenly distributes the leavening agents throughout your flour.
Step 3: Cream Butter and Sugars

In the bowl of your stand mixer, add the cubed butter, brown sugar, and granulated sugar. Attach the paddle attachment and set the mixer to medium speed. Cream these ingredients until smooth and fluffy, about 2-3 minutes. The texture should be light and airy at this stage.
Step 4: Add Eggs and Vanilla

Next, crack in the eggs and egg yolks, and pour in the vanilla extract and almond extract. Mix again until everything is well incorporated. Use a rubber spatula to scrape down the sides to include any mixture clinging on the edges, then mix once more.
Step 5: Combine Dry Ingredients

Slowly add the previously mixed dry ingredients into the wet mixture with the mixer on low speed. You want to combine them just until blended. Finally, fold in the milk chocolate chips (and pecans if you’re using them) with the spatula until evenly distributed.
Step 6: Preheat Oven

Before shaping the dough, preheat your oven to 400°F.
Step 7: Divide Dough
Once your dough is mixed, divide it into three equal sections. I genuinely suggest using a kitchen scale for this part; it helps achieve uniformity.
Step 8: Color the Dough
Take one section of dough and mix in red food coloring until you get a rich color. Do the same for the second section with blue food coloring, leaving the third section plain. Aim for vibrant colors, but be careful; adding too little will produce a pastel look that won’t stand out.
Step 9: Chill Dough (if needed)
If you find that the dough is getting too sticky and hard to handle, pop it in the fridge for a few minutes. It makes shaping the logs much easier.
Step 10: Shape the Cookies
Roll each colored dough section into a long log, about 15 inches long. Place these logs side by side on plastic wrap or parchment paper. Wrap and roll them together to form one large uniform log. Depending on how big you want your cookies, slice sections of dough, roll them into balls, and place them on the prepared baking sheets. I usually do six per sheet.
Step 11: Bake
Slide the baking sheets into your preheated oven. Bake for about 10 minutes or until the edges start turning golden brown. If you like, gently press more chocolate chips into the tops of the cookies as they come out of the oven for that extra touch.
Step 12: Cooling and Decorating
Let the cookies sit on the baking sheet for about 5-10 minutes before transferring them to a cooling rack. When they’re completely cool, feel free to decorate with edible glitter stars for extra pizzazz!
Notes
– Chill the dough if you find it too sticky to handle; it makes working with it much smoother.
– If you don’t have a stand mixer, a hand mixer will do just fine—just be prepared for a good workout!
– Experiment with other colors if desired but make sure they fit the theme of red, white, and blue.
– Adjust the sweetness by reducing the chocolate chips if you prefer.
– Use high-quality ingredients for the best flavor—this makes a world of difference in your cookies!
Storage Tips
Keep your July 4th cookies in an airtight container at room temperature, where they can last for up to a week. If you want to keep them fresh longer, you can store them in the fridge for up to two weeks or freeze them for up to three months. Just make sure to put parchment paper between layers if stacking.
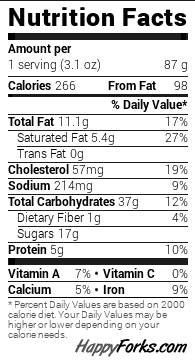
Nutrition Information
– Calories: Approx. 200 per small cookie
– Carbohydrates: 28g
– Fat: 10g
– Protein: 2g
Serving Suggestions
– Festive Dessert Table: Serve these cookies with other traditional July 4th favorites like brownies and fruit salads.
– Picnic Treat: Package them up for easy transport to a fun picnic outing.
– BBQ Companion: Pair these with grilled hamburgers and hot dogs at your summer cookout.
– Kids’ Party: They make an excellent snack for children’s parties, adding color and fun to the dessert table.
– Independence Day Breakfast: Enjoy a cookie alongside a cup of coffee if you’re in the mood for a sweet morning treat.
What Other Substitute Can I Use in July 4th Cookies?
– Gluten-Free Flour: Use a 1:1 gluten-free baking mix for a gluten-free version.
– Semi-Sweet Chocolates: Swap out milk chocolate chips for semi-sweet to make them less sweet.
– Nut Butter: Use peanut or almond butter instead of butter for a nutty flavor.
– Coconut Sugar: For a lower glycemic index option, replace regular sugar with coconut sugar.
– Dried Fruit: Replace chocolate chips with dried cranberries or blueberries for a fruity take.

July 4th Cookies
Equipment
- stand mixer
- Baking sheets
- Parchment paper
- Rubber spatula
- Scale
Ingredients
- For my July 4th cookies I like to keep the ingredients both classic and fun, ensuring they bring joy to every bite. Here’s what you’ll need:
- – 2 ½ cups of all-purpose flour
- – 1 cup of cake flour
- – 1 tsp of cornstarch
- – 1 tsp of baking soda
- – 1 tsp of baking powder
- – 1 tsp of salt
- – 1 cup of unsalted cold butter cubed
- – 1 cup of packed brown sugar dark or light
- – ½ cup of granulated sugar
- – 2 large eggs
- – 2 large egg yolks
- – 2 tsp of vanilla extract
- – 3 cups of milk chocolate chips add less if you prefer
- – Red gel food coloring
- – Blue gel food coloring
- – 1 tsp of almond extract a little extra flavor!
- – ½ cup of chopped pecans optional, but adds a lovely crunch
Instructions
Step 1: Prepare the Baking Sheets
- Start by lining two baking sheets with parchment paper or silicone baking mats. This prevents sticking and ensures even baking. Set them aside for now.
Step 2: Mix Dry Ingredients
- In a large mixing bowl, combine all-purpose flour, cake flour, cornstarch, baking soda, baking powder, and salt. Make sure to whisk the dry ingredients together well. This step is crucial as it evenly distributes the leavening agents throughout your flour.
Step 3: Cream Butter and Sugars
- In the bowl of your stand mixer, add the cubed butter, brown sugar, and granulated sugar. Attach the paddle attachment and set the mixer to medium speed. Cream these ingredients until smooth and fluffy, about 2-3 minutes. The texture should be light and airy at this stage.
Step 4: Add Eggs and Vanilla
- Next, crack in the eggs and egg yolks, and pour in the vanilla extract and almond extract. Mix again until everything is well incorporated. Use a rubber spatula to scrape down the sides to include any mixture clinging on the edges, then mix once more.
Step 5: Combine Dry Ingredients
- Slowly add the previously mixed dry ingredients into the wet mixture with the mixer on low speed. You want to combine them just until blended. Finally, fold in the milk chocolate chips (and pecans if you’re using them) with the spatula until evenly distributed.
Step 6: Preheat Oven
- Before shaping the dough, preheat your oven to 400°F.
Step 7: Divide Dough
- Once your dough is mixed, divide it into three equal sections. I genuinely suggest using a kitchen scale for this part; it helps achieve uniformity.
Step 8: Color the Dough
- Take one section of dough and mix in red food coloring until you get a rich color. Do the same for the second section with blue food coloring, leaving the third section plain. Aim for vibrant colors, but be careful; adding too little will produce a pastel look that won’t stand out.
Step 9: Chill Dough (if needed)
- If you find that the dough is getting too sticky and hard to handle, pop it in the fridge for a few minutes. It makes shaping the logs much easier.
Step 10: Shape the Cookies
- Roll each colored dough section into a long log, about 15 inches long. Place these logs side by side on plastic wrap or parchment paper. Wrap and roll them together to form one large uniform log. Depending on how big you want your cookies, slice sections of dough, roll them into balls, and place them on the prepared baking sheets. I usually do six per sheet.
Step 11: Bake
- Slide the baking sheets into your preheated oven. Bake for about 10 minutes or until the edges start turning golden brown. If you like, gently press more chocolate chips into the tops of the cookies as they come out of the oven for that extra touch.
Step 12: Cooling and Decorating
- Let the cookies sit on the baking sheet for about 5-10 minutes before transferring them to a cooling rack. When they’re completely cool, feel free to decorate with edible glitter stars for extra pizzazz!
Notes
FAQs
1. Can I make these cookies in advance?
Absolutely! You can prepare the dough a day or two ahead, just make sure to refrigerate it. Once baked, they’ll also stay fresh in an airtight container for about a week.
2. How can I make these cookies dairy-free?
For a dairy-free version, substitute the butter with coconut oil or a plant-based butter alternative, and use dairy-free chocolate chips.
3. Can I freeze the cookie dough?
Yes! You can freeze the logs of cookie dough. Wrap them tightly in plastic wrap and place them in a freezer-safe bag. When you’re ready to bake, let them thaw in the fridge overnight.
4. What can I use instead of gel food coloring?
If you prefer, you can use liquid food coloring, but keep in mind that you may need to adjust the amount to achieve the desired color intensity.
5. Are these cookies suitable for shipping?
Yes, these cookies can be shipped but be sure to package them well in bubble wrap to avoid breakage, and choose a sturdy container.
Conclusion
Making July 4th cookies is a delightful way to celebrate America’s birthday with friends and family. Their eye-catching colors and scrumptious flavors bring smiles and satisfaction to any gathering. With their versatility and ease of preparation, these cookies will become a staple at your summer celebrations for years to come. So whip up a batch and get ready to enjoy your Fourth of July festivities! Happy baking!