This post contains affiliate links. As an Amazon Associate I earn from qualifying purchases.
There’s something about warm chocolate muffins fresh from the oven that turns any morning into a celebration. These beauties pair wonderfully with fresh coffee, a cold glass of milk, or even as a simple dessert after dinner. If you’re craving more chocolate indulgence, you might also enjoy my Large Batch Brownies for when you’re feeding a crowd.
How This Recipe Came to Life in My Kitchen
I still remember the Tuesday morning in 2021 when my daughter asked me to recreate the muffins her grandmother used to make. My mother-in-law’s handwritten recipe card was stained and barely legible, but the memory was crystal clear—dense, fudgy chocolate muffins that somehow stayed moist for days. I spent three weeks testing different ratios of cocoa powder, chocolate chips, and sour cream until I nailed it.
What makes this version special is the two-stage baking method. I start at a higher temperature to set the structure quickly, then lower the heat to keep the centers tender and gooey. It’s a technique I borrowed from my years of working with home bakers who wanted restaurant-quality results without fancy equipment.
These muffins have become the recipe I share most often with clients who say they “can’t bake.” They’re genuinely foolproof when you follow the simple steps.
What is Double Chocolate Muffins Recipe?
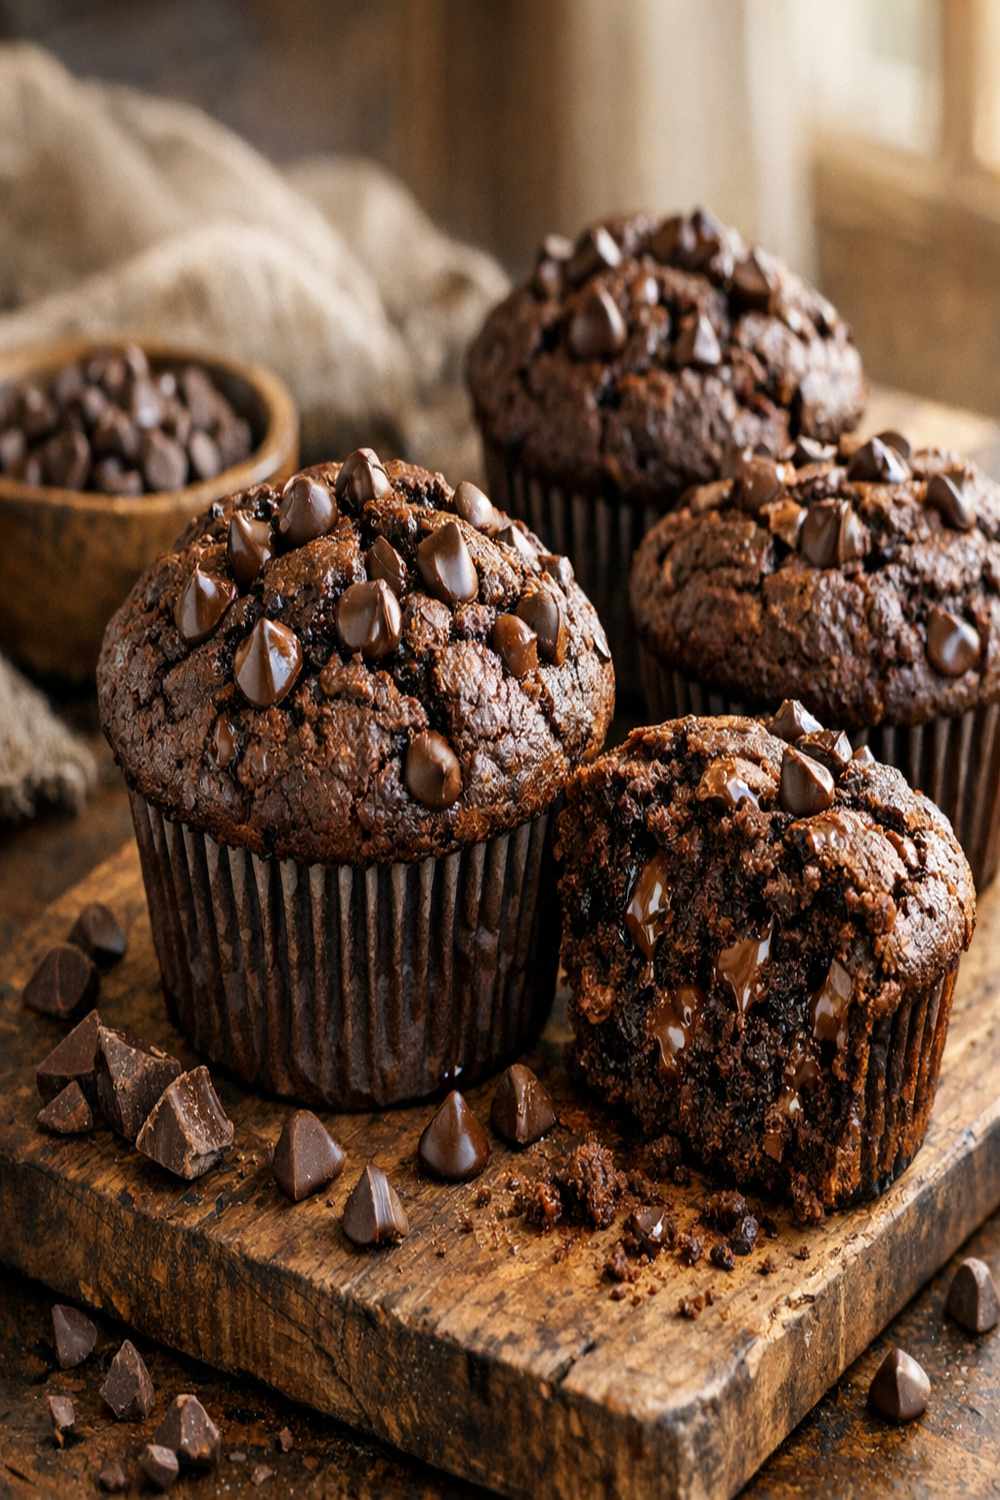
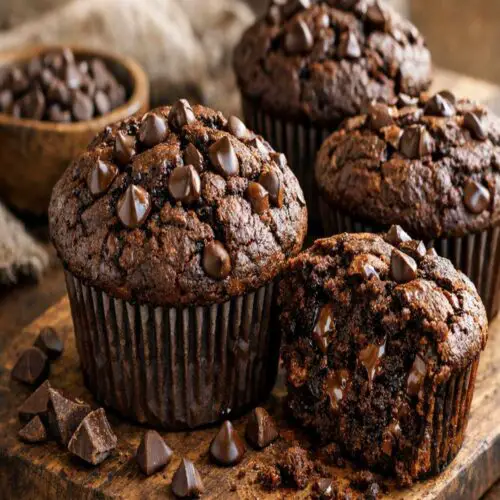
Double chocolate muffins are a celebration of cocoa in two forms: unsweetened cocoa powder mixed into the batter and semi-sweet chocolate chips scattered throughout. The result is a tender, cake-like crumb with intense chocolate flavor that isn’t overwhelming or overly sweet.
Unlike traditional muffins made with just a touch of cocoa, these are built on a chocolate foundation. The cocoa powder provides deep, complex flavor while the chocolate chips add pockets of melted sweetness and texture. They’re sturdy enough to grab on your way out the door but tender enough to enjoy with a fork when you have a moment to sit down.
This recipe makes about 14 muffins, which is perfect for a week of breakfasts or afternoon snacks. The yield varies slightly based on how full you fill each liner—fill them to the top for taller, more impressive muffins.
Why You’ll Love This Double Chocolate Muffins Recipe
- Two-stage baking creates perfect texture – Starting at 425°F then reducing to 350°F ensures the tops set while centers stay fudgy and moist, not dry.
- Simple ingredient list with pantry staples – You likely have everything you need right now. No specialty items, no complicated substitutions required.
- Makes enough to last the week – Bake once, enjoy for days. They store beautifully at room temperature and taste even better on day two.
- Works perfectly in standard kitchen equipment – No stand mixer, no special pans, no thermometers needed. Just a bowl, a whisk, and your favorite muffin pan.
- Customizable for your preferences – Swap chocolate types, add nuts, or include coffee powder to deepen flavor. This recipe is flexible.
- Satisfies chocolate cravings without guilt – Full-fat sour cream adds richness and protein while keeping ingredients real and recognizable.
The Ingredients
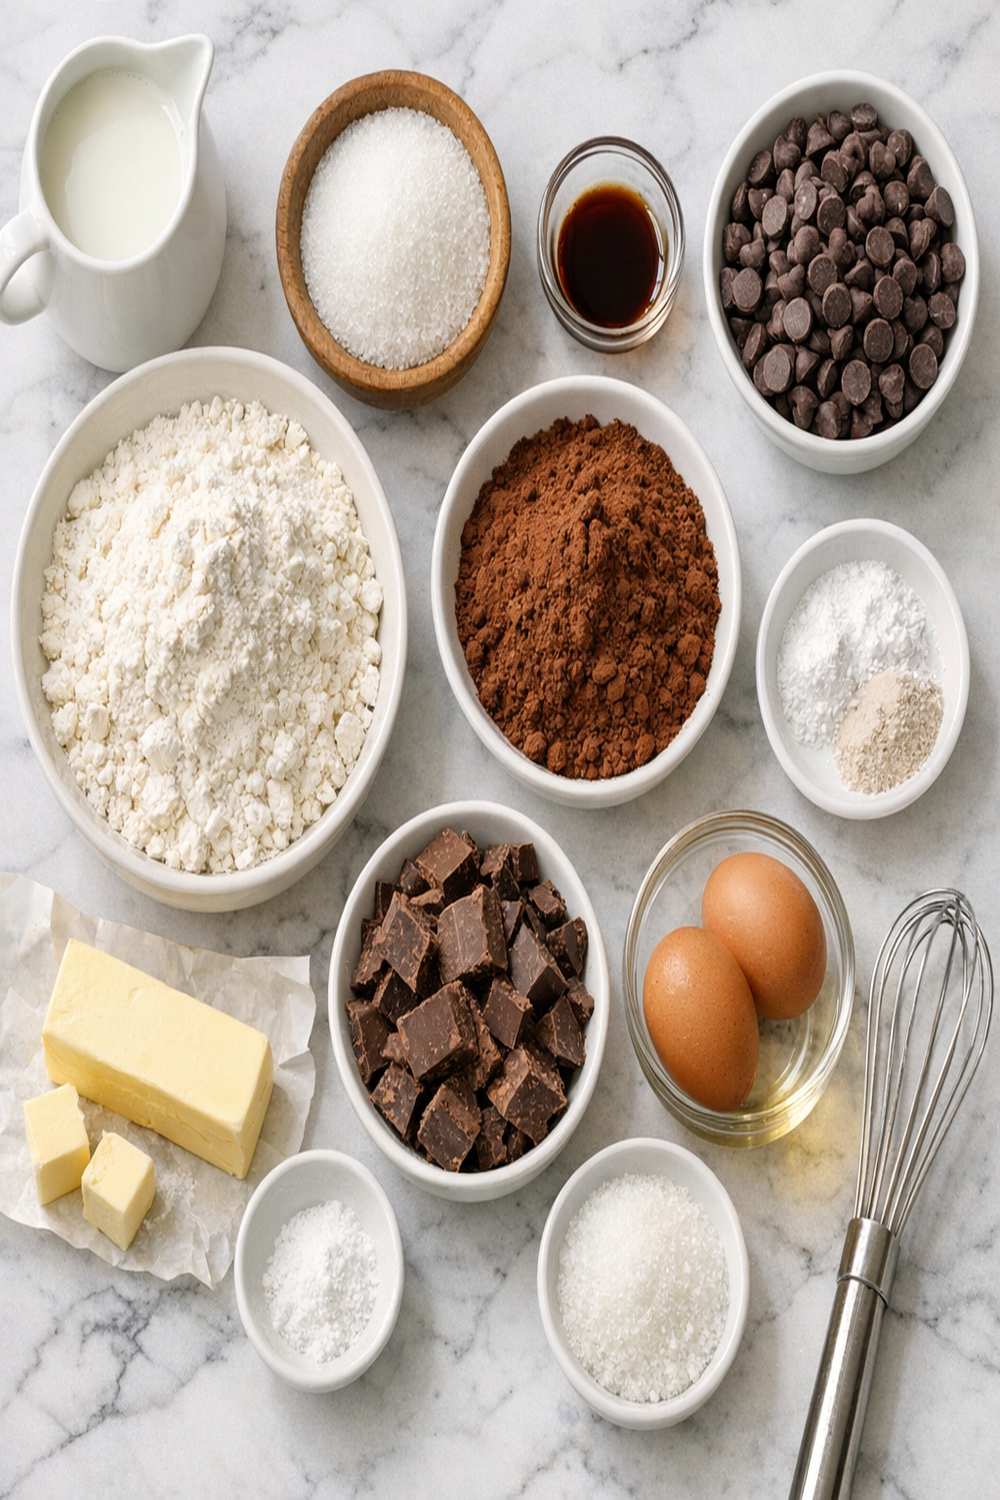
This recipe uses a combination of cocoa powder and chocolate chips to create layers of chocolate flavor. Room temperature ingredients blend more smoothly, so pull your eggs, sour cream, and milk from the refrigerator about 30 minutes before you start. I’ve included specific notes for each ingredient based on what I’ve learned testing these muffins hundreds of times.
- 1/2 teaspoon salt (balances sweetness and enhances chocolate flavor)
- 1/2 cup vegetable oil (120ml, neutral oil like canola works well)
- 3/4 cup full-fat sour cream or plain yogurt (185g, room temperature)
- 2 cups all-purpose flour (250g, spooned and leveled into your measuring cup)
- 1/4 teaspoon instant espresso powder, optional (deepens chocolate notes without tasting like coffee)
- 1/2 cup unsweetened natural cocoa powder (41g, not Dutch-process)
- 1 teaspoon baking soda (leavening agent that reacts with sour cream)
- 2 large eggs (room temperature for proper emulsification)
- 1 and 3/4 cups semi-sweet chocolate chips (about 315g, plus a handful for topping if desired)
- 1 cup granulated sugar (200g, white sugar works best here)
- 1/2 cup whole milk (120ml, full-fat creates the best crumb structure)
- 1 and 1/2 teaspoons pure vanilla extract (not imitation, which tastes thin)
How to Make Double Chocolate Muffins?
I’ve organized these steps so you can work at a comfortable pace. The entire process from start to finish takes about 40 minutes, with most of that time being hands-off baking. Read through all the steps once before beginning—it takes two minutes but prevents surprises.
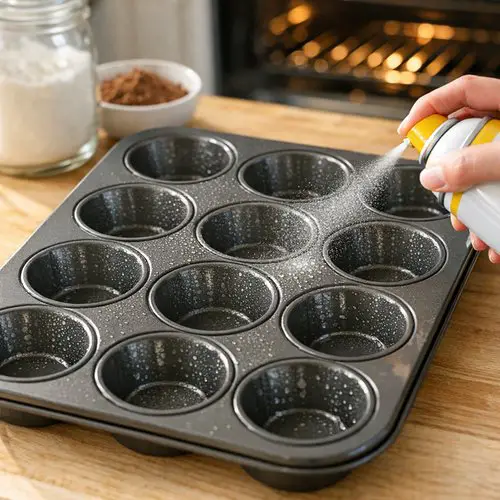
Step 1: Prepare Your Baking Station
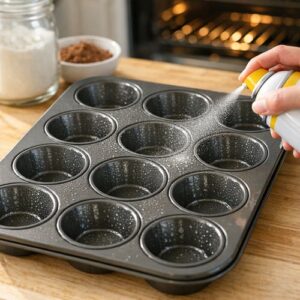
Preheat your oven to 425°F (218°C) and position a rack in the center. While the oven heats, prepare your muffin pan by spraying all 12 cups with nonstick spray, making sure to coat the bottom and sides. If you prefer liners, use them instead—either method works perfectly.
Since this recipe yields about 14 muffins, you have two options: prepare a second muffin pan with the same spray treatment, or plan to bake in two batches. If you’re baking in batches, that’s fine—the extra batter sits happily at room temperature for 30 minutes while the first batch bakes.
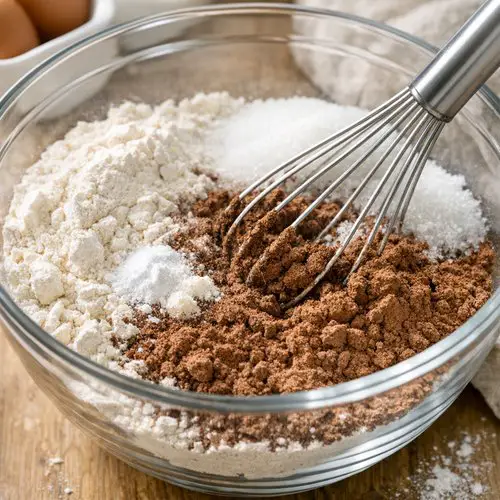
Step 2: Combine Dry Ingredients
In a large mixing bowl, whisk together the flour, sugar, cocoa powder, baking soda, and salt. Use a whisk to break up any lumps in the cocoa powder—it can clump if it’s been sitting for a while. This step aerates your dry mixture and distributes the leavening evenly.
Add the chocolate chips directly to this bowl and gently fold them in with a silicone spatula. Don’t crush them—you want distinct chocolate pieces throughout your muffins, not chocolate powder.
Step 3: Blend the Wet Mixture
In a separate medium bowl, whisk together the eggs, sour cream, vegetable oil, milk, and vanilla extract until the mixture is smooth and well combined. This takes about 30 seconds of gentle whisking. The mixture might look slightly separated at first—that’s normal—but keep whisking until it’s uniform in color.
The room temperature ingredients are important here because they blend more smoothly without creating cold pockets in your batter.

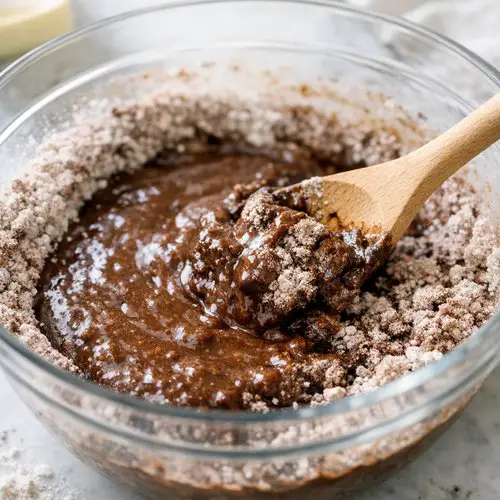
Step 4: Fold Wet and Dry Together
Pour the wet mixture into the bowl with your dry ingredients and fold together gently using a silicone spatula or wooden spoon. This is crucial: don’t overmix. You’re looking for a thick, sticky batter that comes together in about 15-20 folds. A few streaks of flour are fine and actually desirable—overmixing develops gluten, which makes muffins tough instead of tender.
The batter should look dense and dark, almost like thick brownie batter. It won’t be smooth like cake batter, and that’s exactly right.
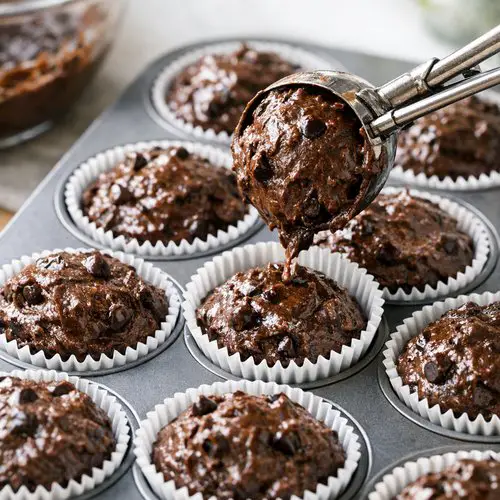
Step 5: Fill Your Muffin Cups
Using an ice cream scoop or large spoon, divide the batter evenly among your prepared muffin cups, filling each one all the way to the top. These muffins rise beautifully and need that full cup. If you’re using a scoop, one rounded scoop per cup is perfect.
Wipe any batter splatter from the edges of your pan with a damp paper towel—this prevents burnt edges and keeps your pan looking neat.
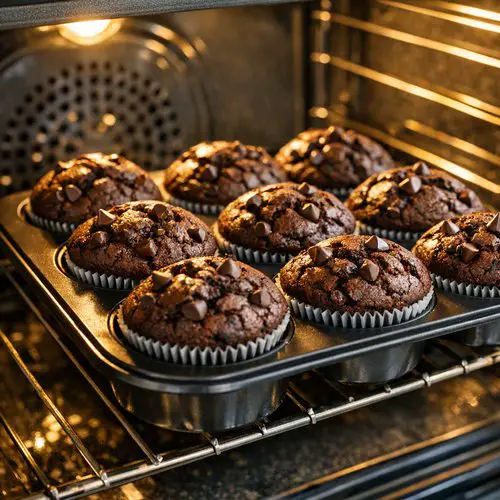
Step 6: Two-Stage Baking Magic
Place your muffin pan in the 425°F oven for exactly 5 minutes. This high heat sets the structure and creates that beautiful domed top. At the 5-minute mark, keeping the muffins in the oven, reduce the oven temperature to 350°F (177°C) and continue baking for an additional 15-16 minutes.
The total baking time is 20-21 minutes. You’ll know they’re done when a toothpick inserted into the center comes out clean or with just a few moist crumbs clinging to it. The tops should look set and feel slightly firm to a gentle touch.
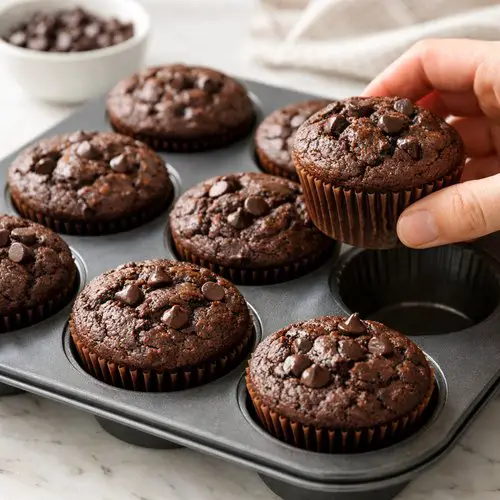
Step 7: Cool and Release
Let your muffins cool in the pan for exactly 10 minutes. This brief rest allows them to set slightly so they come out cleanly. After 10 minutes, gently run a thin knife around the edges of each muffin and turn the pan on its side, tapping the bottom until they slide out onto a wire cooling rack.
Let them cool on the rack for another 15 minutes before eating. They’ll still be warm and wonderful, but cool enough to handle without burning your fingers.
Tips and Tricks
- Room temperature ingredients are non-negotiable – Cold sour cream and eggs won’t blend smoothly. Set them out 30 minutes ahead or place them in a warm water bath for 5 minutes.
- Don’t skip the two-stage baking method – This technique is what makes the difference between dry, cakey muffins and tender, fudgy ones. The high heat sets structure, the low heat keeps centers moist.
- Fill liners all the way to the top – These muffins are meant to be tall and impressive. Filling only halfway creates shorter, denser muffins.
- Use unsweetened cocoa powder, not Dutch-process – Dutch-process cocoa is darker but less acidic. You need the natural cocoa’s acidity to react with the baking soda for proper rise.
- Test doneness with the toothpick trick – Insert a wooden toothpick into the center of the muffin. It should come out clean or with just a few moist crumbs. If it has wet batter clinging, bake another minute.
- Invest in quality liners if you bake regularly – Paper liners are worth it for easy release and less pan cleanup. Brown liners are my preference—they look more professional.
- Make a double batch and freeze half – Bake two pans at once, let them cool completely, then wrap individually in plastic wrap and freeze for up to 3 months. Thaw at room temperature for 30 minutes.
Expert’s Nutritional Tip
As a registered dietitian, I’m always looking at how ingredients affect the overall nutrition profile. Here’s what I love about this recipe: the full-fat sour cream isn’t just for flavor. Dairy fat helps your body absorb fat-soluble vitamins and keeps you satisfied longer than low-fat versions. Plus, the cocoa powder is loaded with flavonoids—powerful compounds with antioxidant properties linked to heart health in research.
The combination of whole milk and sour cream creates a muffin with about 8 grams of protein per muffin, making this genuinely balanced for a snack or breakfast. Pair with an egg or some nuts and you have a complete mini-meal, not just empty calories.
Make-Ahead Guide
Batter prepared up to 8 hours ahead: Mix your batter and refrigerate it covered in an airtight container. Bake directly from cold—add 2-3 minutes to your baking time since the batter starts cold.
Baked muffins: Cool completely, then store in an airtight container at room temperature. They taste incredible on day two when flavors have set.
Freezing for later: Wrap completely cooled muffins individually in plastic wrap, then place in a freezer-safe container for up to 3 months. Thaw at room temperature for 30 minutes before eating, or microwave a frozen muffin for 45 seconds.
Freeze batter in liners: Fill muffin liners with batter, freeze until solid, then pop out and store in a freezer bag. Bake from frozen, adding 5-7 minutes to baking time—no thawing needed.
Common Mistakes to Avoid
- Overmixing the batter – This is the number one reason for tough, dense muffins. Mix just until ingredients combine. A few flour streaks are absolutely fine and actually desirable.
- Using cold ingredients straight from the refrigerator – Cold eggs, sour cream, and milk won’t blend smoothly into the batter, creating pockets of unmixed ingredients. Set them out 30 minutes ahead.
- Not filling cups high enough – These muffins are designed to rise beautifully. Fill each cup all the way to the top for proper height and that signature domed top.
- Skipping the cooling time in the pan – Turning muffins out immediately burns your fingers and can cause them to break apart. The 10-minute rest is essential for structure.
Seasonal Variations
Spring & Summer: Add 1 teaspoon of fresh mint extract or zest from one orange to the wet ingredients for a bright twist. Mint and chocolate is magical.
Fall & Winter: Reduce milk to 1/4 cup and add 1/4 cup strong brewed coffee to the wet ingredients. This deepens the chocolate flavor beautifully. You could also add 1/2 teaspoon of ground cinnamon to the dry ingredients for warmth.
Year-Round Upgrades: Stir in 1/2 cup of chopped toasted nuts (walnuts or pecans work beautifully), replace 1/4 cup of chocolate chips with white chocolate chips, or add 1 tablespoon of honey to the wet ingredients for subtle sweetness and moisture.
Can I Store Double Chocolate Muffins?
Room temperature: Store in an airtight container for 5 days. The muffins actually taste better on day two and three as flavors develop and set.
Refrigerator: These keep beautifully in the refrigerator for up to 1 week covered in an airtight container. Cold muffins are denser and fudgier, which some people love.
Freezer: Cool completely, wrap individually in plastic wrap and place in a freezer-safe bag for up to 3 months. Thaw at room temperature (about 30 minutes) or microwave from frozen for 45 seconds.
Reheating: Microwave for 20-30 seconds to warm through and refresh texture. Or wrap in foil and warm in a 300°F oven for 10 minutes. This restores that fresh-baked softness.
Nutrition Information
Based on USDA data, each muffin contains approximately 320 calories, 8 grams of protein, 16 grams of fat, and 40 grams of carbohydrates. Each serving provides 2 grams of fiber from the cocoa powder and 280mg of calcium from the dairy components.
The saturated fat content is 6 grams per muffin, which is reasonable when you consider that most of it comes from nutrient-dense cocoa butter and full-fat dairy. This recipe is made without artificial ingredients, colors, or preservatives—everything you taste is something you can pronounce and recognize.
I calculate nutrition based on dividing the yield into 14 muffins. If you make taller muffins using larger liners, your portion might be 12 muffins instead, raising calories slightly per muffin.
What Can I Serve With Double Chocolate Muffins?
These chocolate muffins are wonderful on their own but pair beautifully with complementary flavors. Here are my favorite combinations for breakfast, snack time, or dessert.
- Cold milk or iced coffee – The classic pairing. The cool beverage balances the richness of the chocolate beautifully.
- Fresh berries – Raspberries or strawberries add brightness and tartness that cuts through the chocolate richness perfectly.
- Whipped cream or Greek yogurt – A dollop on top turns these into a simple dessert. Greek yogurt adds protein for a more satisfying snack.
- Almond butter or peanut butter – Spread a thin layer on warm muffins. The nutty flavor complements chocolate in a sophisticated way.
- Honey or jam – A drizzle of honey or spoonful of jam adds moisture and sweetness. Try this with your favorite fruit jam.
For dessert occasions, these pair beautifully with the flavors in my these homemade cookies if you want to create a chocolate and citrus dessert board.
Substitutes
- Greek yogurt instead of sour cream – Use the same amount. Greek yogurt is higher in protein and creates a slightly lighter crumb, though sour cream’s tang is ideal.
- Buttermilk instead of sour cream – Use 3/4 cup buttermilk plus 1/4 cup melted butter to replace the sour cream. Buttermilk is thinner, so reduce the milk to 1/4 cup.
- All chocolate chips or no chocolate chips – You can use 2 cups of chocolate chips if you love them, or omit them entirely for pure cocoa muffins. The recipe remains stable either way.
- Dark chocolate or white chocolate chips – Semi-sweet is my recommendation, but dark chocolate creates richer muffins while white chocolate creates sweeter ones. Use the same amount.
- Canola or coconut oil instead of vegetable oil – Both work. Coconut oil creates slightly denser muffins with subtle coconut notes. Use refined coconut oil to avoid overpowering chocolate flavor.
- Whole wheat flour – Replace up to 1/2 cup of all-purpose flour with whole wheat flour. Whole wheat creates heartier, denser muffins. Don’t exceed 1/2 cup or they become too heavy.
- Brown sugar instead of granulated – Use the same amount. Brown sugar creates moister, chewier muffins with caramel notes. I prefer it for an even more indulgent result.
Double Chocolate Muffins Recipe
Ingredients
- 1/2 teaspoon salt balances sweetness and enhances chocolate flavor
- 1/2 cup vegetable oil 120ml, neutral oil like canola works well
- 3/4 cup full-fat sour cream or plain yogurt 185g, room temperature
- 2 cup all-purpose flour 250g, spooned and leveled into your measuring cup
- 1/4 teaspoon instant espresso powder, optional deepens chocolate notes without tasting like coffee
- 1/2 cup unsweetened natural cocoa powder 41g, not Dutch-process
- 1 teaspoon baking soda leavening agent that reacts with sour cream
- 2 large eggs room temperature for proper emulsification
- 1 and 3/4 cups semi-sweet chocolate chips about 315g, plus a handful for topping if desired
- 1 cup granulated sugar 200g, white sugar works best here
- 1/2 cup whole milk 120ml, full-fat creates the best crumb structure
- 1 and 1/2 teaspoons pure vanilla extract not imitation, which tastes thin
Instructions
Step 1: Prepare Your Baking Station
- Preheat your oven to 425°F (218°C) and position a rack in the center. While the oven heats, prepare your muffin pan by spraying all 12 cups with nonstick spray, making sure to coat the bottom and sides. If you prefer liners, use them instead—either method works perfectly. Since this recipe yields about 14 muffins, you have two options: prepare a second muffin pan with the same spray treatment, or plan to bake in two batches. If you're baking in batches, that's fine—the extra batter sits happily at room temperature for 30 minutes while the first batch bakes.
Step 2: Combine Dry Ingredients
- In a large mixing bowl, whisk together the flour, sugar, cocoa powder, baking soda, and salt. Use a whisk to break up any lumps in the cocoa powder—it can clump if it's been sitting for a while. This step aerates your dry mixture and distributes the leavening evenly. Add the chocolate chips directly to this bowl and gently fold them in with a silicone spatula. Don't crush them—you want distinct chocolate pieces throughout your muffins, not chocolate powder.

Step 3: Blend the Wet Mixture
- In a separate medium bowl, whisk together the eggs, sour cream, vegetable oil, milk, and vanilla extract until the mixture is smooth and well combined. This takes about 30 seconds of gentle whisking. The mixture might look slightly separated at first—that's normal—but keep whisking until it's uniform in color. The room temperature ingredients are important here because they blend more smoothly without creating cold pockets in your batter.

Step 4: Fold Wet and Dry Together
- Pour the wet mixture into the bowl with your dry ingredients and fold together gently using a silicone spatula or wooden spoon. This is crucial: don't overmix. You're looking for a thick, sticky batter that comes together in about 15-20 folds. A few streaks of flour are fine and actually desirable—overmixing develops gluten, which makes muffins tough instead of tender. The batter should look dense and dark, almost like thick brownie batter. It won't be smooth like cake batter, and that's exactly right.

Step 5: Fill Your Muffin Cups
- Using an ice cream scoop or large spoon, divide the batter evenly among your prepared muffin cups, filling each one all the way to the top. These muffins rise beautifully and need that full cup. If you're using a scoop, one rounded scoop per cup is perfect. Wipe any batter splatter from the edges of your pan with a damp paper towel—this prevents burnt edges and keeps your pan looking neat.

Step 6: Two-Stage Baking Magic
- Place your muffin pan in the 425°F oven for exactly 5 minutes. This high heat sets the structure and creates that beautiful domed top. At the 5-minute mark, keeping the muffins in the oven, reduce the oven temperature to 350°F (177°C) and continue baking for an additional 15-16 minutes. The total baking time is 20-21 minutes. You'll know they're done when a toothpick inserted into the center comes out clean or with just a few moist crumbs clinging to it. The tops should look set and feel slightly firm to a gentle touch.

Step 7: Cool and Release
- Let your muffins cool in the pan for exactly 10 minutes. This brief rest allows them to set slightly so they come out cleanly. After 10 minutes, gently run a thin knife around the edges of each muffin and turn the pan on its side, tapping the bottom until they slide out onto a wire cooling rack. Let them cool on the rack for another 15 minutes before eating. They'll still be warm and wonderful, but cool enough to handle without burning your fingers.

Notes
FAQs
Why are my muffins dense and dry?
The most common culprit is overmixing the batter. When you overmix, you develop too much gluten, which creates tough, dense structure. Mix just until ingredients combine—stop when you see a few streaks of flour. The second reason is baking too long. Use the toothpick test: pull them out when a toothpick inserted in the center comes out clean, not over-baked. Finally, using cold ingredients straight from the refrigerator can create dry pockets. Always let eggs, sour cream, and milk come to room temperature first.
Can I make these muffins without eggs?
Yes, but the results are different. Replace 2 eggs with 1/2 cup applesauce or 1/2 cup mashed banana (about 2 ripe bananas). Applesauce keeps the chocolate flavor pure while banana adds subtle sweetness. Reduce the milk to 1/4 cup since applesauce adds liquid. The muffins will be slightly denser and more cake-like, but still delicious. Flax eggs (2 tablespoons ground flax mixed with 5 tablespoons water) also work beautifully here.
Why did my muffins overflow in the oven?
You likely filled the cups too full or your oven runs hot. These muffins rise significantly, especially with the high initial heat. Fill each cup just to the top—not overflowing. If your oven runs hot (ask me how I know), reduce the oven temperature by 25°F. You can also place a baking sheet on the rack below to catch any overflow, which I always do for peace of mind.
What’s the difference between using cocoa powder and chocolate pieces?
Cocoa powder is ground from fermented cocoa beans with most of the cocoa butter removed. It’s unsweetened and provides intense chocolate flavor without adding significant fat. Chocolate chips contain cocoa solids, cocoa butter, sugar, and sometimes other ingredients—they’re sweeter and add melted pockets of richness throughout the muffin. Using both creates complexity: the cocoa powder provides deep, sophisticated chocolate flavor while the chips add sweetness and texture. You need both for the true double chocolate experience.
Can I use mini muffin pans instead?
Absolutely! Mini muffins are fun and perfect for portion control. Fill mini muffin cups about 3/4 full and bake at 350°F for 13-14 minutes total (no temperature change needed). Start checking at 12 minutes. This recipe yields approximately 30 mini muffins. Mini muffins dry out faster than regular muffins, so watch them closely and pull them out as soon as a toothpick comes out clean.
More Recipes You’ll Love
- Krollskorner Pumpkin Bread – A tender quick bread with warm spices that pairs beautifully with morning coffee, just like these chocolate muffins.
- Krolls Cookies – Classic, reliable cookies using simple ingredients and straightforward techniques you’ll recognize from this recipe.
- Kiwi Chocolate – A sophisticated flavor pairing that shows how chocolate works with unexpected ingredients for a stunning result.
- these homemade cookies – The same approachable, make-ahead mentality applied to festive cookies your whole family will love.
After testing hundreds of muffin recipes over my years in nutrition and cooking, I can tell you that these chocolate muffins hit that perfect balance: they’re impressive enough to share with guests but simple enough that anyone can make them. They taste like you spent hours in the kitchen when really, you spent twenty minutes of actual hands-on work.
I hope you’ll make these for your own family moments. Maybe your daughter will ask you to recreate them someday, or a friend will request them for a potluck. That’s when you know you’ve created something special. Bake them warm, enjoy them fresh, and remember—good food is a good mood!

My name is Lori Walker. I’m a registered dietitian, food blogger and food enthusiast. I share easy healthy, delicious recipes on my blog and review necessary kitchen items. The recipes I share take less… Read more