As the holiday season rolls around, the aroma of freshly baked cookies wafts through the air like comfort itself. There’s something about the holidays that beckons a warm, sweet treat. Picture this: guests arriving at your festive gathering, and there you are, hands poised proudly over a platter of cookies you’ve made with love (and perhaps a dash of holiday cheer). As they reach for a chocolatey morsel, you can practically hear their sigh of contentment. This holiday season, let’s elevate that cookie experience with beautiful jar cookies!

If you’re like me, cookies aren’t just a treat—they’re a canvas for celebration. These jar cookies can turn a simple gift into a cherished memory. You’ll prepare the layers, seal them in a jar, and then your lucky recipient simply adds a few fresh ingredients and pops these ready-to-bake delights into the oven. Talk about a holiday win! And the best part? They look downright festive, making them perfect for sharing or decorating your home.
You Might Like These Recipes!
Ice Cream With Cheesecake Chunks Recipe
What is jar cookies for Christmas?
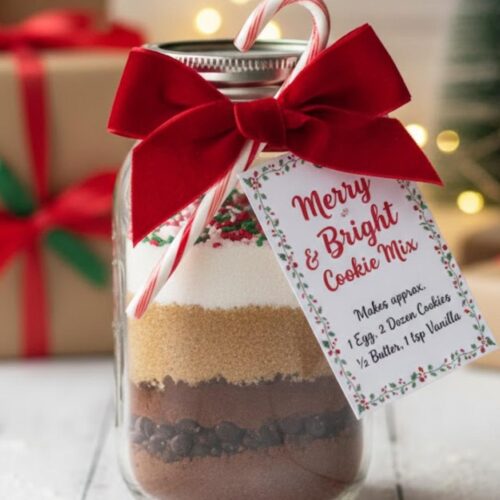
Jar cookies for Christmas are a clever and delightful concept where a mix of dry cookie ingredients are layered and beautifully presented in a mason jar. These jars act as charming gifts, combining practicality with the joy of baking. Once a friend or family member receives one, all they need is to add a few basic ingredients—like butter and an egg—mix, and bake. It’s a perfect solution for those who love cookies but may not have the time or resources to bake from scratch.
Why You’ll Love these jar cookies for Christmas?
You’re going to adore these jar cookie recipes because they blend convenience with creativity. First, they’re make-ahead gifts that look stunning. Second, they make baking incredibly straightforward. All the dry ingredients are neatly pre-measured and layered, cutting down on kitchen chaos. Plus, they’re customizable! If your favorite flavors are chocolate and peppermint, there’s an option for you. Versatile, visually appealing, and utterly delicious—who can resist?
The Ingredients
Let’s gather our ingredients for these holiday delights! We’ll focus on two variations: the Christmas M&M Cookies and the Chocolate Peppermint Cookies. I’ve made minor modifications for a unique twist.
Christmas M&M Cookies in a Jar
– 1 and 3/4 cups (219g) all-purpose flour (spooned & leveled)
– 1/4 teaspoon baking powder
– 1/2 teaspoon salt
– 3/4 cup (150g) packed brown sugar (light or dark)
– 1/4 cup (50g) granulated sugar
– 1/2 cup (90g) semi-sweet chocolate chips
– 1/2 cup (100g) mini M&Ms
– 1/4 cup (30g) chopped nuts (your choice like walnuts or pecans) (gift recipient will add)
– Gift recipient will also add:
– 10 tablespoons (145g) softened unsalted butter
– 1 large egg
– 1 teaspoon vanilla extract
Chocolate Peppermint Cookies in a Jar
– 1 and 1/2 cups (188g) all-purpose flour (spooned & leveled)
– 1/4 teaspoon baking powder
– 3/4 teaspoon baking soda
– 1/2 teaspoon salt
– 1/4 cup (21g) unsweetened cocoa powder
– 3/4 cup (150g) packed light brown sugar
– 1/4 cup (50g) granulated sugar
– 1/2 cup (90g) semi-sweet chocolate chips
– 1/2 cup (90g) crushed peppermint candies
– Gift recipient will add:
– 10 tablespoons (145g) softened unsalted butter
– 1 large egg
– 1 teaspoon vanilla extract
Ingredients From : sallysbakingaddiction.com
How to make jar cookies for Christmas?
Now that we have our ingredients ready, let’s dive into how to assemble these charming jars. It’s a straightforward process that anyone can manage, no baking experience required. The assembly will be a delightful activity, especially if you’re doing this with kids or friends!
Step 1: Prepare the Dry Ingredients

Start by taking a large bowl and whisking together the flour, baking soda, salt, and cocoa powder (for the chocolate version). If using baking powder instead, mix it well. This step is crucial as it ensures that there are no lumps in your mixture.
Step 2: Layering the Ingredients

This is where the magic happens! Now, grab your clean, 32-ounce mason jars. Carefully start layering your dry ingredients in a thoughtful order:
– First, add the flour mix.
– Next, sprinkle in the baking powder or baking soda if you haven’t already.
– Follow with the granulated sugar, then the brown sugar. Next, choose a layer of chocolate chips followed by either the crushed peppermint or M&Ms.
– You might want to use a funnel for the perfect layers. Alternatively, just use the back of a spoon to help maintain distinct layers.
Step 3: Seal and Decorate

Once you’ve filled your jars, tightly seal the lids. Feel free to tie a pretty ribbon around the neck of the jar or attach a gift tag with the baking instructions. You could even add a little holiday charm for an extra festive touch!
Step 4: Baking the Cookies

When it’s time to bake, your gift recipient will unpack the jar. In a mixing bowl, combine the softened butter, egg, and vanilla extract and beat until creamy. They won’t need to worry if the egg integrates perfectly right away—the next step will make everything come together!
Now, add the dry ingredients from the jar into the bowl gradually, mixing on low speed. It doesn’t require chilling time, which saves on wait time. Once the dough is combined, drop rounded tablespoons onto lined baking sheets, spacing the cookies about three inches apart.
Step 5: Bake Away!

Preheat your oven to 350°F (177°C) and pop those trays in! Bake for about 10 minutes, or until the edges have set but the centers are still soft. This will yield around two dozen cookies, perfect for sharing (or keeping all to yourself, I won’t judge!).
Let them cool on wire racks, and enjoy! Remember, these cookies can last up to a week in an airtight container, making them a fantastic holiday staple.
Tips & Tricks
– Use Room Temperature Ingredients: This helps your cookies mix more uniformly.
– Personal Touch: Encourage your recipients to add a dash of spice like cinnamon or nutmeg for a festive kick!
– Storage: For freshness, keep cookies in a sealed container with a slice of bread (it helps keep them soft).
– Experiment: Mix up the candies or nuts used depending on what you have or what you like!
– Tag Inspiration: Use beautiful wrappers or tags with baking instructions—don’t skimp on presentation!
Can I store jar cookies for Christmas?
Absolutely! The beauty of jar cookies is that they can be stored for a good amount of time, making them perfect for gifting ahead of the holiday rush. When you’ve layered your ingredients, keep the jars in a cool, dry place. For baked cookies, ensure they’re in an airtight container. They can last up to a week at room temp, or you can freeze them in a ziploc for up to three months.
Nutrition Information
On average, these cookies carry about 120 calories each, depending on the size and specific ingredients used. While they’re a delightful treat, always enjoy in moderation—especially during the holidays when cookies are everywhere!
What can I serve with jar cookies for Christmas?
Here are some delightful pairings to elevate your cookie experience:
– Hot Cocoa: A cozy drink that complements the sweet warmth of cookies.
– Coffee: Brew your favorite blend for an adult twist.
– Milk: Always a classic option that practically begs for cookies!
– Ice Cream: A scoop of vanilla or peppermint can take these cookies to a whole new level.
– Dessert Boards: Combine these cookies with an array of treats for a show-stopping holiday platter.
What other substitutes can I use in jar cookies for Christmas?
Here are alternatives if you’re looking to swap things up:
– Whole Wheat Flour: For a healthier take, simply use whole wheat flour in place of all-purpose, adjusting as needed for consistency.
– Coconut Sugar: A great substitute for brown sugar if you want a bit of a caramel flavor.
– Almond Extract: For a different twist, swap vanilla extract with almond for a unique flavor profile.
– Nut Butter: Add 1/4 cup of peanut or almond butter for richer cookies.
– Dark Chocolate Chips: If milk chocolate isn’t your thing, dark chocolate chips add depth of flavor.
Jar Cookies For Christmas
Equipment
- handheld or stand mixer
- 32-ounce mason jars
- Baking sheets
- Parchment paper
- Spoons
Ingredients
- Let’s gather our ingredients for these holiday delights! We’ll focus on two variations: the Christmas M&M Cookies and the Chocolate Peppermint Cookies. I’ve made minor modifications for a unique twist.
Christmas M&M Cookies in a Jar
- – 1 and 3/4 cups 219g all-purpose flour (spooned & leveled)
- – 1/4 teaspoon baking powder
- – 1/2 teaspoon salt
- – 3/4 cup 150g packed brown sugar (light or dark)
- – 1/4 cup 50g granulated sugar
- – 1/2 cup 90g semi-sweet chocolate chips
- – 1/2 cup 100g mini M&Ms
- – 1/4 cup 30g chopped nuts (your choice like walnuts or pecans) (gift recipient will add)
– Gift recipient will also add:
- – 10 tablespoons 145g softened unsalted butter
- – 1 large egg
- – 1 teaspoon vanilla extract
- Chocolate Peppermint Cookies in a Jar
- – 1 and 1/2 cups 188g all-purpose flour (spooned & leveled)
- – 1/4 teaspoon baking powder
- – 3/4 teaspoon baking soda
- – 1/2 teaspoon salt
- – 1/4 cup 21g unsweetened cocoa powder
- – 3/4 cup 150g packed light brown sugar
- – 1/4 cup 50g granulated sugar
- – 1/2 cup 90g semi-sweet chocolate chips
- – 1/2 cup 90g crushed peppermint candies
– Gift recipient will add:
- – 10 tablespoons 145g softened unsalted butter
- – 1 large egg
- – 1 teaspoon vanilla extract
Instructions
Step 1: Prepare the Dry Ingredients
- Start by taking a large bowl and whisking together the flour, baking soda, salt, and cocoa powder (for the chocolate version). If using baking powder instead, mix it well. This step is crucial as it ensures that there are no lumps in your mixture.
Step 2: Layering the Ingredients
- This is where the magic happens! Now, grab your clean, 32-ounce mason jars. Carefully start layering your dry ingredients in a thoughtful order:
- – First, add the flour mix.
- – Next, sprinkle in the baking powder or baking soda if you haven’t already.
- – Follow with the granulated sugar, then the brown sugar. Next, choose a layer of chocolate chips followed by either the crushed peppermint or M&Ms.
- – You might want to use a funnel for the perfect layers. Alternatively, just use the back of a spoon to help maintain distinct layers.
Step 3: Seal and Decorate
- Once you’ve filled your jars, tightly seal the lids. Feel free to tie a pretty ribbon around the neck of the jar or attach a gift tag with the baking instructions. You could even add a little holiday charm for an extra festive touch!
Step 4: Baking the Cookies
- When it’s time to bake, your gift recipient will unpack the jar. In a mixing bowl, combine the softened butter, egg, and vanilla extract and beat until creamy. They won’t need to worry if the egg integrates perfectly right away—the next step will make everything come together!
- Now, add the dry ingredients from the jar into the bowl gradually, mixing on low speed. It doesn’t require chilling time, which saves on wait time. Once the dough is combined, drop rounded tablespoons onto lined baking sheets, spacing the cookies about three inches apart.
Step 5: Bake Away!
- Preheat your oven to 350°F (177°C) and pop those trays in! Bake for about 10 minutes, or until the edges have set but the centers are still soft. This will yield around two dozen cookies, perfect for sharing (or keeping all to yourself, I won’t judge!).
- Let them cool on wire racks, and enjoy! Remember, these cookies can last up to a week in an airtight container, making them a fantastic holiday staple.
Notes
FAQs
1. Can I use gluten-free flour?
Yes! Substituting with a gluten-free flour blend works beautifully for both cookie mixes, and you won’t sacrifice taste.
2. How long do jar cookies last?
Unbaked jar cookies stay fresh for several weeks if sealed properly. Once baked, they last up to a week at room temperature.
3. Can I add more ingredients?
Of course! Feel free to swap or add nuts, dried fruits, or even spices to your layers.
4. What is the best method for gifting?
Layer your jars carefully, sealing them tightly, and embellish with a tag that includes baking instructions and a personal note.
5. Can I double the recipe?
Sure! It’s a great way to make multiple jars for friends and family. Just keep in mind to proportionately adjust your ingredients.
Conclusion
These jar cookies for Christmas aren’t just a delicious snack. They’re a delightful way to share joy, sweetness, and a little bit of home-baked love. Whether you make them for guests, friends, or family, they’re sure to be a hit. So, roll up your sleeves, gather those ingredients, and jump into the festive spirit of cookie-making! Happy baking!
You Might Also Like These Latest Recipes!
Italian Style Pinwheels Recipe

My name is Lori Walker. I’m a registered dietitian, food blogger and food enthusiast. I share easy healthy, delicious recipes on my blog and review necessary kitchen items. The recipes I share take less… Read more