No Knead Bread is a delightful canvas for various toppings and pairings. Imagine slathering buttery garlic spread onto a warm slice or dipping it into a rich, velvety marinara. You could enjoy it alongside a hearty soup, like minestrone or chicken noodle.
It’s fantastic for sopping up sauces from your favorite Italian dish, or perhaps served next to a fresh arugula salad, with a squeeze of lemon. The options are endless.
Now, let’s take a step into the kitchen.

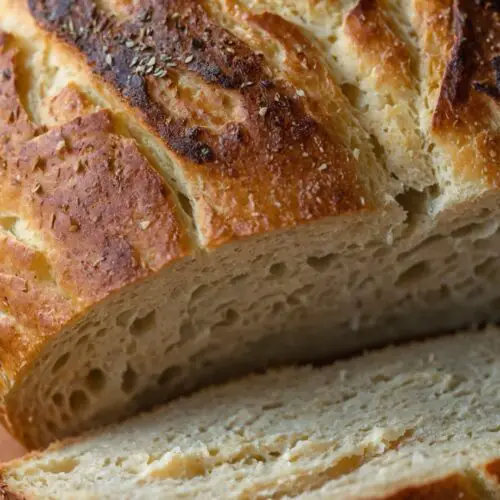
No Knead Bread
I remember the first time I tasted No Knead Bread. A friend had baked it and shared it with me. That crusty exterior and chewy inside captivated me entirely. It was bread, but it felt like magic. Ever since, I’ve been on a quest to recreate that experience at home.
So, why is this recipe such a keeper? It requires minimal active work and yields extraordinary results. You mix the ingredients, let the dough rest, and voilà! You end up with a loaf that rivals those from a fancy bakery. Each bite is a testament to the simplicity of few ingredients. No heavy manual labor, no fancy gadgets—just the honest, satisfying joy of fresh bread.
You will also like the following Breakfast recipes!
- How to make Whataburger Breakfast Taquitos
- Healthy Breakfast Sandwich
- 15 Minute Meal Prep Breakfast Sandwiches
The Ingredients: My Journey with Each Component
Let’s dive into the ingredients I use. They’re incredibly straightforward, yet each one plays a vital role in the bread-making process:
- 1 1/2 cups lukewarm water
- 3 cups all-purpose or bread flour
- 1 teaspoon honey
- 2 teaspoons rapid-rise or instant yeast
- 1 1/2 tablespoons flour
- 1 tablespoon olive oil
- 1 1/2 teaspoons kosher or coarse sea salt

How to Make No Knead Bread
Step 1: Prepare Your Ingredients
Begin by gathering all your ingredients. It’s important to have everything ready. I usually set them out on the counter and measure as I go. The key is to enjoy the process.
Step 2: Mix the Dough
In a large mixing bowl, combine the lukewarm water, honey, and yeast. Give it a gentle stir. In another bowl, whisk together the flour and salt. When they’re well mixed, pour this dry mixture into the bowl with the water.
Skip the kneading—seriously! Just stir until the flour is fully incorporated. It should look shaggy, and that’s okay.
Step 3: Let the Dough Rest
Cover the bowl with plastic wrap or a clean kitchen towel. Leave it at room temperature for about 12 to 18 hours. I often do this overnight. You’ll know it’s ready when the dough is bubbly and has doubled in size.
Step 4: Shape the Dough
Sprinkle flour on a clean surface. Turn the dough out onto this floured area. With floured hands, gently shape it into a ball. Remember, no heavy kneading is required!
Step 5: Second Rise
Place the shaped dough on a piece of parchment paper. Dust the top lightly with flour. Cover it with a towel and let it rise for another 1 to 2 hours. You want to see it puff up nicely.
Step 6: Preheat Your Oven
About 30 minutes before you’re ready to bake, preheat your oven to 450°F (230°C). If you have a Dutch oven, place it in the oven as it heats. This step is crucial for achieving that perfect crust.
Step 7: Bake the Bread
Once the oven is hot, carefully lift the dough, parchment paper and all, and place them into the Dutch oven. Use caution; it will be hot! Cover it with the lid and bake for 30 minutes.
After 30 minutes, remove the lid to allow that glorious crust to form. Bake for an additional 15 to 20 minutes until the top is golden brown. The aroma should be heavenly by now!
Step 8: Cool Down & Enjoy
Transfer your bread to a wire rack to cool. Honestly, waiting is the hardest part. Let it cool for at least 30 minutes before slicing into it.
Recipe Notes
- Lukewarm Water: The water temperature should be between 100°F to 110°F. Think of it as a warm bath—just right for the yeast to thrive.
- All-purpose vs. Bread Flour: All-purpose flour is versatile, while bread flour has a higher protein content, giving your loaf more chew and structure.
- Honey’s Role: It’s not just for sweetness; honey helps the yeast rise. If you don’t have honey, sugar can also do the trick.
- Yeast Choices: Instant yeast doesn’t require active proofing, saving time. Yeast can be picky, so above all, check the expiration date!
- Olive Oil: A good olive oil enhances flavor. Your taste buds will thank you.
- Salt Importance: Salt not only flavors the bread but also strengthens gluten formation, essential for a good rise and texture.
Recipe Variations
Feel free to get creative. Here are some fun ideas:
- Herbed Bread: Add dried herbs like rosemary or thyme into the dry ingredients for a fragrant loaf.
- Cheesy Delight: Fold in shredded cheese during the mixing step for a cheesy twist.
- Garlic Lover: Add minced garlic to the dough for flavorful hints throughout.
- Seeded Crust: Before the final rise, sprinkle the top with sesame or poppy seeds.
- Whole Wheat Option: Substitute a portion of the all-purpose flour with whole wheat for added nutrition.
- Additions: Toss in olives, sundried tomatoes, or nuts for a hearty variation.
Nutrition Facts
No Knead Bread Recipe Nutrition Facts


No Knead Bread Recipe
Equipment
- bowl
Ingredients
Instructions
Step 1: Prepare Your Ingredients
- Begin by gathering all your ingredients. It’s important to have everything ready. I usually set them out on the counter and measure as I go. The key is to enjoy the process.
Step 2: Mix the Dough
- In a large mixing bowl, combine the lukewarm water, honey, and yeast. Give it a gentle stir. In another bowl, whisk together the flour and salt. When they’re well mixed, pour this dry mixture into the bowl with the water.
- Skip the kneading—seriously! Just stir until the flour is fully incorporated. It should look shaggy, and that’s okay.
Step 3: Let the Dough Rest
- Cover the bowl with plastic wrap or a clean kitchen towel. Leave it at room temperature for about 12 to 18 hours. I often do this overnight. You’ll know it’s ready when the dough is bubbly and has doubled in size.
Step 4: Shape the Dough
- Sprinkle flour on a clean surface. Turn the dough out onto this floured area. With floured hands, gently shape it into a ball. Remember, no heavy kneading is required!
Step 5: Second Rise
- Place the shaped dough on a piece of parchment paper. Dust the top lightly with flour. Cover it with a towel and let it rise for another 1 to 2 hours. You want to see it puff up nicely.
Step 6: Preheat Your Oven
- About 30 minutes before you’re ready to bake, preheat your oven to 450°F (230°C). If you have a Dutch oven, place it in the oven as it heats. This step is crucial for achieving that perfect crust.
Step 7: Bake the Bread
- Once the oven is hot, carefully lift the dough, parchment paper and all, and place them into the Dutch oven. Use caution; it will be hot! Cover it with the lid and bake for 30 minutes.
- After 30 minutes, remove the lid to allow that glorious crust to form. Bake for an additional 15 to 20 minutes until the top is golden brown. The aroma should be heavenly by now!
Step 8: Cool Down & Enjoy
- Transfer your bread to a wire rack to cool. Honestly, waiting is the hardest part. Let it cool for at least 30 minutes before slicing into it.
Notes
- Lukewarm Water: The water temperature should be between 100°F to 110°F. Think of it as a warm bath—just right for the yeast to thrive.
- All-purpose vs. Bread Flour: All-purpose flour is versatile, while bread flour has a higher protein content, giving your loaf more chew and structure.
- Honey’s Role: It’s not just for sweetness; honey helps the yeast rise. If you don’t have honey, sugar can also do the trick.
- Yeast Choices: Instant yeast doesn’t require active proofing, saving time. Yeast can be picky, so above all, check the expiration date!
- Olive Oil: A good olive oil enhances flavor. Your taste buds will thank you.
- Salt Importance: Salt not only flavors the bread but also strengthens gluten formation, essential for a good rise and texture.
Frequently Asked Questions
1. Can I make this dough ahead of time?
Absolutely! In fact, the long rise allows the flavors to develop beautifully. You can refrigerate the dough for up to three days before baking. Just shape it back into a ball after refrigerating and let it rise again.
2. What if my dough doesn’t rise?
If your dough doesn’t rise, it’s likely due to inactive yeast. Check the yeast’s expiration date before starting. Also, ensure your water is the right temperature.
3. Can this be made gluten-free?
Yes! Substitute with your favorite gluten-free flour blend. Just note that the texture may differ slightly.
4. How do I know when my bread is done?
Tap the bottom of the loaf—if it sounds hollow, it’s ready! Additionally, the crust should be a deep golden brown.
5. Can I freeze No Knead Bread?
Definitely! Wrap the cooled loaf tightly in plastic wrap and then in foil. It can last up to three months in the freezer. Just thaw it at room temperature when you’re ready to enjoy.
6. What’s the best way to store the bread?
Keep the bread in a paper bag for a day or two. For longer storage, slice it and freeze. Thaw slices as you need them, and then toast for a delightful snack.
Conclusion
No Knead Bread has become a staple in my kitchen. Every bite reminds me that simplicity can lead to sheer satisfaction. You don’t have to be a bread-making expert to enjoy homemade bread. This recipe gives you that fresh-baked aroma and taste without the fuss.
So, roll up your sleeves and give this recipe a go. With minimal effort and love poured into it, you’ll end up with a loaf that has everyone asking for seconds. Whether paired with soups, dressed up with toppings, or just enjoyed with a pat of butter, you’ll relish each bite. Here’s to happy baking!
You’ll also like these latest recipes!

My name is Lori Walker. I’m a registered dietitian, food blogger and food enthusiast. I share easy healthy, delicious recipes on my blog and review necessary kitchen items. The recipes I share take less… Read more