This post contains affiliate links. As an Amazon Associate I earn from qualifying purchases.
This creamy, indulgent cannoli dip brings all the joy of the classic Italian pastry straight to your dessert spread without any of the frying hassle. I love serving it alongside fresh fruit, crispy treats, and warm cookies at gatherings because it feels fancy but comes together in minutes. If you’re planning a dessert board, this pairs beautifully with Kiwi Chocolate for a sophisticated flavor balance, or try it with Large Batch Brownies for a crowd-pleasing combination.
How This Dip Changed My Holiday Game
I’ll never forget the December afternoon in 2020 when my cousin Maria called asking if I could recreate her grandmother’s cannoli filling in a dip form for a holiday party. She was stressed, short on time, and honestly worried about frying anything in her tiny kitchen. I pulled together what felt like the most obvious solution—the ricotta-based heart of those beloved pastries, whipped until cloud-soft, studded with chocolate—and honestly? It was a revelation.
What struck me most wasn’t just how simple it was. It was watching my family gather around that bowl like it held something precious. My aunt took one bite and got teary-eyed, talking about Maria’s nonna and Sunday dinners. That’s when I understood: good food isn’t just about flavor. It’s about connection, memory, and making people feel cared for without exhausting yourself in the process.
That memory inspired me to refine this recipe, test it endlessly on my standard kitchen equipment, and document it for families like yours. Because you deserve desserts that taste like love and feel stress-free to make.
What is Cannoli Dip?
Cannoli dip is a modern, no-bake take on the traditional Sicilian cannoli pastry. Instead of frying crispy pastry tubes and filling them to order, you’re creating that same luscious, slightly sweet filling and serving it warm or chilled with dippable accompaniments.
The traditional cannoli originated in Sicily and remains one of Italy’s most celebrated desserts. The filling—traditionally made with sheep’s milk ricotta, powdered sugar, and chocolate—carries centuries of culinary tradition. This dip version honors that legacy while making it accessible for home cooks who might feel intimidated by pastry work or deep frying.
What makes this version special is its versatility. It’s naturally lower in labor intensity than traditional cannoli while delivering that authentic taste your guests crave. The texture is cloud-like, creamy, and luxurious without being heavy.
Why You’ll Love This Cannoli Dip Recipe
- No-bake and no-fry simplicity – This dessert requires zero oven time and zero oil splatters. Just a mixer, a bowl, and about 10 minutes of your time. I test all recipes on standard kitchen equipment, so you’ll feel confident from start to finish.
- Naturally crowd-pleasing – From children to grandparents, everyone gravitates toward this dip. It tastes indulgent and restaurant-quality, but nobody needs to know how effortlessly you made it.
- Make-ahead friendly – You can prepare this up to two days in advance, which means less stress on party day. This is one of my favorite time-saving strategies when I’m hosting multiple desserts.
- Authentic Italian flavor – Despite its simplicity, this dip captures the genuine taste of traditional Sicilian cannoli filling. The ricotta provides that slightly grainy, creamy texture while the chocolate adds richness.
- Customizable sweetness level – Unlike baked desserts where sweetness is fixed, you can taste-test this dip and adjust the powdered sugar to your family’s preference. I love this flexibility for accommodating different palates.
- Budget-conscious – You likely have most of these ingredients on hand already. Quality ricotta and cream cheese are affordable compared to specialty ingredients, making this accessible for any kitchen.
The Ingredients
I’ve kept this ingredient list intentionally short because that’s how I develop recipes—I ask: what’s truly essential, and what’s just extra noise? Each ingredient here earns its place. You’ll notice I’ve also added two complementary ingredients that elevate the experience without complicating your shopping trip. This recipe makes enough for 12-16 servings (about 3-4 tablespoons per person).
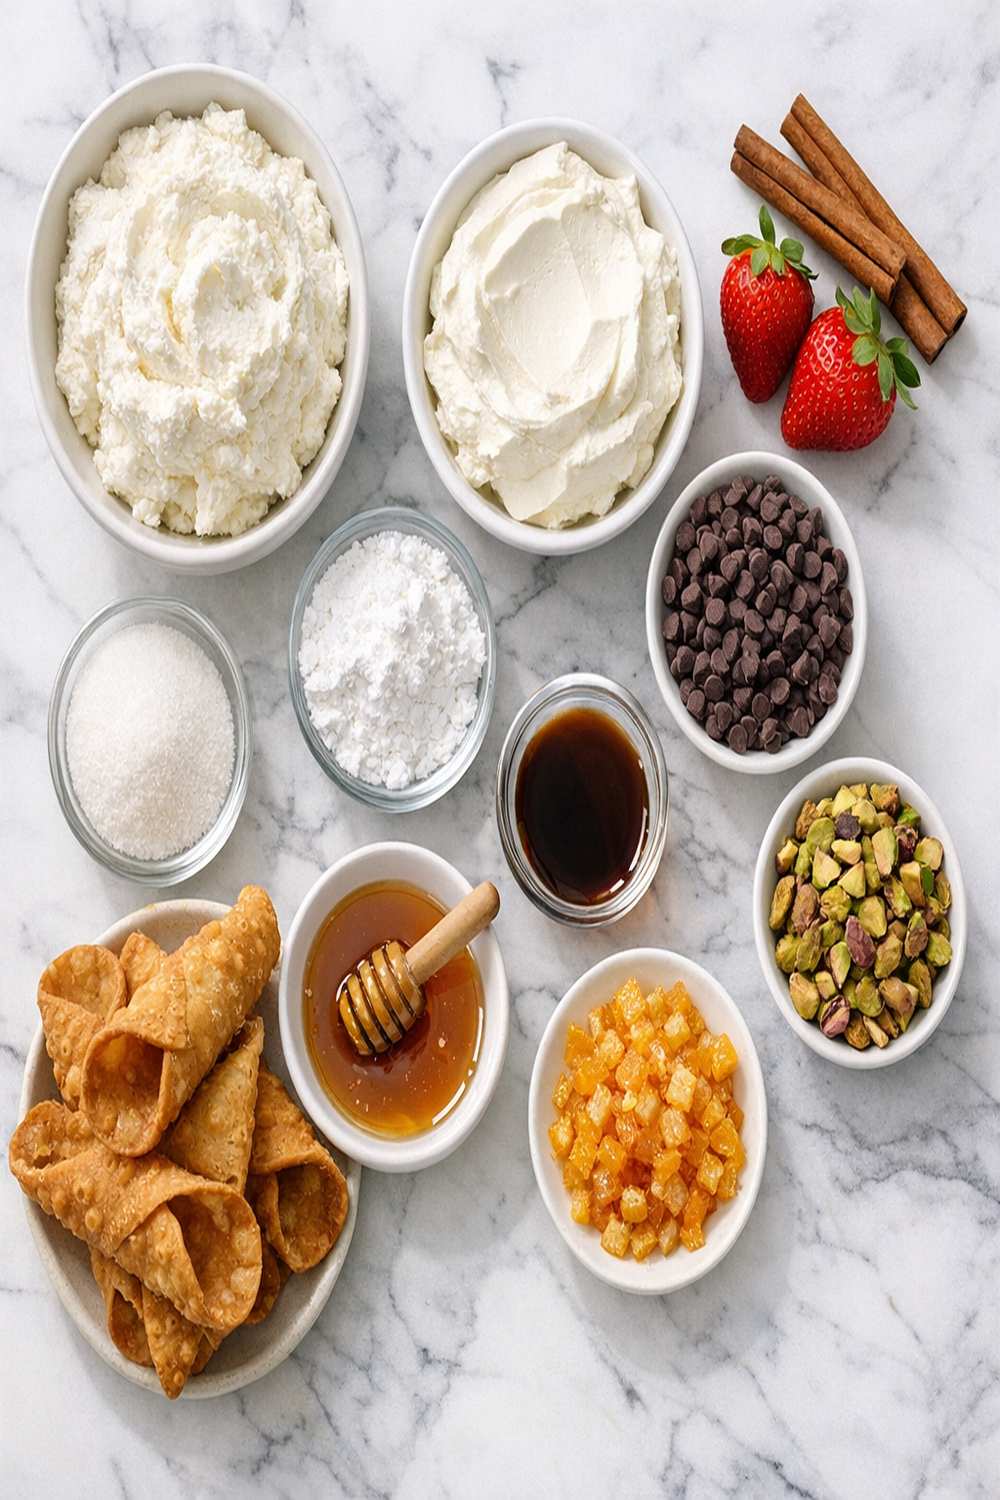
- ⅔ cup mini chocolate chips (semi-sweet or dark, depending on your preference)
- Pinch of sea salt (enhances sweetness and balances richness)
- ¼ teaspoon ground cinnamon (a secret ingredient that adds warmth without being identifiable)
- 1 cup powdered sugar (sifted before measuring prevents lumps)
- 8 ounces cream cheese (softened to room temperature for smooth mixing)
- 1 teaspoon pure vanilla extract (not imitation; the flavor difference matters here)
- 1 cup whole milk ricotta cheese (not the whey-based variety; look for the creamier option)
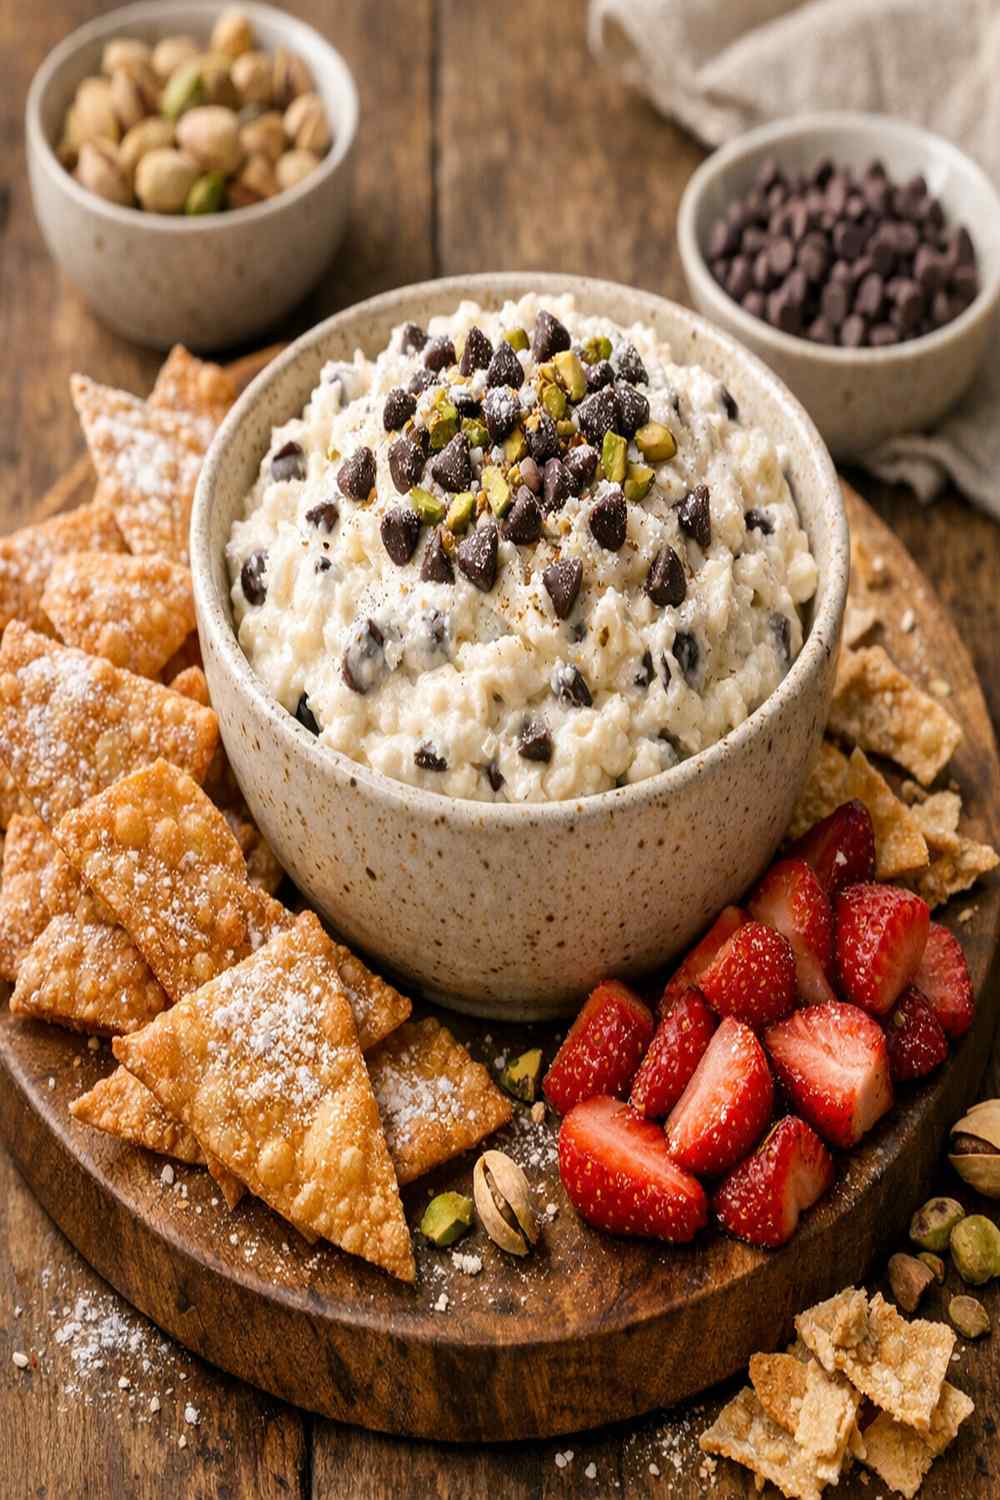
- Broken waffle cone pieces (for dipping; about 2-3 full cones, depending on serving size preference)
Expert’s Nutritional Insight
As a registered dietitian, I want you to understand what you’re serving. This dip contains about 140 calories per 3-tablespoon serving, with 8 grams of fat and 14 grams of carbohydrates. The ricotta provides a meaningful amount of calcium and protein—roughly 6 grams of protein per serving—which makes this dessert slightly more nutrient-dense than typical sweet treats.
The cream cheese contributes fat-soluble vitamins like vitamin A, while the dark chocolate (if you choose that variety) offers antioxidants. This isn’t a “health food,” but it’s certainly a more thoughtful dessert choice than many alternatives. Portion control matters, as with any sweet, but enjoying a proper serving without guilt is completely reasonable.
How to Make Cannoli Dip
This recipe is genuinely hard to mess up, which is why I love teaching it to nervous home cooks. I’ve tested this method on both stand mixers and hand mixers, so use whichever you have available. The timeline is quick—you’re looking at about 10 minutes from start to finish, not counting chill time.
Step 1: Prepare Your Ingredients
Before you do anything else, remove your cream cheese from the refrigerator and let it sit on the counter for 15-20 minutes. This step is non-negotiable if you’re using a hand mixer, and it makes a real difference with a stand mixer too. Cold cream cheese creates lumps that are difficult to beat out, no matter how long you mix.
While you’re waiting, sift your powdered sugar into a small bowl using a fine-mesh strainer. This prevents those annoying grainy streaks in your final dip. It takes 30 seconds and makes a noticeable difference in texture.

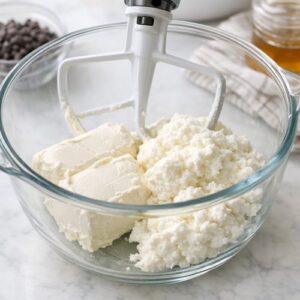
Step 2: Combine the Ricotta and Cream Cheese
Add your softened cream cheese and ricotta to a large mixing bowl. If you’re using a stand mixer, attach the paddle attachment. If using a hand mixer, you’ll want to hold the bowl steady with one hand (or ask someone to help) while mixing.
Start on medium-high speed and beat for 3-5 minutes, until the mixture is completely smooth and light. You’re aiming for a texture that looks almost cloud-like. Some tiny ricotta grains will remain—that’s okay and actually desirable for authentic texture. You’re looking to eliminate all visible cream cheese streaks.
Stop occasionally and scrape down the bowl with a spatula, pushing any mixture from the sides back toward the center. This ensures even mixing.

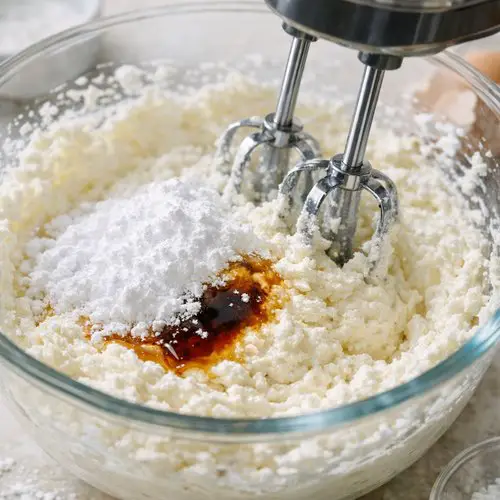
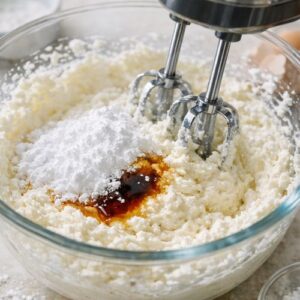
Step 3: Add the Sweetness and Flavor
Add your sifted powdered sugar and vanilla extract to the ricotta mixture. Continue mixing on medium-high speed for another 30-45 seconds. The mixture will become noticeably sweeter and more cohesive. Don’t overbeat at this stage—just incorporate the ingredients fully.
Stop the mixer and taste your dip. This is crucial. Some families prefer less sweetness, while others want maximum indulgence. If you’d like it sweeter, add more powdered sugar in 2-tablespoon increments, mixing briefly between additions. You can safely add up to another ½ cup of powdered sugar (which equals 8 tablespoons total) without negatively impacting the dip’s texture or creaminess.
Remember: you can always add more sweetness, but you can’t take it out, so taste as you go.
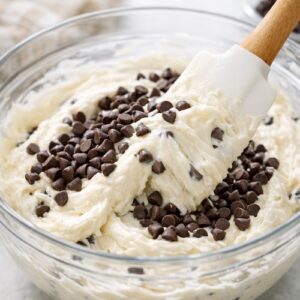
Step 4: Fold in the Chocolate and Finishing Touches
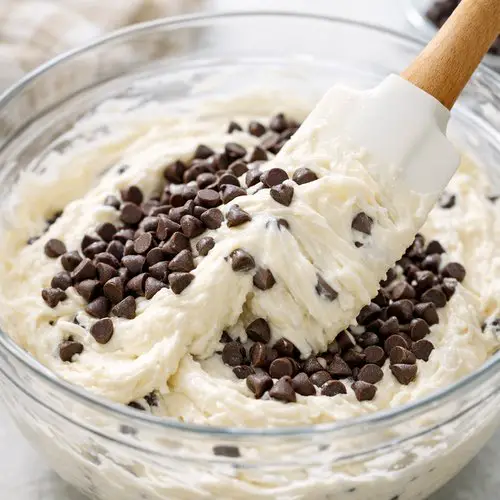
Using a rubber spatula, gently fold your mini chocolate chips into the dip with careful, deliberate motions. Folding (rather than mixing) preserves the airiness you’ve just created. Continue folding until the chips are evenly distributed throughout, about 1-2 minutes of gentle stirring.
Reserve a small handful of chocolate chips to sprinkle on top for visual appeal, if you’d like. Then add your cinnamon and salt, folding gently to combine. These two ingredients won’t be noticeable in a flavor sense—instead, they’ll deepen and enhance all the other flavors already present.
Step 5: Chill and Serve
Transfer your finished dip to a serving bowl. At this point, you have two options: serve it immediately at room temperature (it’s creamy and soft), or refrigerate it for 30-60 minutes to firm up slightly. I find that chilled dip holds its shape better when guests are dipping, while room temperature dip feels more luxurious and melts on the tongue.
If you made this ahead (even days ahead), let it sit on the counter for 15-20 minutes before serving to return it to the ideal consistency. Break your waffle cones into dippable pieces—roughly the size of your thumbnail—and arrange them in a small bowl next to the dip.

Tips and Tricks
- Soften cream cheese properly – Cold cream cheese is the enemy here. Leave it on the counter for at least 15 minutes. If you’re in a rush, cut it into small cubes before softening; they’ll warm up faster.
- Use whole milk ricotta – Don’t buy the low-fat variety. Whole milk ricotta has a naturally creamier texture and richer flavor. The fat isn’t something to fear in a dessert meant to be indulgent.
- Invest in pure vanilla extract – This is one of those moments where quality genuinely matters. Imitation vanilla has a chemical aftertaste that contrasts poorly with delicate ricotta. Pure vanilla costs a bit more but lasts longer and tastes infinitely better.
- Sift your powdered sugar – I mention this repeatedly because it’s genuinely transformative. A 30-second task with a fine-mesh strainer eliminates graininess and creates a silkier final texture.
- Don’t overmix after adding chocolate – Overmixing at the end incorporates too much air and can cause the dip to separate slightly when it sits. Gentle folding is key.
- Prepare broken waffle cone pieces just before serving – Waffle cones soften when exposed to air and the dip’s moisture. Break them fresh or break them 10-15 minutes before serving, not hours ahead.
- Double the recipe easily – This dip scales beautifully. Simply double every ingredient and follow the same method. It’s perfect for larger gatherings and stores just as well as a single batch.
Common Mistakes to Avoid
- Using cold cream cheese – This creates lumpy, uneven texture no matter how long you beat it. Patience here prevents frustration later. Set a timer when you take it from the fridge.
- Skipping the powdered sugar sifting step – I know it feels optional, but it’s not. Unsifted powdered sugar creates a grainy, slightly gritty mouthfeel that undermines the luxurious texture you’re after.
- Adding too much sweetness too quickly – The powdered sugar measure is already quite generous. Before adding more, really taste it. Many people find it perfectly sweet as-is, and oversweetening ruins the delicate flavor balance.
- Using imitation vanilla or low-quality ricotta – These are the two ingredients where budget-cutting backfires. Both are noticeable in flavor. Ricotta is inexpensive to begin with, and pure vanilla lasts for months, making both worthwhile investments.
Make-Ahead Guide
This dip is one of my favorite make-ahead desserts because it actually improves slightly as it sits—the flavors deepen and meld together. Here’s my professional game plan:
- Up to 2 days ahead – Prepare the complete dip, transfer to an airtight container, and refrigerate. When you’re ready to serve, let it sit on the counter for 15-20 minutes to return to the ideal consistency. The texture will be completely unchanged.
- Up to 1 day ahead – Prepare the base (ricotta, cream cheese, powdered sugar, vanilla, cinnamon, and salt) and refrigerate. Fold in chocolate chips just 2-3 hours before serving so they don’t absorb any excess moisture.
- Morning of an evening event – Prepare the complete dip by midday. Refrigerate covered. This gives flavors time to settle and removes any last-minute stress from your timeline.
- Freezing option – You can freeze this dip in an airtight container for up to 1 month. Thaw overnight in the refrigerator before serving. The texture will be slightly less silky (frozen ricotta is more porous), but flavor is unaffected.
Can I Store Cannoli Dip?
Yes, this dip stores beautifully. Transfer any leftovers to an airtight container immediately after serving. The dip will keep in your refrigerator for up to 3 days without any texture or flavor degradation. I find it actually tastes better on day two because the flavors have time to meld together.
If you’ve prepared it ahead and aren’t serving for a couple of days, refrigerate it in a covered container, and it will remain fresh for the full 2-3 day window. Before serving leftovers, let the dip sit on the counter for 15-20 minutes to return to the proper creamy consistency.
Freezing is also an option. Transfer the dip to a freezer-safe container and freeze for up to 1 month. Thaw overnight in the refrigerator before serving. The texture will be slightly less silky than fresh, but flavor is completely preserved.
Nutrition Information
Based on USDA data, one serving of this cannoli dip (approximately 3-4 tablespoons) contains approximately 140 calories, 8 grams of fat, 14 grams of carbohydrates, and 6 grams of protein. The ricotta cheese contributes meaningful amounts of calcium (about 10% of daily value per serving) and selenium, a mineral important for thyroid function.
If you choose dark chocolate chips instead of semi-sweet, you’ll add antioxidants including flavonoids, which research suggests support heart health. The protein content makes this a slightly more substantial dessert than alternatives—the protein contributes to satiety, meaning you might feel satisfied with a smaller portion.
This is a dessert meant to be enjoyed in appropriate portions as part of a balanced diet. One serving pairs well with fresh fruit or lighter accompaniments to balance the richness.
What Can I Serve With Cannoli Dip?
The beauty of dip is its versatility. You’ll want to offer 2-3 different dipping options so guests can customize their experience. Some prefer crispy elements, while others gravitate toward fruit. If you’re planning a dessert spread, this dip pairs beautifully with Kings Hawaiian Buffalo Chicken Sliders if you’re creating a mixed sweet-and-savory board (the Hawaiian rolls work as dippers too, believe it or not), or integrate it into a traditional Italian-themed dessert table.
- Waffle cone pieces – Crispy, slightly sweet, and naturally complementary. These are my top choice for texture contrast.
- Fresh strawberries – Hulled and halved, these provide bright acidity that balances the dip’s richness. Serve in a separate bowl so they don’t absorb moisture.
- Vanilla wafers or crispy butter cookies – Simple cookies let the dip shine without competing flavors. They’re also more elegant for formal gatherings.
- Crispy biscotti – These Italian cookies are practically made for this dip. Their firm texture means they won’t soften as quickly as other options.
- Apple slices – Lightly brush with lemon juice to prevent browning. The tartness complements the sweetness perfectly.
- Pear slices – More delicate than apples, pears offer subtle sweetness and interesting texture contrast.
- Cubed pound cake – Homemade or store-bought, pound cake pieces are elegant and pair naturally with ricotta-based desserts.
- Chocolate-covered pretzels – For guests who love salty-sweet combinations, these add surprising depth.
Seasonal Variations
This base recipe is perfect year-round, but you can adapt it beautifully to match seasonal ingredients and flavors:
- Spring Version – Add ½ teaspoon of lemon zest and reduce vanilla to ¾ teaspoon. Fold in white chocolate chips instead of semi-sweet. Serve with fresh strawberries and raspberries. This lighter variation feels fresh without losing the dip’s luxurious quality.
- Summer Version – Omit the chocolate chips entirely and add ¼ teaspoon almond extract plus ½ teaspoon of orange zest. Fold in toasted slivered almonds instead of chocolate. Serve with grilled peaches or nectarines. This version feels bright and sophisticated.
- Fall Version – Increase cinnamon to ½ teaspoon, add ¼ teaspoon of nutmeg, and fold in chopped candied pecans instead of some of the chocolate chips. Serve with apple slices, pear slices, and gingersnap cookies. This variation feels cozy and spiced.
- Winter Version – The base recipe as written is perfect for winter, but you can enhance it by substituting 2 tablespoons of the powdered sugar with crushed candy canes, adding ¼ teaspoon of peppermint extract (just a touch), and serving with dark chocolate biscotti or gingerbread cookies.
Substitutes
- Mascarpone instead of cream cheese – Use the same amount (8 ounces). Mascarpone will create a slightly richer, more luxurious texture. It’s more expensive but worth it if you have it on hand. Mix for just 2-3 minutes instead of the full 3-5 minutes since mascarpone breaks down more easily.
- Greek yogurt instead of some ricotta – Replace ¼ cup of ricotta with ¼ cup of full-fat Greek yogurt. This adds tang and slightly reduces richness. The dip will be slightly less heavy while maintaining creaminess.
- Dark chocolate chips instead of semi-sweet – Use the same amount. Dark chocolate will make the dip less sweet overall (adjust powdered sugar upward by 2 tablespoons if you prefer more sweetness). Dark chocolate offers more antioxidants and a more sophisticated flavor.
- Crushed pistachios instead of chocolate chips – Use ⅔ cup of roasted, salted pistachios, roughly chopped. Toast them lightly in a dry pan for 2 minutes before folding in. This creates a completely different flavor profile—less traditional but absolutely delicious. The salt from pistachios means you might reduce the salt pinch to just a whisper.
- Cinnamon graham crackers instead of waffle cones – Break into dippable pieces. These are more substantial and hold up better under moisture, plus they add subtle sweetness and spice without competing with the dip.
- Honey instead of 2 tablespoons powdered sugar – This substitution adds complexity and a subtle floral sweetness. Use the same amount and mix well, but reduce the total powdered sugar by 2 tablespoons to account for honey’s liquid content.

Cannoli Dip Recipe
Ingredients
- ⅔ cup mini chocolate chips semi-sweet or dark, depending on your preference
- Pinch of sea salt enhances sweetness and balances richness
- ¼ teaspoon ground cinnamon a secret ingredient that adds warmth without being identifiable
- 1 cup powdered sugar sifted before measuring prevents lumps
- 8 ounce cream cheese softened to room temperature for smooth mixing
- 1 teaspoon pure vanilla extract not imitation; the flavor difference matters here
- 1 cup whole milk ricotta cheese not the whey-based variety; look for the creamier option
- Broken waffle cone pieces for dipping; about 2-3 full cones, depending on serving size preference
Instructions
Step 1: Prepare Your Ingredients
- Before you do anything else, remove your cream cheese from the refrigerator and let it sit on the counter for 15-20 minutes. This step is non-negotiable if you're using a hand mixer, and it makes a real difference with a stand mixer too. Cold cream cheese creates lumps that are difficult to beat out, no matter how long you mix. While you're waiting, sift your powdered sugar into a small bowl using a fine-mesh strainer. This prevents those annoying grainy streaks in your final dip. It takes 30 seconds and makes a noticeable difference in texture.

Step 2: Combine the Ricotta and Cream Cheese
- Add your softened cream cheese and ricotta to a large mixing bowl. If you're using a stand mixer, attach the paddle attachment. If using a hand mixer, you'll want to hold the bowl steady with one hand (or ask someone to help) while mixing. Start on medium-high speed and beat for 3-5 minutes, until the mixture is completely smooth and light. You're aiming for a texture that looks almost cloud-like. Some tiny ricotta grains will remain—that's okay and actually desirable for authentic texture. You're looking to eliminate all visible cream cheese streaks. Stop occasionally and scrape down the bowl with a spatula, pushing any mixture from the sides back toward the center. This ensures even mixing.
Step 3: Add the Sweetness and Flavor
- Add your sifted powdered sugar and vanilla extract to the ricotta mixture. Continue mixing on medium-high speed for another 30-45 seconds. The mixture will become noticeably sweeter and more cohesive. Don't overbeat at this stage—just incorporate the ingredients fully. Stop the mixer and taste your dip. This is crucial. Some families prefer less sweetness, while others want maximum indulgence. If you'd like it sweeter, add more powdered sugar in 2-tablespoon increments, mixing briefly between additions. You can safely add up to another ½ cup of powdered sugar (which equals 8 tablespoons total) without negatively impacting the dip's texture or creaminess. Remember: you can always add more sweetness, but you can't take it out, so taste as you go.
Step 4: Fold in the Chocolate and Finishing Touches
- Using a rubber spatula, gently fold your mini chocolate chips into the dip with careful, deliberate motions. Folding (rather than mixing) preserves the airiness you've just created. Continue folding until the chips are evenly distributed throughout, about 1-2 minutes of gentle stirring. Reserve a small handful of chocolate chips to sprinkle on top for visual appeal, if you'd like. Then add your cinnamon and salt, folding gently to combine. These two ingredients won't be noticeable in a flavor sense—instead, they'll deepen and enhance all the other flavors already present.
Step 5: Chill and Serve
- Transfer your finished dip to a serving bowl. At this point, you have two options: serve it immediately at room temperature (it's creamy and soft), or refrigerate it for 30-60 minutes to firm up slightly. I find that chilled dip holds its shape better when guests are dipping, while room temperature dip feels more luxurious and melts on the tongue. If you made this ahead (even days ahead), let it sit on the counter for 15-20 minutes before serving to return it to the ideal consistency. Break your waffle cones into dippable pieces—roughly the size of your thumbnail—and arrange them in a small bowl next to the dip.

Notes
FAQs
Can I make this dip if I don’t have a mixer?
Absolutely. You’ll need more elbow grease, but you can absolutely make this with nothing but a bowl and a sturdy whisk or fork. Start by breaking the cream cheese into small pieces and mashing it with a fork until it’s as smooth as possible. Then add the ricotta gradually while stirring constantly. It’ll take about 10 minutes of mixing to achieve the proper texture, but you’ll get there. Your arm might be tired, but the result will be just as delicious. This is how my mother made desserts before she had any electrical appliances, and she never complained about the process—she just appreciated the result.
What’s the difference between ricotta and mascarpone?
Both are Italian cheeses, but they’re quite different. Ricotta is grainy (in a pleasant way), slightly tangy, and lower in fat. Mascarpone is smooth, rich, and made from cream. In this dip, ricotta provides authentic flavor while mascarpone would make it creamier and less tangy. For traditional cannoli taste, stick with ricotta. For maximum luxury, use some of each.
Why is my dip grainy?
Graininess usually means one of two things: either your cream cheese was too cold when you mixed it (causing small lumps), or you used low-fat ricotta (which has a naturally grainier texture). Solution: start over with room-temperature cream cheese and whole milk ricotta. If you’re already committed to finishing the current batch, you can press it through a fine-mesh strainer, which will smooth out the texture. It’s extra work, but it works.
Can I reduce the sugar in this recipe?
Yes, but carefully. This recipe already uses a moderate amount of powdered sugar compared to traditional cannoli filling. You can reduce it by ¼ cup (down to ¾ cup total), and the dip will still be sweet and delicious—just slightly less sweet. Don’t go lower than that without tasting frequently, as you’ll lose the balance that makes this dip feel complete. Remember, you can always add more sugar, but you can’t remove it.
Is this dip good for people with dairy allergies?
Unfortunately, no. This dip is built entirely on dairy—ricotta, cream cheese, and chocolate chips (which often contain milk). If you’re serving guests with dairy allergies, I’d recommend preparing a completely separate dessert rather than trying to adapt this one. Dairy substitutes often change the texture and flavor so dramatically that the result doesn’t resemble cannoli dip anymore. There are wonderful dairy-free dessert dips available, but this isn’t one of them.
Can I serve this warm?
You can, though it’s not my preference. Room temperature is ideal—it’s creamy and spreadable but still holds its shape. If you’d like to serve it warm (perhaps for a winter gathering), transfer it to an oven-safe serving dish and warm it gently in a 250°F oven for about 10-15 minutes, just until it reaches room temperature or slightly warmer. Don’t overheat, as the cream cheese can separate. Most guests find room temperature or chilled versions more appealing, so I’d suggest offering it cold unless you have a specific reason to warm it.
More Recipes You’ll Love
- Large Batch Brownies – Rich, fudgy, and perfect for pairing with this dip on a dessert board
- Kiwi Chocolate – A sophisticated flavor combination that complements cannoli dip beautifully in a mixed dessert spread
- my weeknight pasta – If you’re planning an Italian-themed dinner, this creamy pasta pairs perfectly with cannoli dip as dessert
Making this cannoli dip has become my secret weapon for hosting. It’s the dessert that makes me look like a pastry chef while requiring nothing more than a mixer and a handful of beautiful ingredients. I’ve watched this simple recipe transform ordinary gatherings into moments people remember—the kind where someone takes a bite and their eyes close for just a second because the flavor is that good.
That moment of joy, that connection around a bowl of creamy, chocolatey deliciousness, is what cooking is really about. It’s not about complexity or hours in the kitchen. It’s about care, intention, and showing up for the people you love with something that tastes like home. Good food is a good mood!
- Chipotle Almond Dip Recipe
- Captain Rodney’s Dip Recipe
- Avocado Dip Recipe – Easy Kitchen Guide
- Onion Dip

My name is Lori Walker. I’m a registered dietitian, food blogger and food enthusiast. I share easy healthy, delicious recipes on my blog and review necessary kitchen items. The recipes I share take less… Read more