Summer has rolled around once again, and you know what that means—endless outdoor gatherings, family cookouts, and delightful desserts to beat the heat. While barbecued burgers and yard games are always a blast, nothing completes a sunny day like cookies paired with ice cream! Trust me, whether it’s a backyard party or a casual family get-together, my Ice Cream Cookies have become a staple. They’re bound to bring smiles, laughter, and sticky fingers that you won’t mind cleaning up afterward. Good news: they’re as easy to make as they are to devour!

So, what’s all the fuss about Ice Cream Cookies? Picture this: warm, chewy cookies filled with gooey chocolate and sandwiching a generous scoop of your favorite ice cream. Sounds dreamy, right? This dessert is a glorious combination of textures and flavors, and it’s just as fun to make as it is to eat. Let’s dive into creating a treat that’s sure to be the highlight of any summer spread.
You Might Also Like These Recipes!
- Ice Cream With Cheesecake Chunks Recipe
- Golden Grahams S’mores Bars Recipe
- The Best Easy Peanut Butter Pie Recipe
What is Ice Cream Cookie?
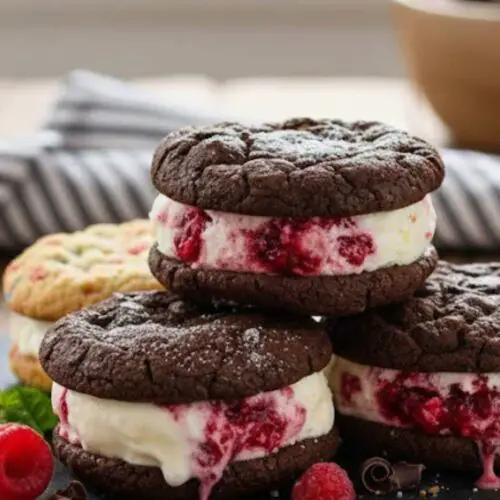
An Ice Cream Cookie is essentially a delicious cookie sandwich that features your choice of creamy ice cream tucked between two warm, delectable cookies. The cookies can come in many variations, but my version uses oats and peanut butter for a tasty twist that adds substance without skimping on flavor. These treats are great for sharing or for indulging alone—a little dessert therapy, if you will!
What Does It Taste Like?
Imagine biting into a warm cookie that’s slightly crisp on the edges and wonderfully soft in the middle. It oozes with sweet, creamy chocolate chips, and then—bam—you’re into a scoop of cool, smooth ice cream that melds perfectly with the cookie. The overall effect is a delightful sweetness balanced by the nutty flavor of the peanut butter and oats, making these cookies scrumptious and surprisingly satisfying.
Why This Recipe Works?
This recipe works because it blends classic flavors and textures that everyone loves. The oats lend a hearty quality, ensuring these cookies satisfy cravings without feeling too indulgent. Plus, using peanut butter adds creaminess and richness that works harmoniously with your chosen ice cream. Using fresh ingredients and making the dough from scratch transforms a simple dessert into a special occasion, while still staying quick and easy enough for busy days.
Ingredients
Here’s what you need to create these delightful Ice Cream Cookies:
– ⅓ cup softened butter
– 1 cup packed light brown sugar
– ⅔ cup granulated sugar
– 2 large eggs
– 1½ teaspoons baking soda
– 1 teaspoon pure vanilla extract
– 1 tablespoon maple syrup (or pancake syrup)
– 1 cup creamy peanut butter
– 3 cups quick-cooking oats
– ⅔ cup semi-sweet chocolate chips
– ½ teaspoon sea salt (adds flavor balance)
– 1/2 cup chopped walnuts (adds texture)
—–
How to Make Ice Cream Cookie
Making Ice Cream Cookies is a simple process. I’ll guide you through the steps to whip them up in no time.
Step 1: Preheat Your Oven
Preheat the oven to 350°F (175°C). This step is crucial because you want your cookies to start baking at the right temperature. A hot oven helps them rise perfectly and develop that wonderful golden edge.
Step 2: Cream the Butter and Sugars
In a large mixing bowl, cream together the softened butter, light brown sugar, and granulated sugar using an electric mixer. You’re looking for a light, fluffy mixture here. This process incorporates air, which gives your cookies a lovely texture.
Step 3: Mix in Wet Ingredients
Add the eggs, vanilla extract, maple syrup, and baking soda to the mixture. Beat this well until it’s all blended into a smooth batter. Don’t rush this step; letting it blend gives your cookies a great foundation of flavor.
Step 4: Add Peanut Butter
Stir in the creamy peanut butter until it’s well combined. The mixture will start to pull together nicely at this stage. Peanut butter adds richness and lends a delightful flavor that pairs perfectly with the chocolate chips.
Step 5: Incorporate Oats and Add-ins
Gradually mix in the quick oats, sea salt, and chopped walnuts. The oats add some bulk and chewiness to your cookies, while the walnuts bring that extra crunch. Stir until everything is evenly distributed.
Step 6: Fold in Chocolate Chips
Lastly, fold in your semi-sweet chocolate chips. This step is where you’ll be tempted to “taste test” the dough—trust me, it’s hard to resist!
Step 7: Scoop the Dough
Use a large cookie scoop to drop rounded dough balls onto a parchment-lined baking sheet. You can fit eight balls on a half-size sheet. Roll each ball between your hands to ensure they’re smooth and nice to look at.
Step 8: Bake the Cookies
Bake in the preheated oven for about 12 minutes. Keep an eye on them; you want the edges to be lightly browned and the tops just past looking wet. Underbaking slightly ensures that they remain soft inside.
Step 9: Cool the Cookies
Let the cookies cool on the baking sheet for about 1 minute before transferring them to a wire rack. Cooling on the sheet allows them to set just enough to keep their shape, while the wire rack will cool them down perfectly so they’re ready for the ice cream.
Step 10: Assemble the Ice Cream Sandwiches
Once your cookies are completely cool, scoop about 1/3 cup of ice cream onto the flat side of one cookie. I love to use the same scoop here to keep things consistent. Then, gently press a second cookie on top to create your sandwich. You want to push down just enough to spread the ice cream slightly without squeezing it out the sides.
Step 11: Freeze the Sandwiches
Arrange your ice cream sandwiches on a large tray and place them in the freezer until firm. This part is essential for enjoying them. Once they’re frozen, they’re ready to be devoured and are great for summer parties or just a sweet treat on a hot day!

Notes
– Cooling is Key: Let the cookies cool as mentioned to avoid melting the ice cream before you’re ready.
– Variety is Fun: Feel free to mix in different add-ins like crushed pretzels or other types of chips for a new twist.
– Watch the Bake Time: Ovens can differ, so keep an eye on the cookies during baking to prevent overbaking.
– Scoop Smart: Using a cookie scoop helps create evenly sized cookies that bake uniformly.
– Dough Storage: If you’re not ready to bake them all, you can chill the dough for later use or freeze it for a quick dessert later.
Storage Tips
Store your Ice Cream Cookies in an airtight container or freezer-safe bag in the freezer for up to a month. Layer parchment paper between each sandwich if stacking, to prevent them from sticking together. For the best texture, allow them to thaw slightly before eating.
Nutrition Information
Each Ice Cream Cookie Sandwich contains approximately 320 calories, loaded with the goodness of oats and protein from peanut butter. They offer a decent hit of energy, perfect for a sweet treat that leaves you satisfied but not overindulged.
Sides for Ice Cream Cookie
– Fresh Fruit Salad:Brighten your plate with seasonal berries and melons. Perfectly balances the sweetness of the cookies.
– Chocolate Sauce Drizzle:Add an extra layer of richness with warm chocolate sauce over the cookies. Ideal for chocolate lovers!
– Milk or Plant-Based Milk:A classic pairing that complements cookies beautifully. Great for dipping!
– Whipped Cream:Top these sandwiches with a dollop for an indulgent dessert experience.
– Nut Butter Spread:Halve the sandwich and spread some nut butter for a delightful twist. Adds nutritional value and packs more flavor.
What are Some Alternative Choices to the Ingredients in Case They are Not in Your Pantry?
– Butter:Coconut oil can be a great substitute for dairy-free versions of these cookies.
– Peanut Butter:Almond butter or sunflower seed butter can work too, especially for nut allergies.
– Eggs:Flaxseed meal can replace eggs if you need a vegan option—mix 1 tablespoon with 2.5 tablespoons of water.
– Brown Sugar:Coconut sugar can also be used for a healthier option—it provides a lovely caramel-like flavor.
– Oats:If you’re in a pinch, you can use quick-cooking rolled oats or even quinoa flakes for a gluten-free version.
Icecream Cookie
Equipment
- ice cream scoop
- Cookie Sheet
- Parchment paper
Ingredients
- – ⅓ cup softened butter
- – 1 cup packed light brown sugar
- – ⅔ cup granulated sugar
- – 2 large eggs
- – 1½ teaspoons baking soda
- – 1 teaspoon pure vanilla extract
- – 1 tablespoon maple syrup or pancake syrup
- – 1 cup creamy peanut butter
- – 3 cups quick-cooking oats
- – ⅔ cup semi-sweet chocolate chips
- – ½ teaspoon sea salt adds flavor balance
- – 1/2 cup chopped walnuts adds texture
Instructions
- Making Ice Cream Cookies is a simple process. I’ll guide you through the steps to whip them up in no time.
Step 1: Preheat Your Oven
- Preheat the oven to 350°F (175°C). This step is crucial because you want your cookies to start baking at the right temperature. A hot oven helps them rise perfectly and develop that wonderful golden edge.
Step 2: Cream the Butter and Sugars
- In a large mixing bowl, cream together the softened butter, light brown sugar, and granulated sugar using an electric mixer. You’re looking for a light, fluffy mixture here. This process incorporates air, which gives your cookies a lovely texture.
Step 3: Mix in Wet Ingredients
- Add the eggs, vanilla extract, maple syrup, and baking soda to the mixture. Beat this well until it’s all blended into a smooth batter. Don’t rush this step; letting it blend gives your cookies a great foundation of flavor.
Step 4: Add Peanut Butter
- Stir in the creamy peanut butter until it’s well combined. The mixture will start to pull together nicely at this stage. Peanut butter adds richness and lends a delightful flavor that pairs perfectly with the chocolate chips.
Step 5: Incorporate Oats and Add-ins
- Gradually mix in the quick oats, sea salt, and chopped walnuts. The oats add some bulk and chewiness to your cookies, while the walnuts bring that extra crunch. Stir until everything is evenly distributed.
Step 6: Fold in Chocolate Chips
- Lastly, fold in your semi-sweet chocolate chips. This step is where you’ll be tempted to “taste test” the dough—trust me, it’s hard to resist!
Step 7: Scoop the Dough
- Use a large cookie scoop to drop rounded dough balls onto a parchment-lined baking sheet. You can fit eight balls on a half-size sheet. Roll each ball between your hands to ensure they’re smooth and nice to look at.
Step 8: Bake the Cookies
- Bake in the preheated oven for about 12 minutes. Keep an eye on them; you want the edges to be lightly browned and the tops just past looking wet. Underbaking slightly ensures that they remain soft inside.
Step 9: Cool the Cookies
- Let the cookies cool on the baking sheet for about 1 minute before transferring them to a wire rack. Cooling on the sheet allows them to set just enough to keep their shape, while the wire rack will cool them down perfectly so they’re ready for the ice cream.
Step 10: Assemble the Ice Cream Sandwiches
- Once your cookies are completely cool, scoop about 1/3 cup of ice cream onto the flat side of one cookie. I love to use the same scoop here to keep things consistent. Then, gently press a second cookie on top to create your sandwich. You want to push down just enough to spread the ice cream slightly without squeezing it out the sides.
Step 11: Freeze the Sandwiches
- Arrange your ice cream sandwiches on a large tray and place them in the freezer until firm. This part is essential for enjoying them. Once they’re frozen, they’re ready to be devoured and are great for summer parties or just a sweet treat on a hot day!
Notes
FAQs
1. Can I make these cookies gluten-free?
Absolutely! Just ensure you use gluten-free oats and a suitable gluten-free flour if you decide to adjust the base.
2. How long do the ice cream sandwiches stay fresh?
The ice cream sandwiches will be best for consumption within a month but can last longer if securely wrapped.
3. What kind of ice cream should I use?
You can use any flavor you desire! Vanilla, chocolate, and even a fruity sorbet work beautifully with these cookies.
4. Can I freeze the cookie dough?
Yes, you can! Freeze the dough in balls, and just remember to thaw before baking.
5. Can I use other mix-ins besides chocolate chips?
Definitely! Feel free to get creative with dried fruit, nuts, or even toffee pieces to jazz up your cookies.
Conclusion
These Ice Cream Cookies are a fun and easy way to brighten up any summer day. With their delightful chewy texture and indulgent ice cream center, it’s hard to resist just one. Whether shared with friends or enjoyed on a lazy afternoon, they’re bound to bring joy to your table. So let’s embrace the ice cream season and make some memories—one delicious cookie sandwich at a time! Now, roll up your sleeves and get to baking; summer’s calling!
You Might Also Like These Latest Recipes!
- Ice Cream With Cheesecake Chunks Recipe
- Sweet Potato Casserole Recipe
- Egg and Croissant Brunch Bake Recipe


My name is Lori Walker. I’m a registered dietitian, food blogger and food enthusiast. I share easy healthy, delicious recipes on my blog and review necessary kitchen items. The recipes I share take less… Read more