This post contains affiliate links. As an Amazon Associate I earn from qualifying purchases.
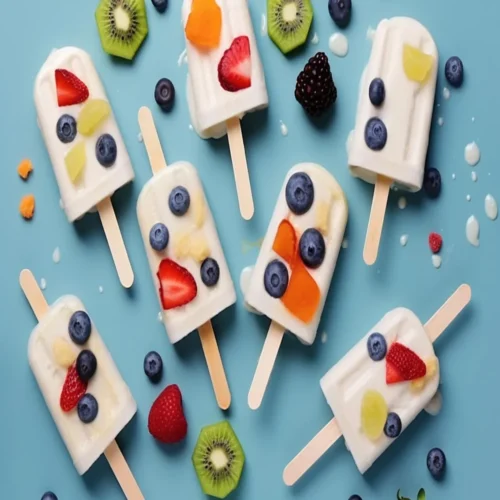
Are you searching for a delicious yet healthy treat to satisfy your cravings? Look no further! I am thrilled to share with you my irresistible recipe for Paletas De Yogurt, a delightful frozen yogurt popsicle that will make your taste buds dance with joy.
What sets this recipe apart is the creamy Greek yogurt combined with the perfect balance of sweetness from NESTLÉ® Condensed Milk, accompanied by a delightful blend of fruits and cereal. Trust me; this is a culinary adventure you don’t want to miss!
Picture this: a sunny summer afternoon, the cool breeze gliding through, and the sound of laughter filling the air. It was during such a moment that I found myself yearning for a refreshing, guilt-free dessert.
Combining my love for yogurt and vibrant fruits, I set out to create Paletas De Yogurt – a recipe that celebrates the goodness of nature’s bounty.
Now, let’s dive into the ingredients that make these Paletas De Yogurt truly incredible!

You’ll also like these Recipes!
- How to Make No Bake Mango Pie Recipe
- COpycat Mango Kalakand With Ricotta Cheese
- Paula Deen Lemon Pound Cake
Ingredients:
- Greek Yogurt: I use Greek yogurt as the base for the paletas because it provides a creamy and tangy texture. The thickness of Greek yogurt contributes to the richness of the frozen treat, making it satisfying and indulgent.
- Blackberries and Strawberries Cut into Cubes: I include blackberries and strawberries to add a burst of freshness and vibrant fruity flavors to the paletas. The combination of these berries provides a sweet and slightly tart taste, making the popsicles more enjoyable.
- Sugar: You can add a touch of sugar to sweeten the yogurt mixture. The sweetness balances the tanginess of the Greek yogurt and enhances the overall flavor profile of the paletas.
- Lemon Juice: The addition of lemon juice brings a zesty and citrusy brightness to the paletas. It helps elevate the flavors of the fruits and adds a refreshing twist to the frozen treat.
- Cereal: Including cereal adds a delightful crunch to the paletas. The texture contrast of the crunchy cereal against the smooth yogurt makes each bite interesting and enjoyable.
- Bananas Cut into Cubes: I incorporate bananas for their natural sweetness and creamy texture. The bananas not only contribute to the sweetness of the paletas but also add a velvety consistency to the frozen pops.
- NESTLÉ® Condensed Milk: I use NESTLÉ® Condensed Milk to bring a rich and luscious sweetness to the paletas. It adds a creamy and indulgent quality, enhancing the overall taste and mouthfeel of the frozen treats.
Directions
Step 1: Preparing the Creamy Base
To begin our journey of taste and texture, take a large bowl and combine the Greek yogurt and Condensed Milk. Blend them together until the mixture becomes smooth and velvety, like a cloud floating in the sky.
Step 2: Sweeten the Deal
Now, it’s time to add a touch of sweetness to our Paletas De Yogurt. Sprinkle the sugar onto your creamy base and add a teaspoon of lemon juice for that subtle tangy twist. Gently whisk away until the sugar dissolves, allowing the flavors to mingle harmoniously.
Step 3: Embrace the Vibrant Colors
We all know that beauty lies in diversity, and it resonates with our fruity medley. Fold the cubed bananas, blackberries, and strawberries into your creamy concoction. Witness how the vibrant hues playfully blend, creating a visually stunning masterpiece.
Step 4: Add a Crunchy Surprise
As we embrace the harmony of flavors, let’s introduce an unexpected element. Sprinkle half a cup of your favorite cereal into the mix. The delicate crunch will add a delightful texture, surprising your palate with each bite.
Step 5: Assemble the Paletas De Yogurt
Now that our mixture is complete, it’s time to fill our popsicle molds and freeze them to perfection. Pour the creamy goodness into each mold, making sure to leave a little space at the top for expansion during the freezing process. Secure the molds with their respective sticks, ensuring they are firm enough to withstand a playful lick.
Step 6: Freeze and Savor
With patience and anticipation, allow your Paletas De Yogurt to freeze for at least four hours. Once time has worked its magic, remove the frozen delicacies from their molds and indulge in a symphony of flavors and textures that will transport you to a realm of pure delight.

Recipe Notes:
– Greek Yogurt: The use of Greek yogurt ensures a velvety and thick base, resulting in a creamy mouthfeel that truly elevates the paletas’ indulgent experience.
– NESTLÉ® Condensed Milk: The condensed milk serves as the perfect sweetener, infusing richness and depth into the mixture. Its smooth consistency harmonizes the flavors while imparting a touch of sweetness.
– Cereal Crunch: The addition of cereal provides a delightful crunch within each bite, adding a unique textural element to this frozen treat.
Recipe Variations:
- Tropical Paradise: Replace the blackberries and strawberries with diced mangoes and pineapple for a taste of the tropics.
- Nutty Delight: For an added crunch, mix in a handful of your favorite nuts, such as almonds or pecans, to take your paletas to the next level.
- Chocolate Lover’s Dream: Incorporate a tablespoon of unsweetened cocoa powder and a handful of chocolate chips to create a decadent chocolatey twist.
- Berry Blast: Exchange the cereal for a mixture of fresh raspberries, blueberries, and blackberries, allowing their natural tartness to tantalize your taste buds.
- Fruity Explosion: Experiment with an assortment of seasonal fruits, such as diced peaches, kiwis, and watermelon, to enjoy a burst of fruity goodness in every bite.
- Coffee Infusion: Add a teaspoon of instant coffee powder or brew some strong coffee and mix it in for a delightful caffeinated treat.

Frequently Asked Questions:
Can I use regular yogurt instead of Greek yogurt?
Greek yogurt is ideal for this recipe as it provides a richer and creamier texture. However, if you prefer regular yogurt, you can use it as a substitute. Just keep in mind that the consistency may be slightly different.
How long do these paletas need to freeze?
To achieve the perfect frozen texture, it is recommended to freeze the paletas for at least four hours. However, if you desire a firmer consistency, feel free to extend the freezing time.
Do I need special equipment to make paletas de yogurt?
You will need popsicle molds to make paletas de yogurt. If you don’t have popsicle molds, you can use ice cube trays or small paper cups with popsicle sticks.
Can I replace the NESTLÉ® Condensed Milk with a different sweetener?
While NESTLÉ® Condensed Milk contributes to the unique taste and texture of these paletas, you can experiment with other liquid sweeteners like maple syrup or honey. Adjust the quantity according to your desired level of sweetness.
Can I use frozen fruits instead of fresh ones?
Fresh fruits are highly recommended for this recipe as they provide a vibrant burst of flavor and texture. However, if you can’t access fresh fruits, you can use frozen ones. Just make sure to thaw them before dicing and incorporating them into the mixture.
How long do these paletas last in the freezer?
When stored in an airtight container, these paletas can last up to two months in the freezer. However, it is highly unlikely they will survive that long without being devoured!
Can I make these paletas vegan-friendly?
Absolutely! Simply substitute the Greek yogurt with your favorite plant-based yogurt alternative, and replace the NESTLÉ® Condensed Milk with a dairy-free, sweetened condensed milk alternative. The rest of the steps remain the same.
Conclusion:
I hope this journey through the world of Paletas De Yogurt has ignited your taste buds and inspired you to embark on your own culinary adventure.
These frozen delights are a celebration of freshness, creaminess, and delectable flavors, perfectly combined to create a treat that is both guilt-free and heavenly.
So, gather your ingredients, let your creativity flow, and indulge in the magic of Paletas De Yogurt – a frozen delight like no other. Happy experimenting and savoring!
Paletas De Yogurt
Ingredients
- 2 cups of Greek yogurt 490 g
- 1/2 cup of blackberries and strawberries cut into cubes
- 1 tbsp of sugar
- 1 tsp of lemon juice
- 1/2 cup of cereal
- 2 bananas cut into cubes
- 1/2 cup of NESTLÉ® Condensed Milk 140 g
Instructions
Step 1: Preparing The Creamy Base
- To begin our journey of taste and texture, take a large bowl and combine the Greek yogurt and Condensed Milk. Blend them together until the mixture becomes smooth and velvety, like a cloud floating in the sky.
Step 2: Sweeten The Deal
- Now, it’s time to add a touch of sweetness to our Paletas De Yogurt. Sprinkle the sugar onto your creamy base and add a teaspoon of lemon juice for that subtle tangy twist. Gently whisk away until the sugar dissolves, allowing the flavors to mingle harmoniously.
Step 3: Embrace The Vibrant Colors
- We all know that beauty lies in diversity, and it resonates with our fruity medley. Fold the cubed bananas, blackberries, and strawberries into your creamy concoction. Witness how the vibrant hues playfully blend, creating a visually stunning masterpiece.
Step 4: Add A Crunchy Surprise
- As we embrace the harmony of flavors, let’s introduce an unexpected element. Sprinkle half a cup of your favorite cereal into the mix. The delicate crunch will add a delightful texture, surprising your palate with each bite.
Step 5: Assemble The Paletas De Yogurt
- Now that our mixture is complete, it’s time to fill our popsicle molds and freeze them to perfection. Pour the creamy goodness into each mold, making sure to leave a little space at the top for expansion during the freezing process. Secure the molds with their respective sticks, ensuring they are firm enough to withstand a playful lick.
Step 6: Freeze And Savor
- With patience and anticipation, allow your Paletas De Yogurt to freeze for at least four hours. Once time has worked its magic, remove the frozen delicacies from their molds and indulge in a symphony of flavors and textures that will transport you to a realm of pure delight.
Notes
You Might Also Like These Recipes!

My name is Lori Walker. I’m a registered dietitian, food blogger and food enthusiast. I share easy healthy, delicious recipes on my blog and review necessary kitchen items. The recipes I share take less… Read more