This post contains affiliate links. As an Amazon Associate I earn from qualifying purchases.
This gluten-free chocolate cake is a delicious and indulgent dessert. Made with simple ingredients and easy-to-follow instructions, this produces a rich and moist cake that is perfect for any occasion.
Whether you have celiac disease, a gluten intolerance, or simply want to avoid wheat in your diet, this cake is the perfect solution for satisfying your dessert cravings without sacrificing flavor or texture.
The best part? It’s completely gluten-free, making it suitable for those with dietary restrictions or anyone looking for a healthier alternative to traditional cakes.
So let’s get started on creating this delectable treat! Let us guide you through each step of the process, from making the pudding filling to assembling and frosting the cake.

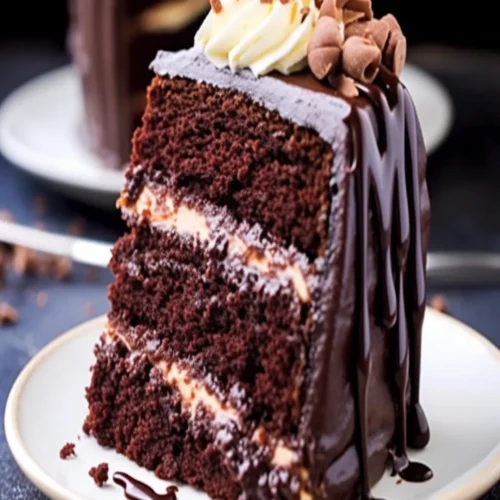
What is Cheesecake Factory Blackout Cake?
The Cheesecake Factory Blackout Cake is a famous dessert from the renowned restaurant chain, The Cheesecake Factory. It is a decadent chocolate cake filled with creamy chocolate pudding and topped with rich chocolate frosting.
This indulgent dessert has become a fan favorite for its intense chocolate flavor and moist texture. What sets this cake apart from other traditional cakes is the added layer of chocolate pudding, which adds a unique and delicious twist to the classic chocolate cake.
And with this gluten-free version, you can enjoy all the goodness of the original recipe without worrying about any dietary restrictions.
Why You’ll Love This Cheesecake Factory Blackout Cake?
There are a few reasons why you’ll love this Cheesecake Factory Blackout Cake. Here are some of the top reasons:
- It’s gluten-free and suitable for those with celiac disease, gluten intolerance, or anyone following a gluten-free diet.
- The combination of chocolate cake, pudding filling, and frosting creates an incredibly rich and indulgent dessert that is perfect for special occasions or as a treat anytime.
- The recipe uses simple ingredients that you likely already have in your pantry, making it easy and convenient to whip up anytime.
- The step-by-step directions make it easy for anyone, even beginners, to follow along and create a delicious dessert.
You’ll also like the following Dessert recipes!
- How to Make Ina Garten Olive Oil Cake
- Stocks Bakery Pound Cake
- Greg Doucette Protein Ice Cream Copycat Recipe
Ingredients
- Boiling water: This will be used to make the pudding for the filling.
- Kosher salt: Just a pinch is needed to balance out the flavors in the pudding.
- Cocoa powder: A combination of Dutch and dark cocoa powder will give the cake a rich chocolate flavor.
- Cold water: This will be mixed with cornstarch to thicken the pudding.
- Chocolate chips: These will add extra richness and depth to the pudding.
- Vanilla extract: This will add a delightful aroma to the pudding.
- Cornstarch: Used as a thickening agent for the pudding.
- Butter or vegan baking stick: This will give the pudding a luscious texture.
- Granulated sugar: Adds sweetness to the pudding filling.
- Gluten-free flour with xanthan gum: This will be used for the cake batter.
- White vinegar: Adds acidity to the cake batter for a fluffy texture.
- Baking soda: Acts as a leavening agent in the cake batter.
- Vegetable oil: Keeps the cake moist and adds richness to the flavor.
- Salt: Enhances the overall taste of the cake.
- Cocoa powder: A combination of Dutch cocoa and dark cocoa adds a deep chocolate flavor to the cake.
- Milk: Provides a creamy base for the cake batter.
- Baking powder: Helps the cake rise and stay fluffy.
- Warm water: Binds all the ingredients together in the cake batter.
- Confectioners’ sugar: Used for the frosting, this adds sweetness and helps achieve a smooth texture.
- Vanilla extract: Adds a delightful aroma to the frosting.
- Butter or vegan baking stick: Gives the frosting a luscious texture.
- Water: Used to achieve the desired consistency in the frosting.
- Cocoa powder: A combination of natural unsweetened and dark cocoa will give the frosting a deep chocolate flavor.

Directions
Step 1
Making the Pudding Filling
- In a small saucepan, pour in 2 cups of boiling water and add a pinch of kosher salt.
- Mix 3 tablespoons of cold water with 4 tablespoons of cornstarch in a separate bowl until fully combined.
- Slowly pour the cornstarch mixture into the boiling water while stirring constantly.
- Add 1 ounce of chocolate chips, 2 tablespoons of cocoa powder (1 tablespoon Dutch and 1 tablespoon dark), and 1 teaspoon of vanilla extract to the saucepan.
- Cook over medium heat until the mixture thickens, stirring occasionally.
- Once thickened, remove from heat and stir in 2 tablespoons of butter or vegan baking stick until fully melted and combined.
- Let the pudding cool to room temperature before using it in the cake.
Step 2
Making the Chocolate Cake Batter
- Preheat your oven to 350°F and grease two 9-inch round baking pans.
- In a large mixing bowl, combine 1.5 cups of gluten-free flour with xanthan gum, 1 tablespoon of white vinegar, and 1.5 teaspoons of baking soda.
- Add 4 tablespoons of vegetable oil, 3/4 teaspoon of salt, and the thick cornstarch mixture (from Step 1) to the bowl and mix well.
- In a separate bowl, whisk together 3/4 cup of cocoa powder (1/2 cup Dutch cocoa and 1/4 cup dark), 1 cup of milk, and 3/4 teaspoon of baking powder.
- Slowly add the wet ingredients to the dry ingredients while mixing until a smooth batter forms.
- Gradually pour in 1 cup of warm water and mix until well combined.
Step 3
Baking the Cake
- Divide the cake batter evenly between the two prepared baking pans.
- Bake for 25-30 minutes or until a toothpick inserted into the center comes out clean.
- Let the cakes cool in the pans for 10 minutes before removing them and placing them on a wire rack to cool completely.
Step 4
Making the Chocolate Frosting
- In a medium mixing bowl, cream together 3 1/2 cups of confectioners’ sugar, 2 teaspoons of vanilla extract, and 3/4 cup of butter or vegan baking stick.
- Gradually add in 1/2 cup of water while mixing until the desired consistency is reached.
- Add in 1 cup of cocoa powder (1/2 cup natural unsweetened and 1/2 cup dark) and mix until the frosting is smooth and fluffy.
Step 5
Assembling the Cake
- Place one of the cooled cakes on a serving platter.
- Spread a layer of the pudding filling over the top of the cake.
- Carefully place the second cake on top of the filling, pressing down gently to secure it in place.
- Frost the top and sides of the cake with the chocolate frosting, using a spatula or knife to create an even layer.
- Optional: Top with additional chocolate chips or sprinkles for decoration.
Step 6
Chilling and Serving
- Place the assembled cake in the refrigerator for at least 1 hour before serving.
- Slice and serve the cake cold, or let it sit at room temperature for a few minutes before slicing and enjoying.
Notes
- For an extra indulgent treat, add a layer of chocolate ganache between the cake layers.
- To make this cake nut-free, use oat milk instead of regular milk and omit the almond extract from the frosting.
- If you don’t need this cake to be gluten-free, you can use regular all-purpose flour instead of gluten-free flour with xanthan gum.
Storage Tips
- Leftover cake can be stored in an airtight container in the refrigerator for up to 3 days.
- To keep the frosting and pudding from getting too hard, let the cake sit at room temperature for about 10 minutes before serving.
- You can also freeze the unfrosted cakes and pudding filling separately for up to 3 months. Thaw in the refrigerator before assembling and serving.

Nutrition Information

Serving Suggestions
- Serve this decadent chocolate cake as a dessert after a delicious dinner.
- Pair it with a cup of coffee or hot chocolate for an indulgent afternoon treat.
- Make it the star of your next celebration by adding festive decorations and toppings.
- Cut into smaller slices and serve as finger food at a party or gathering.
- Enjoy a slice for breakfast with a glass of milk or a cup of tea.
What other substitute can I use in Cheesecake Factory Blackout Cake?
If you want to make this cake even more unique, here are some other substitutes you can use in place of the listed ingredients:
- Instead of vegetable oil, try using coconut oil for a subtle tropical flavor.
- For a healthier option, substitute butter with mashed avocado or unsweetened applesauce.
- To make the cake dairy-free, use almond milk instead of regular milk and omit butter or use a dairy-free alternative.
- For an extra rich and decadent flavor, use dark chocolate instead of semi-sweet chocolate chips in the pudding filling.
- Add some crunch to the cake by sprinkling crushed nuts on top of the frosting or adding chopped nuts to the pudding filling.
Cheesecake Factory Blackout Cake Recipe
Equipment
- Spatula
Ingredients
For the Pudding:
- 2 cups of boiling water piping hot
- A pinch 1/4 teaspoon of kosher salt to balance the flavors
- 2 tablespoons of rich cocoa powder 1 tablespoon Dutch and 1 tablespoon Dark
- 3 tablespoons of cold water to mix with the cornstarch
- 1 ounce of delightful chocolate chips
- 1 teaspoon of pure vanilla extract for that aromatic essence
- 4 level tablespoons of cornstarch for thickness
- 2 tablespoons of unsalted butter or vegan baking stick for richness
- 3/4 cup plus 1 tablespoon of granulated sugar for that sweet touch
For the Cake:
- 1.5 cups of gluten-free flour with xanthan gum
- 1 tablespoon of white vinegar for acidity
- 1.5 teaspoons of baking soda for leavening
- 4 tablespoons of vegetable oil for moisture
- 3/4 teaspoon of salt to enhance the taste
- 4 heaping tablespoons of cornstarch mixed with 6 tablespoons of water for a thick batter
- 3/4 cup of cocoa powder 1/2 cup Dutch cocoa and 1/4 cup dark for a rich chocolatey flavor
- 1 cup of milk for a creamy base
- 3/4 teaspoon of baking powder for a fluffy texture
- 1 cup of warm water to bind the ingredients
- 1.5 cups of granulated sugar for sweetness
- 1 teaspoon of pure vanilla extract to add a delightful aroma
For the Frosting:
- 3 1/2 cups of confectioners’ sugar for that perfect sweetness
- 2 teaspoons of pure vanilla extract for a delightful scent
- 3/4 cup of unsalted butter or vegan baking stick for a luscious texture
- 1/2 cup of water at room temperature to achieve the desired consistency
- 1 cup of cocoa powder 1/2 cup natural unsweetened or Dutch and 1/2 cup dark for a deep chocolate flavor.
Instructions
- Start by heating 2 cups of water in a small saucepan until it reaches boiling point. Add just a pinch of kosher salt to the boiling water for flavor balance. In a separate bowl, thoroughly mix 4 tablespoons of cornstarch with 3 tablespoons of cold water. Gradually pour the cornstarch mixture into the boiling water while constantly stirring to prevent lumps from forming. Incorporate 1 ounce of chocolate chips, 2 tablespoons of cocoa powder (a combination of Dutch and dark), and a teaspoon of vanilla extract into the saucepan. Cook the mixture over medium heat, stirring occasionally until it thickens.
- While your pudding cools down to room temperature, preheat the oven to 350°F and grease two 9-inch baking pans. Begin making the cake batter by combining 1.5 cups of gluten-free flour with xanthan gum, 1 tablespoon of white vinegar, and 1.5 teaspoons of baking soda in a large mixing bowl. Add in 4 tablespoons of vegetable oil, a pinch of salt, and the cooled pudding mixture from Step 1. Mix all the ingredients well until a smooth batter forms.
- In a separate bowl, whisk together ¾ cup of cocoa powder (a combination of Dutch and dark), 1 cup of milk, and ¾ teaspoon of baking powder. Slowly pour the wet ingredients into the dry ingredients while continuously mixing to avoid any lumps. Gradually add 1 cup of warm water and mix until well combined.
- Divide the batter equally between the two greased baking pans and bake for 25-30 minutes or until a toothpick inserted into the center comes out clean. Let the cakes cool in the pans for 10 minutes before transferring them onto a wire rack to cool completely.
- In a medium mixing bowl, cream together 3 ½ cups of confectioners’ sugar, 2 teaspoons of vanilla extract, and ¾ cup of butter or vegan baking stick. Slowly add in half a cup of water while continually mixing until the frosting reaches your desired consistency. Incorporate 1 cup of cocoa powder (a combination of natural unsweetened and dark) into the frosting, mixing until smooth and fluffy.
- Assemble your cake by placing one cooled cake on a serving platter. Spread a layer of the chocolate pudding filling over the top of the cake before gently placing the second cake on top. Frost the top and sides of the cake with the chocolate frosting, using a spatula or knife to create an even layer. For an added touch, decorate the top of the cake with chocolate chips or sprinkles. Chill in the refrigerator for at least 1 hour before slicing and serving cold, or let it sit at room temperature for a few minutes before enjoying.
Notes
- For an extra indulgent treat, add a layer of chocolate ganache between the cake layers.
- To make this cake nut-free, use oat milk instead of regular milk and omit the almond extract from the frosting.
- If you don’t need this cake to be gluten-free, you can use regular all-purpose flour instead of gluten-free flour with xanthan gum.
FAQs
Can I make this cake in advance?
Absolutely! You can make the pudding filling and cakes up to 2 days in advance and store them separately in the refrigerator. Assemble the cake and frost it on the day you plan to serve it.
Can I use regular flour instead of gluten-free flour?
Yes, you can! Just omit the xanthan gum and use the same amount of regular all-purpose flour.
Can I add different flavors to the pudding filling?
Definitely! You can experiment with different extracts, such as almond or peppermint, or add in some instant coffee for a mocha flavor.
Can I make this cake vegan?
Yes, you can easily make this cake vegan by using plant-based milk and butter in the recipe.
Can I use a different type of cocoa powder?
Yes, you can use any combination of cocoa powders that you prefer or have on hand. Just make sure to adjust the amount used accordingly for the desired flavor. For example, if using all dark cocoa powder, you may want to reduce the amount slightly for a less intense chocolate flavor.
Conclusion
In this article, we used a combination of pantry staples and specialty ingredients to create a delicious gluten-free vegan chocolate cake. The key is to use high-quality cocoa powder for a rich and deep chocolate flavor.
Whether you have dietary restrictions or simply want to try something new, this cake is sure to satisfy your sweet tooth. Give it a try and impress your friends and family with this indulgent chocolate dessert.
Thank you for reading this article, we hope you enjoy making and eating this delicious Blackout Cake! Please share this article with others who may be interested in trying this.
You’ll also like the latest recipes!
- Cheesecake Factory Stuffed Mushrooms Copycat Recipe
- How to Make Tropical Smoothie Watermelon Mojito Recipe
- Cheesecake Factory Chinese Chicken Salad

Dr. Leah Alexander, M.D., is a board-certified Pediatrician in New Jersey and has been working at Elizabeth Pediatric Group of New Jersey since 2000.
She also has a passion for culinary arts that extends beyond the medical realm. After completing culinary school at the French Culinary Institute, she started Global Palate, LLC, a catering firm, in 2007. She ran her own six-year-old catering company and served small group parties as an owner and executive chef.