This post contains affiliate links. As an Amazon Associate I earn from qualifying purchases.
There’s something deeply satisfying about pulling perfectly tender ribs straight from a slow cooker. These beauties pair beautifully with simple sides like Corn Casserole or refreshing my favorite salad for a balanced meal that feels restaurant-quality but tastes like home.
The Story Behind My Favorite Slow Cooker Ribs
I’ll never forget the summer my dad attempted ribs on our old backyard grill—it was 98 degrees, the charcoal wouldn’t cooperate, and he stood there sweating through his shirt for three hours. That evening, my mom quietly pulled out her slow cooker at 7 AM the next day, and by dinner time, we had the most fall-apart-tender ribs I’d ever tasted. No stress, no standing outside in the heat, just pure rib perfection.
That moment changed everything for me. I realized that the most forgiving, foolproof way to cook ribs wasn’t about fancy equipment or complicated techniques—it was about working smarter, not harder. When I started recording family recipes in 2019, this slow cooker method was one of the first I documented. Since then, I’ve tested it countless times on standard home equipment, and it never disappoints.
What is Slow Cooker Ribs?
Slow cooker ribs are baby back ribs that are cooked low and slow in a crockpot until they reach that magical point where the meat pulls cleanly from the bone with just a fork. Unlike grilled ribs that rely on high heat and smoke, this method uses gentle, consistent moisture and heat to break down the connective tissue and create incredibly tender meat.
This cooking technique became popular in home kitchens because it’s remarkably forgiving. Whether you’re cooking on high for 4 hours or low for 8 hours, you’re letting the slow cooker do the heavy lifting while you go about your day. Then, at the end, a quick broil with a homemade sauce gives you that beautiful caramelized exterior everyone craves.
The beauty of this method is that it works equally well for a weeknight family dinner or feeding a crowd at a backyard gathering. I’ve made these ribs for potlucks, Sunday dinners, and even meal prep sessions, and the results are consistently excellent.
Why You’ll Love This Slow Cooker Ribs Recipe
- Hands-Off Cooking – You prep the ribs in the morning, set the slow cooker, and go about your day. No standing over a grill, no constant temperature monitoring, no stress.
- Guaranteed Tenderness – The slow, moist heat breaks down collagen in the ribs perfectly, giving you fall-apart meat every single time. Even if you’ve never cooked ribs before, you’ll succeed.
- Flexible Timing – Cooking on high for 4 hours or low for 8 hours? Both work beautifully. Choose based on your schedule, not your ribs’ demands.
- Customizable Flavor – The base cooking method stays the same, but you can swap the sauce to match your mood—spicy, smoky, sweet, or tangy.
- Budget-Friendly – Baby back ribs are usually affordable, especially on sale, and this recipe maximizes their potential without expensive ingredients or equipment.
- Perfect for Meal Prep – Make a batch, refrigerate, and reheat throughout the week. The ribs actually taste better the next day as flavors settle.
The Ingredients
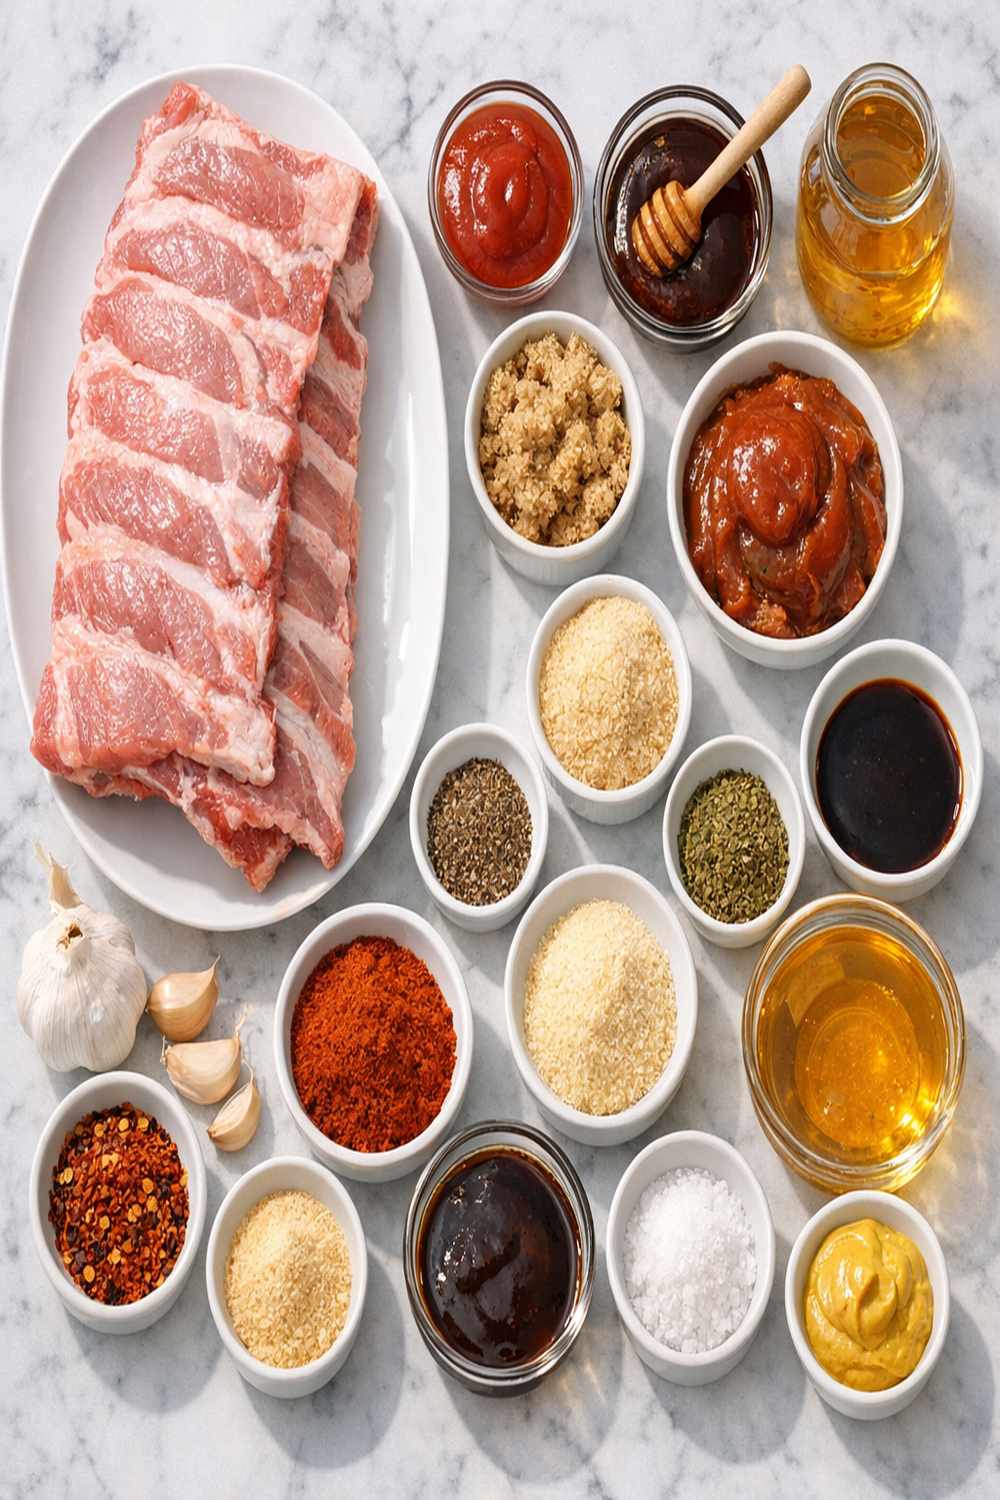
This recipe uses simple, kitchen-staple ingredients that work together to create incredible depth of flavor. I’ve organized them below so you can see exactly what you’re working with. Makes 4 generous servings.
- ¼ cup tomato ketchup (adds depth and slight sweetness)
- 2 racks baby back ribs (about 3 to 4 pounds total, which is typically two full racks)
- ½ cup barbecue sauce of your choice (your favorite brand works perfectly here)
- 2 to 3 tablespoons homemade rib rub or store-bought seasoning blend
- ½ cup filtered water or low-sodium broth (helps prevent sticking)
- 1 medium yellow onion (peeled and sliced into rings)
- 4 cloves fresh garlic (minced or sliced)
- ½ cup chili sauce (creates the sauce base with complexity)
- 1 tablespoon apple cider vinegar (brightens the final sauce)
- 1 teaspoon smoked paprika (optional but recommended for extra depth)
About the Rib Rub
If you’re using store-bought rib rub, you’re already set! But I love making my own because I control the salt level and can adjust spices to my preference. A basic homemade rub combines brown sugar, paprika, garlic powder, onion powder, black pepper, salt, cayenne pepper, and a pinch of cinnamon. Mix about 3 tablespoons total and you’re ready to season those ribs.
How to Make Slow Cooker Ribs?
This recipe is straightforward, which is exactly why it works so well. Follow these steps and you’ll have restaurant-quality ribs with minimal effort. The entire active prep time is about 10 minutes.
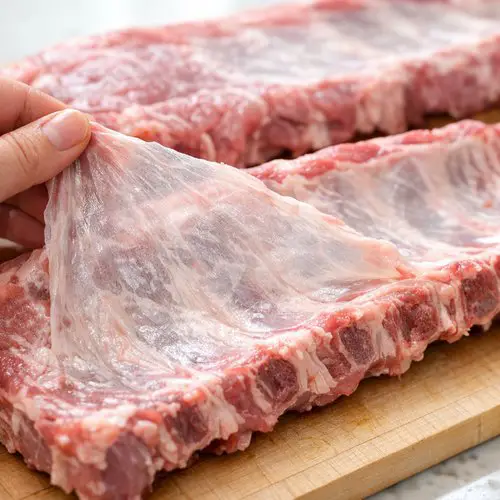
Step 1: Prepare Your Ribs
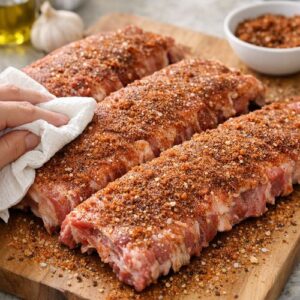
Remove your ribs from the refrigerator and place them on a clean cutting board. Look at the back of each rack—you’ll see a thin, papery silver membrane running along the underside. This membrane doesn’t soften during cooking, so I always remove it first.
Use a small sharp knife to slide under one corner of the membrane, then grip it with a paper towel and pull it away from the bone. It should come off in one piece. If it tears, just keep peeling. Don’t skip this step—removing the membrane ensures even seasoning penetration and better texture throughout.
Step 2: Season the Ribs
Pat your ribs dry with paper towels. This helps the spice rub stick better and creates better browning later. Sprinkle your rib rub generously over both sides of each rack, really working it into the meat with your fingers.
Don’t be shy with the seasoning—it adds incredible flavor that doesn’t intensify much during the long, moist cooking process. I press the rub gently into the meat so it adheres properly. Let the seasoned ribs sit for 5 minutes while you prepare your slow cooker.

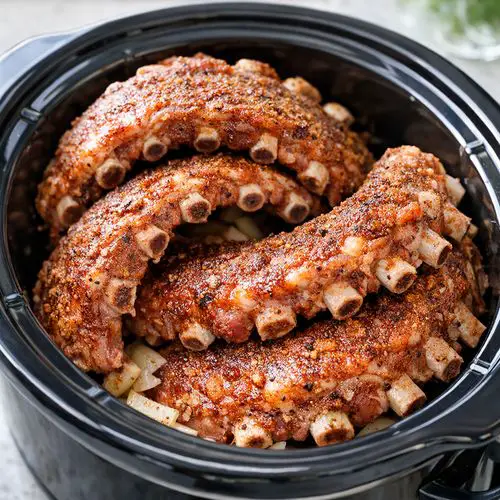
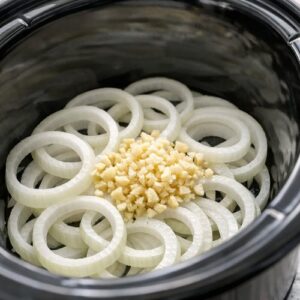
Step 3: Build Your Slow Cooker Base
Slice your onion into rings and mince your garlic. Layer the onion slices on the bottom of your slow cooker—these create a natural rack that keeps the ribs from sitting directly on the hot surface. Scatter the minced garlic over the onions.
Pour the water around the onions and garlic. This liquid becomes the steaming base that keeps everything moist and creates the gentle cooking environment that makes ribs so tender. The onions and garlic infuse the ribs with subtle flavor as everything cooks together.

Step 4: Add the Ribs to the Slow Cooker
Carefully curl each rack to fit into your slow cooker, laying them curved-side down over the onion base. They may stack slightly, and that’s perfectly fine. The ribs will shrink slightly as they cook, so don’t worry if they seem snug at first.
The onions and garlic underneath will help them cook evenly, and the water creates steam that circulates around the meat. You’re not boiling these ribs—you’re gently steaming them in a closed environment, which is why they turn out so tender.
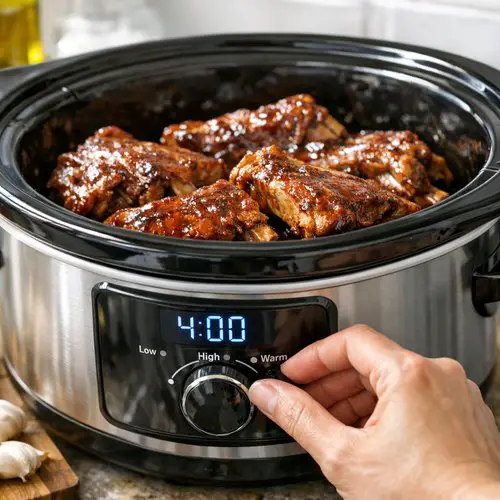
Step 5: Choose Your Cooking Time and Temperature
This is where flexibility becomes your best friend. If you’re setting these up in the morning for dinner, use the high setting for 4 hours. If you prefer a slower cook, use low heat for 8 hours. Both methods produce equally tender ribs.
I usually cook on high for 4 hours because it fits my schedule better, but I’ve made these on low overnight for special brunches, and the results are stunning. Cover your slow cooker and walk away. Resist the urge to peek—every time you lift the lid, you add 15-20 minutes to the cooking time.
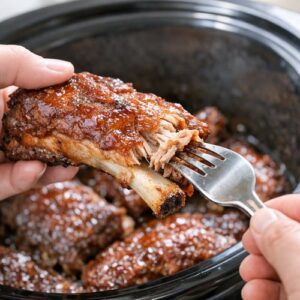
Step 6: Check for Doneness
After your cooking time is complete, carefully remove one rib and test it with a fork. The meat should pull cleanly from the bone with no resistance—this is what I call fork-tender. If there’s still slight resistance, give it another 30 minutes on high and check again.
The meat should look slightly shredded at the surface, and when you pierce it with a fork, it should practically fall apart. This texture is your signal that the collagen has broken down completely and the ribs are ready for their finishing sauce.

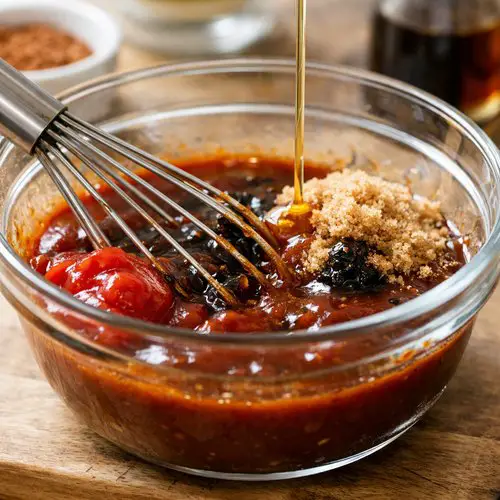
Step 7: Prepare Your Finishing Sauce
While your ribs are in their final minutes of cooking, prepare your broiler by positioning the rack about 4-5 inches from the heating element. In a small bowl, whisk together the tomato ketchup, chili sauce, and barbecue sauce until completely smooth.
Stir in the apple cider vinegar and smoked paprika if using. This combination creates a balanced sauce—the ketchup adds body, the chili sauce brings depth, the barbecue sauce provides familiar sweetness, and the vinegar brightens everything up. Taste and adjust if needed—this is your flavor, so make it your own.
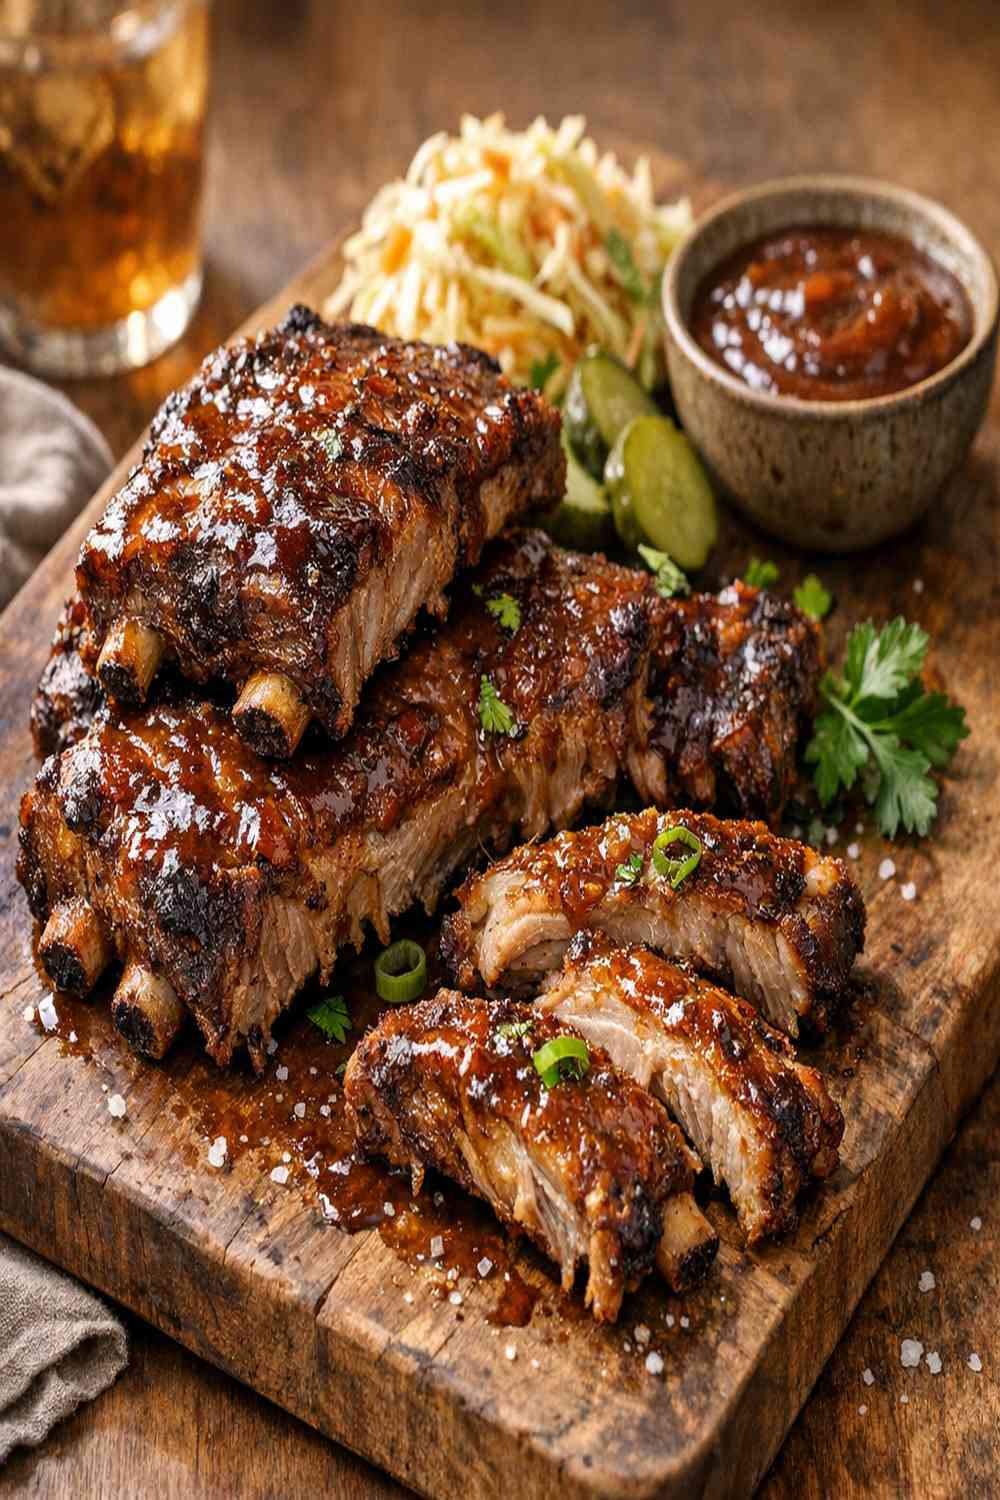
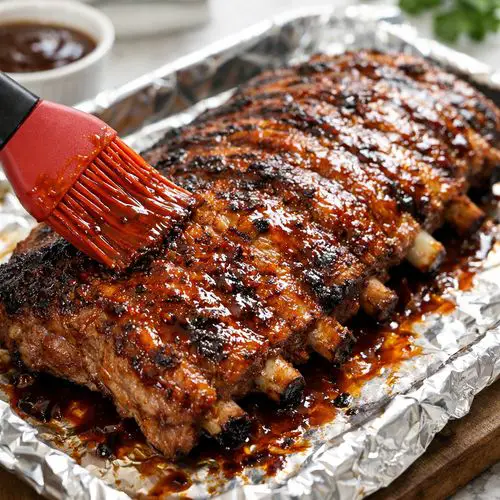
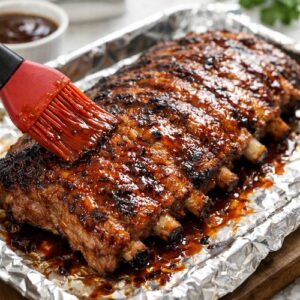
Step 8: Broil the Ribs Until Caramelized
Carefully remove the ribs from your slow cooker and place them on a foil-lined baking sheet. Brush both sides generously with your sauce mixture. You want an even coating that will caramelize beautifully under the broiler.
Place under your preheated broiler for 3-5 minutes, watching carefully. You’re looking for the sauce to bubble slightly and darken at the edges—not burn, but deeply caramelized. If you prefer, you can grill these ribs instead, which gives you a slightly different texture and smoky flavor.
Remove from the broiler and let rest for 2-3 minutes before serving. The ribs will be extremely hot, and this brief rest allows the meat to firm up just slightly, making them easier to cut and serve.
Expert’s Nutritional Tip
As a registered dietitian, I want to highlight why slow-cooked ribs are actually nutritionally interesting. The long, moist cooking process doesn’t strip nutrients the way high-heat grilling sometimes does. Baby back ribs are rich in B vitamins, particularly B12 and niacin, plus iron and zinc—minerals that are crucial for energy and immune function.
The gelatin that renders from the bones during slow cooking actually adds collagen to your sauce, which supports joint and gut health. If you’re concerned about fat content, simply skim any visible fat from the slow cooker liquid before broiling. The ribs remain delicious and you’ve reduced calories slightly.
Tips and Tricks
- Don’t Skip the Membrane – I know I mentioned this, but it’s so important. That papery layer underneath the ribs won’t soften no matter how long you cook, and it blocks seasoning from penetrating properly. Spend 30 seconds removing it and your ribs will be noticeably better.
- Pat the Ribs Dry Before Seasoning – Moisture prevents the rub from adhering properly. Paper towels are your friend here, and the extra 30 seconds makes a huge difference in flavor distribution.
- Use the Onion-Garlic Base – Don’t skip the onion and garlic layer. They create a natural steaming rack and infuse subtle flavor throughout. Plus, you can save this liquid for soups or stews if you’re meal planning.
- Broil Right Before Serving – The ribs are fully cooked after the slow cooker step, so the broiling is purely for that caramelized exterior. Do this right before you serve to keep the sauce sticky and beautiful.
- Invest in Good Kitchen Shears – A pair of sturdy kitchen shears makes serving ribs so much easier than a knife. You can snip between the bones and create beautiful individual portions that look restaurant-quality.
- Save Your Cooking Liquid – The broth left in the slow cooker is liquid gold for soups, gravies, or even freezing for future rib batches. Skim off any excess fat and refrigerate in glass containers.
- Let Sauce Cool Before Storing – If you make extra sauce, let it cool completely before refrigerating. This prevents condensation and keeps the texture smooth.
Make-Ahead Guide for Slow Cooker Ribs
One of my favorite things about this recipe is how beautifully it fits into a meal prep routine. Here’s my detailed make-ahead strategy:
The Day Before
Remove the silver membrane from your ribs and pat them dry completely. Prepare your rib rub and store it in an airtight container. Slice your onion and mince your garlic, storing them separately in the refrigerator in sealed containers. You can do all of this the night before, and everything keeps perfectly for 24 hours.
Morning of Serving
Season your ribs with the rub, layer your onion and garlic in the slow cooker with water, add the ribs, and turn it on. That’s it. You’ve spent 5 minutes total and dinner is handled.
Leftovers and Storage
Slow cooker ribs keep beautifully in the refrigerator for up to 4 days. Store them in an airtight container with the cooking liquid, which keeps them from drying out. Reheat gently in a 325-degree oven for about 15 minutes, then broil with fresh sauce if you want that caramelized finish again.
You can also freeze cooked ribs for up to 3 months. Wrap them well in plastic wrap and then foil, or store in a freezer-safe container. Thaw overnight in the refrigerator before reheating.
Common Mistakes to Avoid
- Cooking Them Too Long – Yes, slow cookers are forgiving, but there is a point where ribs become mushy. After 8 hours on low, check for doneness. If you’re past that point, move the ribs to a serving platter and consider the cooking complete. Over-cooked meat loses its structure and becomes paste-like rather than tender.
- Adding Too Much Liquid – I recommend ½ cup water, and that’s plenty. Too much liquid creates a boiling effect rather than steaming, which can make meat tough rather than tender. The onions already add moisture, so resist the urge to add more.
- Seasoning Them Too Lightly – This is the opposite mistake, but it’s common. People worry about over-seasoning and end up with bland ribs. Remember, the seasoning is going into raw meat, and the long cooking process doesn’t intensify flavors the way high heat does. Be generous with your rub.
- Forgetting the Membrane – I keep mentioning this because I’ve seen people cook beautiful ribs only to bite into them and hit that rubbery layer. It takes 30 seconds to remove. Do it.
Seasonal Variations
I love adapting this recipe throughout the year. Here are my favorite seasonal twists:
Spring and Summer
Add fresh herbs to your base. A few sprigs of fresh rosemary or thyme tucked under the ribs add brightness. For your sauce, swap in a mustard-based barbecue sauce and add fresh lemon juice instead of vinegar.
Fall and Winter
This is when I boost the warm spices. Add ½ teaspoon cinnamon and ¼ teaspoon cloves to your rub. Switch to a darker barbecue sauce, and consider adding a tablespoon of molasses to your finishing sauce for deeper, richer flavor that feels cozy and seasonal.
Can I Store Slow Cooker Ribs?
Absolutely, and they’re one of my favorite things to have on hand for quick meals throughout the week. Store cooked ribs in an airtight container with up to 4 days in the refrigerator. The cooking liquid keeps them moist, so include some when you store them.
To reheat, place ribs in a 325-degree oven for about 15 minutes, or until warmed through. If you want that caramelized exterior again, brush with fresh sauce and broil for 2-3 minutes right before serving.
For longer storage, freeze cooked ribs in a freezer-safe container or wrapped well in plastic wrap and foil for up to 3 months. Thaw overnight in the refrigerator, then reheat using the method above. The texture remains excellent because the slow cooking process already broke down all the connective tissue.
You can also freeze the raw ribs after seasoning them. Wrap individually and freeze for up to 2 months. When you’re ready to cook, there’s no need to thaw—just add them straight to your slow cooker and add 1-2 hours to the cooking time.
Nutrition Information
Based on USDA nutrition data, each serving of slow cooker ribs (approximately 4 ounces of cooked meat with sauce) contains roughly 350-380 calories, 28-32 grams of protein, 22-25 grams of fat, and 8-10 grams of carbohydrates (mostly from the sauce).
Baby back ribs are an excellent source of B vitamins, particularly B12 and niacin, plus iron, zinc, and selenium. The slow cooking process preserves these nutrients better than high-heat methods. If you’re watching sodium, the sauce adds about 500-600mg per serving, so you might rinse the ribs briefly before broiling or make your own lower-sodium sauce.
For those following specific diets, these ribs are naturally gluten-free if you use certified gluten-free barbecue sauce and chili sauce. They’re also keto-friendly if you skip the broiling step and the carb-heavy sauce, though you’d lose that delicious caramelized finish.
What Can I Serve With Slow Cooker Ribs?
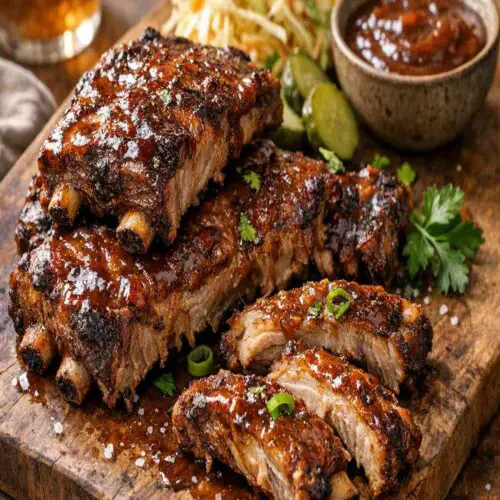
Slow cooker ribs are wonderfully versatile and pair beautifully with both classic and creative sides. Think comforting, summery, and satisfying. A fresh Peanut Soba Noodle Salad brings lightness and crunch, while a hearty Corn Casserole adds richness and warmth. For soup-based sides, consider pairing with Jalapeno Corn Chowder Recipe for a complete comfort meal.
- Classic Coleslaw – The crisp, tangy crunch balances the rich, tender ribs perfectly. Make it creamy or vinegar-based depending on your mood.
- Baked Beans – A Southern classic that feels like it was made for ribs. Slow-baked beans in a sweet, tangy sauce are the ultimate comfort pairing.
- Cornbread – Buttery, slightly sweet cornbread is perfect for soaking up any extra sauce. Serve warm with honey butter.
- Roasted Vegetables – Summer squash, bell peppers, and zucchini roasted with olive oil and herbs add freshness and balance the richness of the ribs.
- Garlic Mashed Potatoes – Creamy, buttery potatoes are an indulgent pairing that makes this feel like a special occasion meal.
- Grilled Corn on the Cob – Fresh corn brushed with herb butter and grilled brings summer brightness to your plate.
- Green Salad with Vinaigrette – A simple, crisp salad with a sharp vinaigrette cuts through the richness beautifully.
- Pickled Vegetables – Homemade or store-bought pickles and pickled onions add brightness and aid digestion alongside the rich meat.
Substitutes
- St. Louis Style Ribs Instead of Baby Back – St. Louis ribs are fattier and slightly larger. They’ll need the same cooking time but will yield a bit more meat and a richer flavor. The cooking method stays identical.
- Beef Short Ribs – If you love beef, substitute short ribs for baby back. They’re larger and meatier, so expect them to take up more space in your slow cooker. The cooking time remains the same, and the flavor is deeper and more savory.
- Pork Shoulder Instead – Not technically ribs, but if you want that fall-apart tender slow cooker result, a pork shoulder works beautifully. Increase cooking time to 6 hours on high or 10 hours on low.
- Homemade Sauce Blend – Instead of the ketchup-chili sauce-barbecue sauce combination, you can make your own from scratch using tomato sauce, apple cider vinegar, brown sugar, Worcestershire sauce, mustard, and your favorite spices. The result is more customized and often less processed.
- Honey Instead of Brown Sugar in Rub – If you’re out of brown sugar, brush honey onto your ribs before the rub application. It helps the seasonings stick and adds a subtle sweetness that caramelizes beautifully.
- Lower-Sodium Broth Instead of Water – For extra flavor, use low-sodium chicken or beef broth instead of water as your cooking liquid. It adds depth and makes an even more flavorful sauce.
Crockpot Ribs Recipe
Ingredients
- ¼ cup tomato ketchup adds depth and slight sweetness
- 2 racks baby back ribs about 3 to 4 pounds total, which is typically two full racks
- ½ cup barbecue sauce of your choice your favorite brand works perfectly here
- 2 to 3 tablespoons homemade rib rub or store-bought seasoning blend
- ½ cup filtered water or low-sodium broth helps prevent sticking
- 1 medium yellow onion peeled and sliced into rings
- 4 clove fresh garlic minced or sliced
- ½ cup chili sauce creates the sauce base with complexity
- 1 tablespoon apple cider vinegar brightens the final sauce
- 1 teaspoon smoked paprika optional but recommended for extra depth
Instructions
Step 1: Prepare Your Ribs
- Remove your ribs from the refrigerator and place them on a clean cutting board. Look at the back of each rack—you'll see a thin, papery silver membrane running along the underside. This membrane doesn't soften during cooking, so I always remove it first. Use a small sharp knife to slide under one corner of the membrane, then grip it with a paper towel and pull it away from the bone. It should come off in one piece. If it tears, just keep peeling. Don't skip this step—removing the membrane ensures even seasoning penetration and better texture throughout.

Step 2: Season the Ribs
- Pat your ribs dry with paper towels. This helps the spice rub stick better and creates better browning later. Sprinkle your rib rub generously over both sides of each rack, really working it into the meat with your fingers. Don't be shy with the seasoning—it adds incredible flavor that doesn't intensify much during the long, moist cooking process. I press the rub gently into the meat so it adheres properly. Let the seasoned ribs sit for 5 minutes while you prepare your slow cooker.
Step 3: Build Your Slow Cooker Base
- Slice your onion into rings and mince your garlic. Layer the onion slices on the bottom of your slow cooker—these create a natural rack that keeps the ribs from sitting directly on the hot surface. Scatter the minced garlic over the onions. Pour the water around the onions and garlic. This liquid becomes the steaming base that keeps everything moist and creates the gentle cooking environment that makes ribs so tender. The onions and garlic infuse the ribs with subtle flavor as everything cooks together.
Step 4: Add the Ribs to the Slow Cooker
- Carefully curl each rack to fit into your slow cooker, laying them curved-side down over the onion base. They may stack slightly, and that's perfectly fine. The ribs will shrink slightly as they cook, so don't worry if they seem snug at first. The onions and garlic underneath will help them cook evenly, and the water creates steam that circulates around the meat. You're not boiling these ribs—you're gently steaming them in a closed environment, which is why they turn out so tender.

Step 5: Choose Your Cooking Time and Temperature
- This is where flexibility becomes your best friend. If you're setting these up in the morning for dinner, use the high setting for 4 hours. If you prefer a slower cook, use low heat for 8 hours. Both methods produce equally tender ribs. I usually cook on high for 4 hours because it fits my schedule better, but I've made these on low overnight for special brunches, and the results are stunning. Cover your slow cooker and walk away. Resist the urge to peek—every time you lift the lid, you add 15-20 minutes to the cooking time.

Step 6: Check for Doneness
- After your cooking time is complete, carefully remove one rib and test it with a fork. The meat should pull cleanly from the bone with no resistance—this is what I call fork-tender. If there's still slight resistance, give it another 30 minutes on high and check again. The meat should look slightly shredded at the surface, and when you pierce it with a fork, it should practically fall apart. This texture is your signal that the collagen has broken down completely and the ribs are ready for their finishing sauce.
Step 7: Prepare Your Finishing Sauce
- While your ribs are in their final minutes of cooking, prepare your broiler by positioning the rack about 4-5 inches from the heating element. In a small bowl, whisk together the tomato ketchup, chili sauce, and barbecue sauce until completely smooth. Stir in the apple cider vinegar and smoked paprika if using. This combination creates a balanced sauce—the ketchup adds body, the chili sauce brings depth, the barbecue sauce provides familiar sweetness, and the vinegar brightens everything up. Taste and adjust if needed—this is your flavor, so make it your own.

Step 8: Broil the Ribs Until Caramelized
- Carefully remove the ribs from your slow cooker and place them on a foil-lined baking sheet. Brush both sides generously with your sauce mixture. You want an even coating that will caramelize beautifully under the broiler. Place under your preheated broiler for 3-5 minutes, watching carefully. You're looking for the sauce to bubble slightly and darken at the edges—not burn, but deeply caramelized. If you prefer, you can grill these ribs instead, which gives you a slightly different texture and smoky flavor. Remove from the broiler and let rest for 2-3 minutes before serving. The ribs will be extremely hot, and this brief rest allows the meat to firm up just slightly, making them easier to cut and serve.
Notes
FAQs
Can I Cook These Ribs Frozen?
Yes, you can cook ribs straight from the freezer, but I don’t recommend it. Frozen ribs take significantly longer to cook—usually 2 hours longer on high or 4 hours longer on low—and the seasoning doesn’t penetrate as effectively. Thaw them overnight in the refrigerator first for best results. The texture will be noticeably better, and your timing will be predictable.
Why Are My Ribs Mushy?
This happens when ribs cook too long. After 8 hours on low or 4 hours on high, ribs should be perfectly tender—not mushy. If they’ve overcooked, the connective tissue completely dissolves and the meat loses structure. Next time, check at the 3.5-hour mark on high cooking to gauge progress. Every slow cooker runs slightly differently, so you might need to adjust your timing.
Can I Cook These Ribs on a Grill Instead of Broiling?
Absolutely! After removing them from the slow cooker, brush with sauce and grill over medium heat for 3-5 minutes per side. You’ll get beautiful grill marks and a slightly smokier flavor. Keep the heat moderate so the sauce doesn’t burn before the ribs heat through. This is my preferred method in summer.
How Do I Know When the Ribs Are Done?
The most reliable test is the fork-tender method. Pierce the meat with a fork—if it shreds easily with no resistance, the ribs are done. Another visual sign is that the meat will have pulled back from the bones slightly, and the surface will look slightly shredded. You shouldn’t need a knife; a gentle fork should do all the work.
Can I Make the Sauce Ahead of Time?
Yes! Mix your ketchup, chili sauce, and barbecue sauce in a bowl, cover, and refrigerate for up to 1 week. The flavors actually meld beautifully as it sits, so the sauce tastes even better the next day. Just give it a good stir before using, and add the vinegar fresh right before broiling to preserve that bright flavor.
What If My Slow Cooker Is Very Large?
If your slow cooker is a 6-7 quart model, the ribs might cook faster because there’s more surface area exposed to heat. Start checking for doneness at 3 hours on high instead of 4. You can always cook longer, but you can’t undo overdone ribs. It’s better to check early and adjust.
Can I Double This Recipe?
Doubling the ribs in a large slow cooker works fine, but don’t double the liquid. The extra ribs will release their own moisture, and too much liquid creates a boiling effect. Use the same ½ cup water and adjust cooking time slightly—perhaps 30 minutes longer to ensure everything is uniformly tender.
More Recipes You’ll Love
- Whataburger Honey BBQ Sauce Recipe – A delicious homemade sauce that’s perfect for ribs, chicken, and grilled vegetables, with that signature honey-sweetness that makes everything better
- Whataburger Sweet Tea Recipe – The perfect refreshing beverage to serve alongside ribs on a warm day, with that signature smooth sweetness
- 5 Minute Magic Green Sauce – A bright, herbaceous condiment that cuts through the richness of ribs beautifully
- this cozy soup – A comforting make-ahead side that pairs wonderfully with ribs for cool evening meals
- This Homemade Flank Recipe – Worth adding to your recipe collection.
- My Favorite Ground Dish – Worth adding to your recipe collection.
- This Flavorful Chicken Dish – Worth adding to your recipe collection.
I hope you make these slow cooker ribs soon and discover what my family learned that hot summer day—sometimes the most impressive meals come from the simplest methods. There’s real joy in pulling a perfectly cooked rack of ribs from a slow cooker, knowing you barely lifted a finger all day. Your family will ask for this again and again, and you’ll feel like a kitchen genius every time. Good food is a good mood!
- Tony Roma Ribs Recipe
- Traditional German Pork Ribs and Sauerkraut
- Costco Boneless Short Ribs Recipe
- Macaroni And Hamburger Recipe

My name is Lori Walker. I’m a registered dietitian, food blogger and food enthusiast. I share easy healthy, delicious recipes on my blog and review necessary kitchen items. The recipes I share take less… Read more