This post contains affiliate links. As an Amazon Associate I earn from qualifying purchases.
There’s something magical about biting into a perfectly crispy taco—that satisfying crunch followed by warm, seasoned beef and melted cheese. I’m sharing my go-to crunchy tacos recipe that delivers restaurant-quality results in your own kitchen. Pair these with a fresh my favorite salad for a complete meal, or serve them alongside Korean Asparagus for a fun fusion dinner night.
The Story Behind My Favorite Taco Night
I’ll never forget the Tuesday my teenage daughter asked if we could make “real tacos” instead of the soft ones we usually prepared. That simple request sparked something in me—a determination to master the technique of creating that crispy shell she craved. I spent the next few weeks testing different methods: pan-frying, deep-frying, even air-frying. What I discovered was that baking these tacos gave us consistent, golden-brown crispiness without the mess or excess oil.
Now, every time I make these, I’m reminded that sometimes the best recipes come from listening to what our families actually want. That first batch of baked crunchy tacos became our new tradition, and I’ve been refining this recipe ever since.
 ” alt=”Golden crispy crunchy tacos fresh from the oven”>
What is a Crunchy Tacos Recipe?
Crunchy tacos are a beloved variation of the classic Mexican taco, featuring a corn tortilla that’s been folded and baked or fried until it achieves that signature crispy texture. Unlike soft flour tortillas, the corn shell provides structural integrity and a satisfying crunch that pairs beautifully with tender, seasoned filling.
What makes my version special is the baking method. Instead of deep-frying (which can be intimidating and messy), I fold seasoned beef into corn tortillas, brush them lightly with oil, and bake them until they’re golden and crispy. The result? Perfectly crunchy tacos with significantly less oil, making them feel lighter while maintaining that irresistible texture.
The beef filling comes alive with fresh garlic, lime juice, roasted green chiles, and warm taco spices. Then I top everything with a quick homemade chipotle crema—a smoky, creamy sauce that takes these tacos from good to absolutely unforgettable.
Why You’ll Love This Crunchy Tacos Recipe
- Ready in under 30 minutes – From ingredient prep to serving, this entire recipe comes together quickly enough for weeknight dinners without sacrificing quality or flavor.
- Baked, not fried – You’ll get that satisfying crunch using your oven, which means less oil, easier cleanup, and more control over the final result.
- Customizable toppings – Build your perfect taco with whatever fresh ingredients you love, from pickled onions to creamy guacamole.
- Naturally gluten-free – Made with corn tortillas, these tacos work beautifully for anyone avoiding gluten while tasting absolutely delicious for everyone else.
- Budget-friendly – Ground beef is affordable, seasoning packets are inexpensive, and you likely have most toppings on hand already.
- Stress-free cooking – This recipe uses standard kitchen equipment and straightforward techniques that build your confidence in the kitchen.
The Ingredients
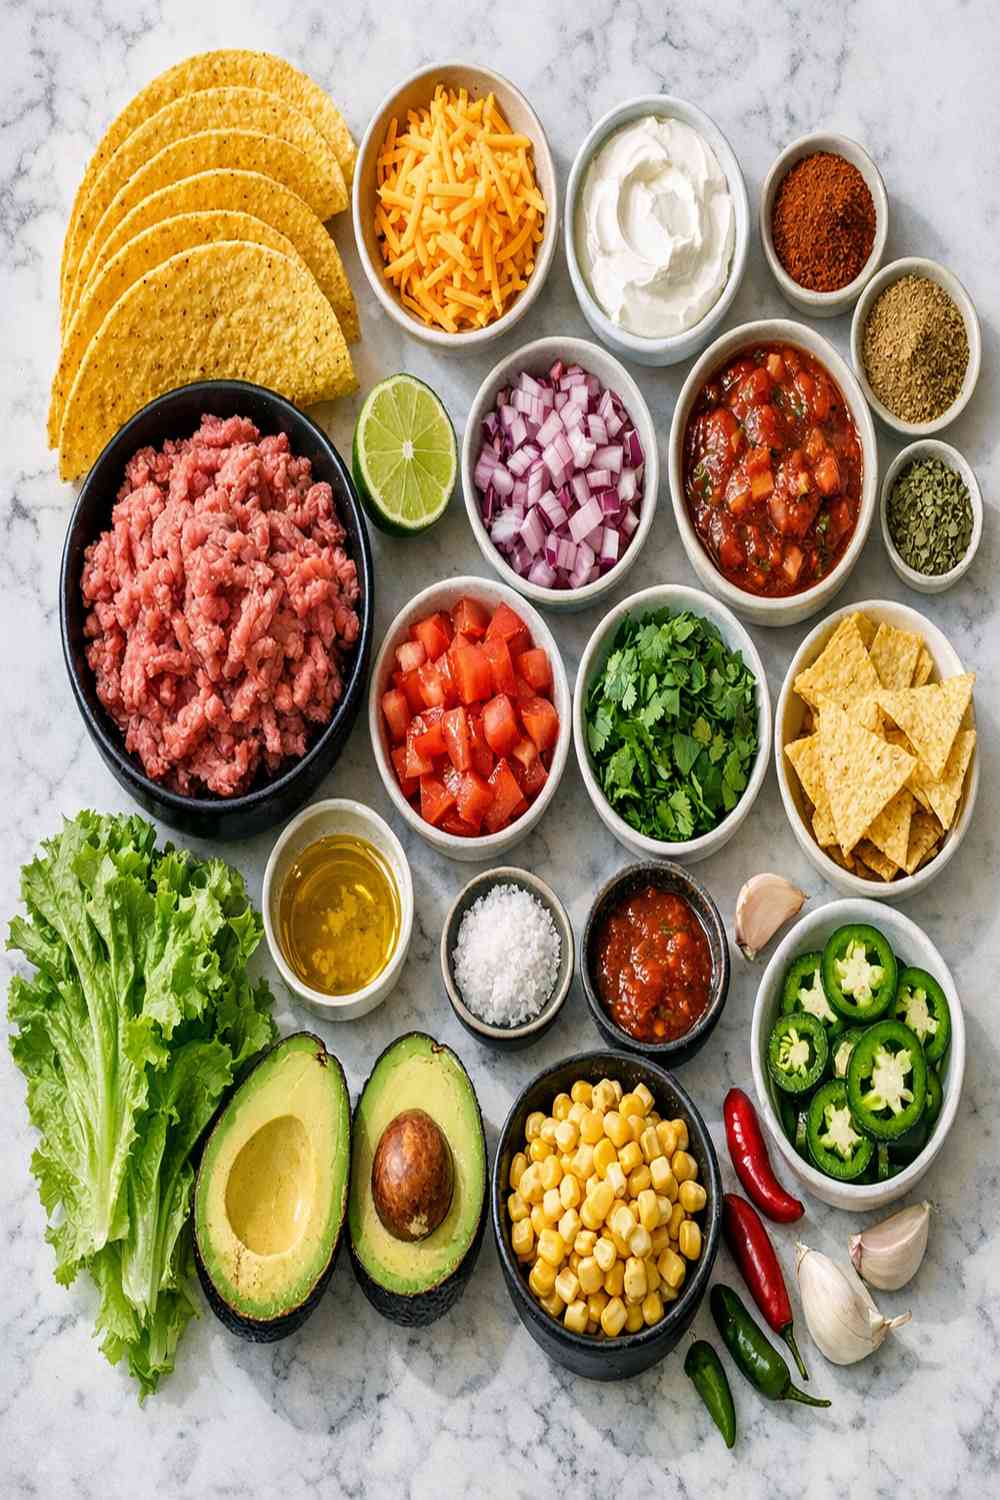 ” alt=”All ingredients laid out for crunchy tacos including ground beef, tortillas, cheese, and chipotle crema components”>
I’ve organized these ingredients into the beef filling and the chipotle crema, since they’re made separately. This makes the process feel manageable and prevents you from getting overwhelmed. Everything here is easy to find at your regular grocery store—no specialty shopping required.
For the Beef Filling
- 2 tablespoons taco seasoning (a convenient packet works wonderfully, or use homemade if you prefer)
- 8 ounces Colby Jack cheese (shredded into two portions—one for filling, one for topping)
- 8 to 10 corn tortillas (6-inch size, white or yellow, whatever you prefer)
- 1 tablespoon neutral cooking oil (canola or vegetable oil is my go-to)
- Additional neutral oil (for brushing the folded tortillas)
- 1 can (4 ounces) diced green chiles (roasted chiles add authentic depth)
- ½ cup water (this helps the spices bloom and distribute evenly)
- 1 pound ground beef (85% lean/15% fat blend works perfectly for maximum flavor)
- Salt and pepper (to taste, added at the end)
- 3 cloves garlic (freshly minced, never from a jar)
- 1 lime (juiced, approximately 2 tablespoons of fresh juice)
For the Chipotle Crema
- 2 chipotle peppers (in adobo sauce, these add gorgeous smoky heat)
- Salt (to taste)
- 1 clove garlic (minced, for bright flavor)
- ¾ cup Mexican crema or sour cream (full-fat versions create the creamiest sauce)
- ½ lime (juiced, approximately 1 tablespoon fresh juice)
- 1 teaspoon honey or light sugar (balances the heat beautifully)
How to Make Crunchy Tacos?
I’m walking you through each step with the same care I use when testing recipes in my own kitchen. The timing is based on standard home equipment, and I’ve included helpful signals so you’ll know exactly when each step is complete.
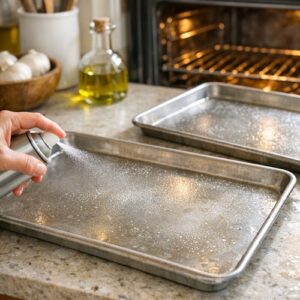
Step 1: Prepare Your Oven and Baking Sheets
Start by preheating your oven to 425°F. While it’s heating, lightly oil or spray two standard baking sheets (I use regular half-sheet pans measuring 18 by 13 inches) with nonstick spray. This prevents sticking and makes cleanup much easier. Set them aside near your cooking station.
 ” alt=”Two baking sheets prepared and ready for crunchy tacos”>
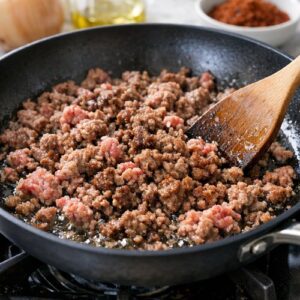
Step 2: Brown the Ground Beef
Pour 1 tablespoon of neutral oil into a medium-sized skillet and heat it over medium heat for about 1 minute—you want it hot enough that a small piece of beef sizzles immediately when it hits the pan. Add your ground beef and cook, breaking it into small crumbles with a wooden spoon or spatula, until no pink remains, approximately 5 to 7 minutes. You should hear it sizzling gently throughout cooking. Once cooked through, carefully pour the beef into a fine-mesh strainer to drain excess fat—this step prevents greasy tacos.
 ” alt=”Ground beef browning in a skillet until no pink remains”>
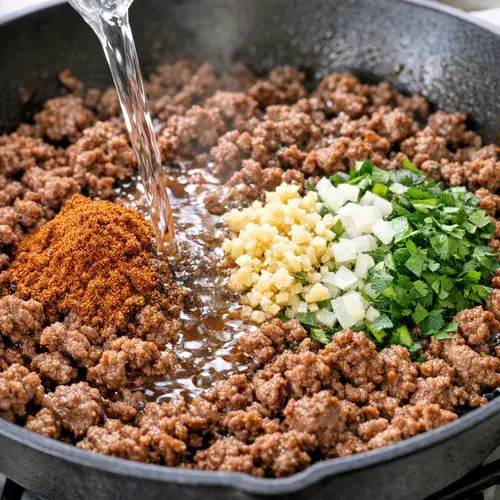
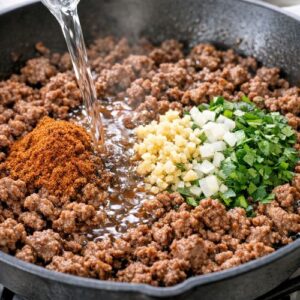
Step 3: Build the Flavorful Beef Mixture
Return the drained beef to the skillet (no need to rinse it) and place it back over medium heat. Add your taco seasoning, water, minced garlic, fresh lime juice, canned green chiles (including their liquid for extra flavor), and a pinch of salt and pepper to your preference. Stir everything together thoroughly to combine.
Let this simmer gently, stirring occasionally, until most of the liquid has evaporated, approximately 5 minutes. You’ll notice the mixture becoming more concentrated and fragrant as the water reduces. The beef should look moist but not soupy. Once it reaches this stage, stir in 1 cup of your shredded Colby Jack cheese until it’s completely melted and distributed throughout. The cheese creates creamy pockets that make each bite delicious. Turn off the burner and remove the skillet from heat.
 ” alt=”Seasoned beef mixture with melted cheese stirred throughout”>
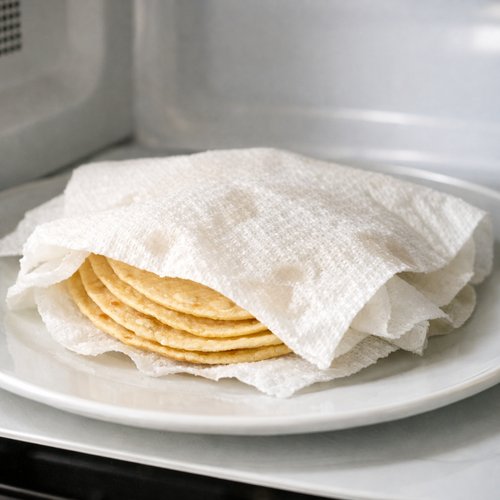
Step 4: Warm Your Tortillas for Perfect Pliability
This step is crucial for preventing broken tacos, so don’t skip it. Wrap your corn tortillas in a slightly damp paper towel and microwave them for 45 to 60 seconds, then flip the stack over halfway through. The steam softens the tortillas and makes them pliable instead of brittle.
Once the time is up, carefully unwrap them and test one by trying to fold it gently. If the tortilla breaks or resists folding, give them another 10 seconds in the microwave. Pliable tortillas will fold smoothly without cracking—this is your signal that they’re ready.
 ” alt=”Warm tortillas wrapped in a damp paper towel”>
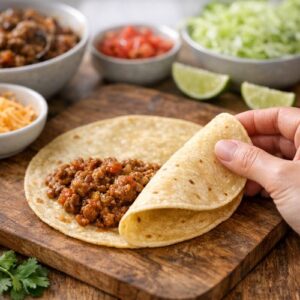
Step 5: Fill and Fold Your Tacos
Working with one tortilla at a time, spread approximately ¼ cup of the warm beef mixture down one half of the tortilla, leaving about ½ inch from the edges. Top that filling with a modest pinch of your remaining shredded cheese—we’re not aiming for overflowing tacos here, as excess filling tends to ooze out during baking and create a mess on your baking sheets.
Fold the tortilla in half over the filling, pressing gently so everything stays inside. Place the folded taco on your prepared baking sheet. Repeat with remaining tortillas and filling. I typically fit about 6 tacos per standard baking sheet comfortably. You should yield 8 to 10 tacos total from this recipe.
 ” alt=”Folded tortillas filled with beef and cheese on baking sheets”>
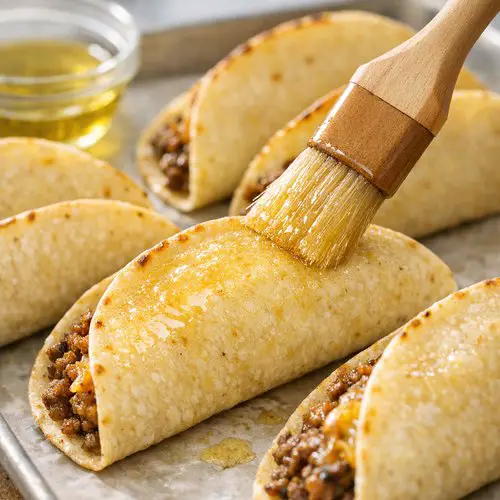
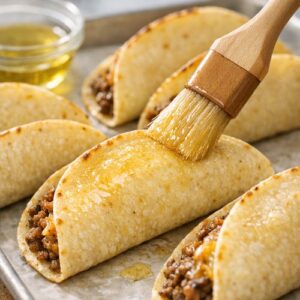
Step 6: Brush with Oil for Golden Crispiness
Using a pastry brush or even a clean fingertip, lightly brush just a little additional oil over the top surface of each folded taco. This is what creates that golden-brown, crispy exterior we’re after. You don’t need much—just enough to coat the surface lightly. Less oil here means healthier tacos without sacrificing that satisfying crunch.
 ” alt=”Folded tacos brushed lightly with oil”>
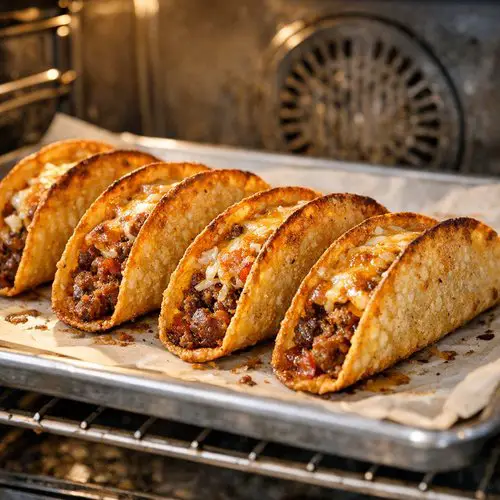
Step 7: Bake Until Golden and Crispy
Place your baking sheets in the preheated 425°F oven. Bake for 15 to 20 minutes without flipping—there’s no need to turn them. You’re looking for the tacos to become golden brown and noticeably crispy to the touch. The tortillas should sound crispy when you tap them lightly with a fork.
The exact timing depends on your oven’s personality (every oven bakes slightly differently), so start checking around the 15-minute mark. The first time you make these, you might peek a few times—that’s completely normal and actually helpful for learning your oven’s timing.
 ” alt=”Golden crispy crunchy tacos fresh from the oven”>
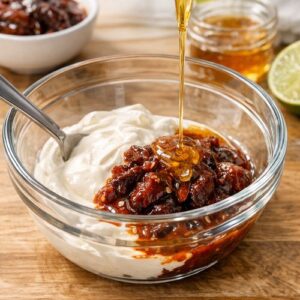
Step 8: Make Your Chipotle Crema While Tacos Bake
While your tacos are baking, prepare the crema—it only takes 2 minutes. Add your Mexican crema or sour cream, chipotle peppers in adobo sauce, honey or sugar, fresh lime juice, minced garlic, and a pinch of salt to a food processor. Blend until completely smooth, approximately 1 to 2 minutes.
Taste a small spoonful and adjust to your preference. If you want it spicier, add another half chipotle pepper. If you prefer it less spicy, add a touch more crema. If it tastes slightly sharp, a pinch more honey rounds it out beautifully. This crema is forgiving, so trust your palate.
 ” alt=”Smooth chipotle crema in a bowl”>
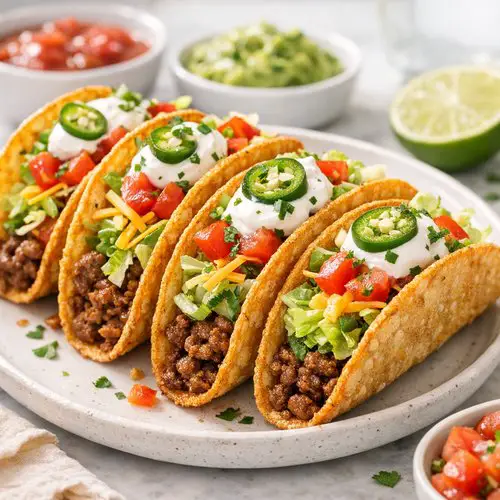
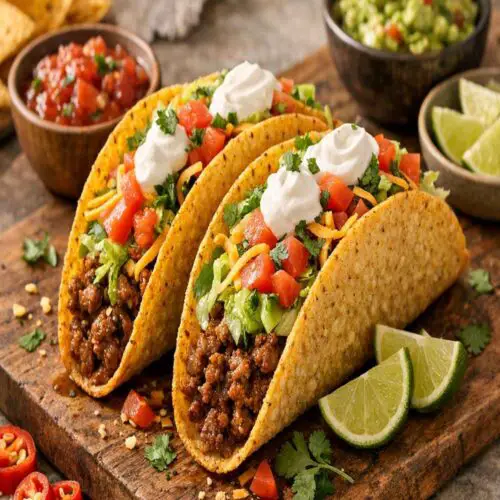
Step 9: Assemble and Serve
Remove your crispy tacos from the oven and let them cool for just 2 to 3 minutes—they’ll continue crisping slightly as they cool. Arrange them on a serving platter and set out your prepared toppings in small bowls so everyone can customize their own tacos.
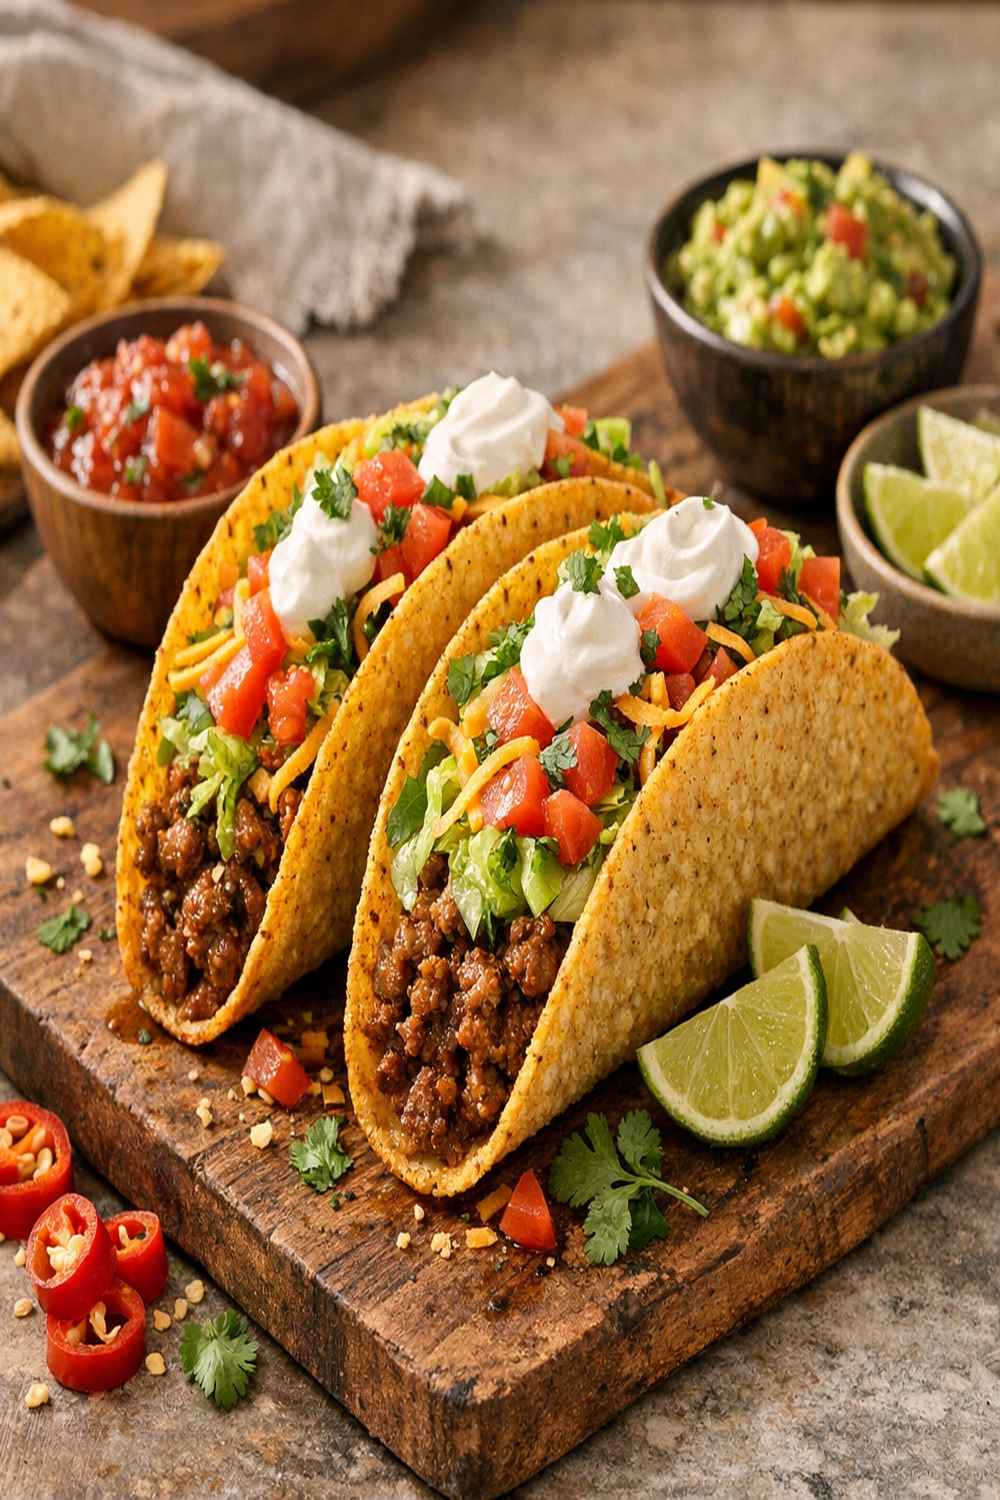
Drizzle or dollop the chipotle crema over each taco, then add your favorite toppings. The combination of hot, crispy tacos with cool, creamy toppings creates an absolutely magical eating experience.
 ” alt=”Finished crunchy tacos topped with chipotle crema and fresh toppings”>
Expert’s Nutritional Tip
As a registered dietitian, I appreciate that this recipe delivers complete protein through the ground beef and cheese combination. The 85% lean beef provides iron and B vitamins that support energy production, while the lime juice throughout the recipe contains vitamin C that enhances iron absorption. The corn tortillas add fiber and resistant starch, which studies show supports healthy digestion and blood sugar stability. By baking rather than deep-frying, you’re keeping the fat content reasonable while maintaining satisfaction—a win-win for both taste and nutrition.
Tips and Tricks
- Don’t skip the tortilla steaming step – This single step prevents broken tacos and makes the entire process feel less stressful. Warm, pliable tortillas are the foundation of success.
- Use 85/15 ground beef for the best balance – It has enough fat to stay flavorful but not so much that you’re draining excess liquid constantly. This ratio prevents greasy tacos while keeping everything tender.
- Fresh lime juice makes a noticeable difference – Bottled juice tastes noticeably different and less bright. Spend 30 seconds squeezing fresh limes—your tacos will taste noticeably better.
- Fill conservatively to prevent oozing – You might feel tempted to stuff these tacos generously, but restraint prevents filling from leaking out during baking. About ¼ cup per taco is your sweet spot.
- Set up a toppings station – Having all your toppings prepped and arranged before you serve makes the meal feel more special and restaurant-like. Plus, it’s less chaotic than hunting through the fridge.
- Let tacos cool slightly before eating – They continue crisping during the 2-to-3-minute cooling window, creating an even better texture than eating them straight from the oven.
Make-Ahead Guide
I love recipes that work with busy schedules, and this one offers several make-ahead options. You can prepare the beef filling up to 2 days ahead—store it in an airtight container in the refrigerator and gently reheat it in a skillet over medium heat before filling tortillas. The chipotle crema keeps beautifully in the fridge for up to 5 days, making it perfect for meal prep.
For the most time-saving approach, assemble the filled but unbaked tacos on baking sheets, cover them tightly with plastic wrap, and refrigerate for up to 8 hours. When you’re ready to bake, simply add 2 to 3 minutes to the baking time since they’ll be coming from the cold refrigerator. This approach means you can prep during a calm moment and bake during dinner rush without stress.
Alternatively, you can freeze assembled unbaked tacos on baking sheets, transfer them to a freezer bag once frozen, and bake directly from frozen—just add 5 to 8 minutes to your baking time. This has saved me countless times when unexpected guests arrive.
Common Mistakes to Avoid
- Using cold tortillas – Cold tortillas break easily when folded. The steaming step is non-negotiable for success, even though it seems like a small detail.
- Overfilling the tacos – The most common mistake I see is trying to fit too much filling into each taco. This causes messy, greasy tacos that fall apart. Less filling actually creates better results.
- Using bottled lime juice – This is worth its own category because the flavor difference is genuinely noticeable. Fresh limes take 30 seconds and completely change the final result.
- Skipping the oil brush step – Without brushing oil on top, your tacos won’t achieve that golden-brown crispiness. This step is what separates adequate tacos from truly crispy ones.
Seasonal Variations
Spring and Summer: When fresh produce is abundant, add diced fresh tomatoes, crispy radishes, and bright cilantro to your toppings. Summer calls for cold, refreshing components alongside the warm, crispy tacos. A squeeze of fresh lime juice over everything brings brightness to the plate.
Fall and Winter: Embrace roasted vegetables like charred corn or caramelized onions mixed into the beef filling for extra depth. Pickled red onions add tangy complexity during cooler months. Consider adding roasted poblano peppers or caramelized jalapeños for warming spice that feels appropriate for the season.
Year-Round Additions: Keep avocado or guacamole on hand—it’s universally loved. Fresh cilantro adds brightness regardless of season. A good salsa or pico de gallo works every single time.
Can I Store Crunchy Tacos?
Freshly baked crunchy tacos are best eaten immediately while they’re hot and crispy. However, if you have leftovers, store them in an airtight container at room temperature for up to 2 hours before they begin losing their crispness.
For longer storage, refrigerate finished tacos for up to 3 days, understanding that they’ll lose some crispness. You can restore crispness by placing them on a baking sheet and warming them in a 350°F oven for 5 to 8 minutes—they’ll regain most of their original texture.
Store the chipotle crema separately in the refrigerator for up to 5 days. Keep the beef filling and any toppings in separate containers. This modular approach means you can enjoy components throughout the week in different ways.
Nutrition Information
Per taco (based on USDA nutritional data for corn tortillas, 85/15 ground beef, and Colby Jack cheese): approximately 215 calories, 12 grams of protein, 13 grams of fat, and 14 grams of carbohydrates. Each taco also provides 2 grams of dietary fiber from the corn tortilla.
The beef supplies iron and B vitamins essential for energy production. The lime juice throughout provides vitamin C, which enhances the body’s ability to absorb that iron. The cheese contributes calcium for bone health. The green chiles add vitamin A and beneficial plant compounds called capsaicinoids.
When you add fresh toppings like lettuce, tomatoes, and cilantro, you’re increasing the fiber, antioxidant, and micronutrient profile significantly. The chipotle crema adds minimal calories while contributing flavor and satisfaction, making the entire meal feel indulgent while remaining nutritionally balanced.
What Can I Serve With Crunchy Tacos?
Crunchy tacos are beautiful on their own, but they absolutely shine when paired with complementary sides. A simple green salad provides fresh contrast to the warm, rich tacos. Consider a Kale Blueberry Salad with a lime vinaigrette for a surprising flavor combination that ties into the taco seasonings beautifully.
For vegetable sides, Korean Asparagus offers a completely different flavor profile that works wonderfully as a contrast. Mexican rice or cilantro-lime rice is a more traditional pairing. Black beans or refried beans round out the meal with additional protein and fiber.
- Fresh fruit – Sliced watermelon, pineapple, or fresh mango provides cooling sweetness that complements the spiced beef beautifully.
- Corn or elote – Mexican street corn (elote) with creamy, spiced toppings pairs perfectly with these tacos without being redundant.
- Beverage pairing – Cold horchata, fresh limeade, or ice-cold Mexican beer all complement the flavors wonderfully.
- Dessert finale – End your taco meal with something cool and citrusy like a Key Lime Pie With Biscoff Crust for a themed finish.
Substitutes
- Ground turkey or chicken – These leaner proteins work wonderfully in place of beef. Use 93% lean ground turkey and reduce the cooking time slightly. The flavor will be milder, so consider adding an extra clove of garlic or a pinch of cumin.
- Plant-based ground meat – Crumbled cooked lentils or store-bought plant-based meat alternatives create delicious vegetarian tacos. Use the same seasoning and cooking method.
- Flour tortillas instead of corn – If you prefer the softer texture of flour tortillas, skip the baking step and pan-fry them gently in a skillet until they achieve a light golden color. They won’t be quite as crispy but will be wonderfully tender.
- Different cheese varieties – Cheddar, Monterey Jack, or a Mexican blend all work beautifully in place of Colby Jack. Choose something that melts easily and has good flavor.
- Fresh salsa instead of chipotle crema – If you prefer not to make the crema, a bright pico de gallo or fresh salsa verde works equally well.
- Canned diced tomatoes for green chiles – If you can’t find roasted green chiles, diced fresh or canned tomatoes provide moisture and flavor (drain them well first).
Crunchy Tacos Recipe
Ingredients
For the Beef Filling
- 2 tablespoon taco seasoning a convenient packet works wonderfully, or use homemade if you prefer
- 8 ounce Colby Jack cheese (shredded into two portions
- 8 to 10 corn tortillas 6-inch size, white or yellow, whatever you prefer
- 1 tablespoon neutral cooking oil canola or vegetable oil is my go-to
- Additional neutral oil for brushing the folded tortillas
- 1 can diced green chiles 4 ounces
- ½ cup water this helps the spices bloom and distribute evenly
- 1 pound ground beef 85% lean/15% fat blend works perfectly for maximum flavor
- Salt and pepper to taste, added at the end
- 3 clove garlic freshly minced, never from a jar
- 1 lime juiced, approximately 2 tablespoons of fresh juice
For the Chipotle Crema
- 2 chipotle peppers in adobo sauce, these add gorgeous smoky heat
- Salt to taste
- 1 clove garlic minced, for bright flavor
- ¾ cup Mexican crema or sour cream full-fat versions create the creamiest sauce
- ½ lime juiced, approximately 1 tablespoon fresh juice
- 1 teaspoon honey or light sugar balances the heat beautifully
Instructions
Step 1: Prepare Your Oven and Baking Sheets
- Start by preheating your oven to 425°F. While it's heating, lightly oil or spray two standard baking sheets (I use regular half-sheet pans measuring 18 by 13 inches) with nonstick spray. This prevents sticking and makes cleanup much easier. Set them aside near your cooking station.
Step 2: Brown the Ground Beef
- Pour 1 tablespoon of neutral oil into a medium-sized skillet and heat it over medium heat for about 1 minute—you want it hot enough that a small piece of beef sizzles immediately when it hits the pan. Add your ground beef and cook, breaking it into small crumbles with a wooden spoon or spatula, until no pink remains, approximately 5 to 7 minutes. You should hear it sizzling gently throughout cooking. Once cooked through, carefully pour the beef into a fine-mesh strainer to drain excess fat—this step prevents greasy tacos.
Step 3: Build the Flavorful Beef Mixture
- Return the drained beef to the skillet (no need to rinse it) and place it back over medium heat. Add your taco seasoning, water, minced garlic, fresh lime juice, canned green chiles (including their liquid for extra flavor), and a pinch of salt and pepper to your preference. Stir everything together thoroughly to combine. Let this simmer gently, stirring occasionally, until most of the liquid has evaporated, approximately 5 minutes. You'll notice the mixture becoming more concentrated and fragrant as the water reduces. The beef should look moist but not soupy. Once it reaches this stage, stir in 1 cup of your shredded Colby Jack cheese until it's completely melted and distributed throughout. The cheese creates creamy pockets that make each bite delicious. Turn off the burner and remove the skillet from heat.
Step 4: Warm Your Tortillas for Perfect Pliability
- This step is crucial for preventing broken tacos, so don't skip it. Wrap your corn tortillas in a slightly damp paper towel and microwave them for 45 to 60 seconds, then flip the stack over halfway through. The steam softens the tortillas and makes them pliable instead of brittle. Once the time is up, carefully unwrap them and test one by trying to fold it gently. If the tortilla breaks or resists folding, give them another 10 seconds in the microwave. Pliable tortillas will fold smoothly without cracking—this is your signal that they're ready.

Step 5: Fill and Fold Your Tacos
- Working with one tortilla at a time, spread approximately ¼ cup of the warm beef mixture down one half of the tortilla, leaving about ½ inch from the edges. Top that filling with a modest pinch of your remaining shredded cheese—we're not aiming for overflowing tacos here, as excess filling tends to ooze out during baking and create a mess on your baking sheets. Fold the tortilla in half over the filling, pressing gently so everything stays inside. Place the folded taco on your prepared baking sheet. Repeat with remaining tortillas and filling. I typically fit about 6 tacos per standard baking sheet comfortably. You should yield 8 to 10 tacos total from this recipe.
Step 6: Brush with Oil for Golden Crispiness
- Using a pastry brush or even a clean fingertip, lightly brush just a little additional oil over the top surface of each folded taco. This is what creates that golden-brown, crispy exterior we're after. You don't need much—just enough to coat the surface lightly. Less oil here means healthier tacos without sacrificing that satisfying crunch.
Step 7: Bake Until Golden and Crispy
- Place your baking sheets in the preheated 425°F oven. Bake for 15 to 20 minutes without flipping—there's no need to turn them. You're looking for the tacos to become golden brown and noticeably crispy to the touch. The tortillas should sound crispy when you tap them lightly with a fork. The exact timing depends on your oven's personality (every oven bakes slightly differently), so start checking around the 15-minute mark. The first time you make these, you might peek a few times—that's completely normal and actually helpful for learning your oven's timing.

Step 8: Make Your Chipotle Crema While Tacos Bake
- While your tacos are baking, prepare the crema—it only takes 2 minutes. Add your Mexican crema or sour cream, chipotle peppers in adobo sauce, honey or sugar, fresh lime juice, minced garlic, and a pinch of salt to a food processor. Blend until completely smooth, approximately 1 to 2 minutes. Taste a small spoonful and adjust to your preference. If you want it spicier, add another half chipotle pepper. If you prefer it less spicy, add a touch more crema. If it tastes slightly sharp, a pinch more honey rounds it out beautifully. This crema is forgiving, so trust your palate.
Step 9: Assemble and Serve
- Remove your crispy tacos from the oven and let them cool for just 2 to 3 minutes—they'll continue crisping slightly as they cool. Arrange them on a serving platter and set out your prepared toppings in small bowls so everyone can customize their own tacos. Drizzle or dollop the chipotle crema over each taco, then add your favorite toppings. The combination of hot, crispy tacos with cool, creamy toppings creates an absolutely magical eating experience.

Notes
FAQs
Can I make these tacos ahead of time and reheat them?
Yes, absolutely. Prepare the filled but unbaked tacos, cover them well with plastic wrap, and refrigerate for up to 8 hours. When you’re ready, bake them directly from the refrigerator, adding 2 to 3 minutes to the baking time. Alternatively, bake them completely, let them cool, store in an airtight container for up to 2 days, and reheat in a 350°F oven for 5 to 8 minutes to restore crispness. Make the chipotle crema fresh or store it separately and drizzle just before serving.
What’s the difference between crunchy tacos and crispy tacos?
Honestly, the terms are used interchangeably in most contexts. Both refer to tacos with a crispy shell rather than soft tortillas. The texture comes from baking or frying the folded tortilla, whether you call it “crunchy” or “crispy.” In this recipe, we’re achieving that texture through oven-baking, which gives you the best results with minimal effort.
Why did my tortillas break while folding?
This happens when tortillas aren’t warm enough. They need that steam to become pliable. The microwave steaming step in Step 4 is absolutely crucial—don’t skip it or rush through it. If you’re still having issues, microwave tortillas for an additional 10 to 15 seconds. Some tortillas are naturally more brittle, so testing one before folding the entire batch helps.
Can I deep-fry these tacos instead of baking them?
You certainly can, though I specifically developed this baked version to avoid deep-frying at home. If you want to fry them, heat about 2 inches of oil to 350°F in a deep skillet, carefully place each taco in the hot oil, and fry for about 1 minute per side until golden brown. However, I find the baked version easier, less messy, requires less oil, and produces equally delicious results without the safety concerns of hot oil splattering.
How can I make the beef filling spicier?
You have several options. Add an extra chipotle pepper to the crema, include diced jalapeños in the beef filling itself, or increase the taco seasoning slightly if your packet allows. You could also stir in some fresh hot sauce directly into the beef mixture. Start small since heat is subjective—you can always add more, but you can’t remove it once it’s mixed in. Taste as you go.
Is it okay to use pre-shredded cheese?
Pre-shredded cheese works fine for this recipe, though freshly shredded cheese melts slightly more smoothly. Pre-shredded varieties contain anti-caking agents that sometimes make them clump slightly when melted. It won’t ruin your tacos—they’ll still taste delicious—but if you have time to shred fresh cheese, it’s worth the extra minute.
More Recipes You’ll Love
- Kroll’s Corner Cheeseburger Sliders – These handheld baked sliders share the same easy-to-execute charm as crunchy tacos and come together just as quickly.
- 20-Minute Healthy Chicken Parmesan – Another crispy-baked favorite that feels indulgent while staying approachable for weeknight dinners.
- these homemade cookies – Since lime appears throughout these tacos, you might enjoy this tangy, bright dessert that echoes those same flavors.
I genuinely hope you love making these crunchy tacos as much as I do. Every time you bite into one of these golden, crispy shells filled with seasoned beef and that creamy chipotle crema, I want you to feel the same joy I experience in my kitchen. There’s something transformative about feeding people food that makes them smile—it’s honestly why I do what I do. These tacos prove that stress-free cooking can deliver restaurant-quality results, and that good food truly is a good mood!

My name is Lori Walker. I’m a registered dietitian, food blogger and food enthusiast. I share easy healthy, delicious recipes on my blog and review necessary kitchen items. The recipes I share take less… Read more