This post contains affiliate links. As an Amazon Associate I earn from qualifying purchases.
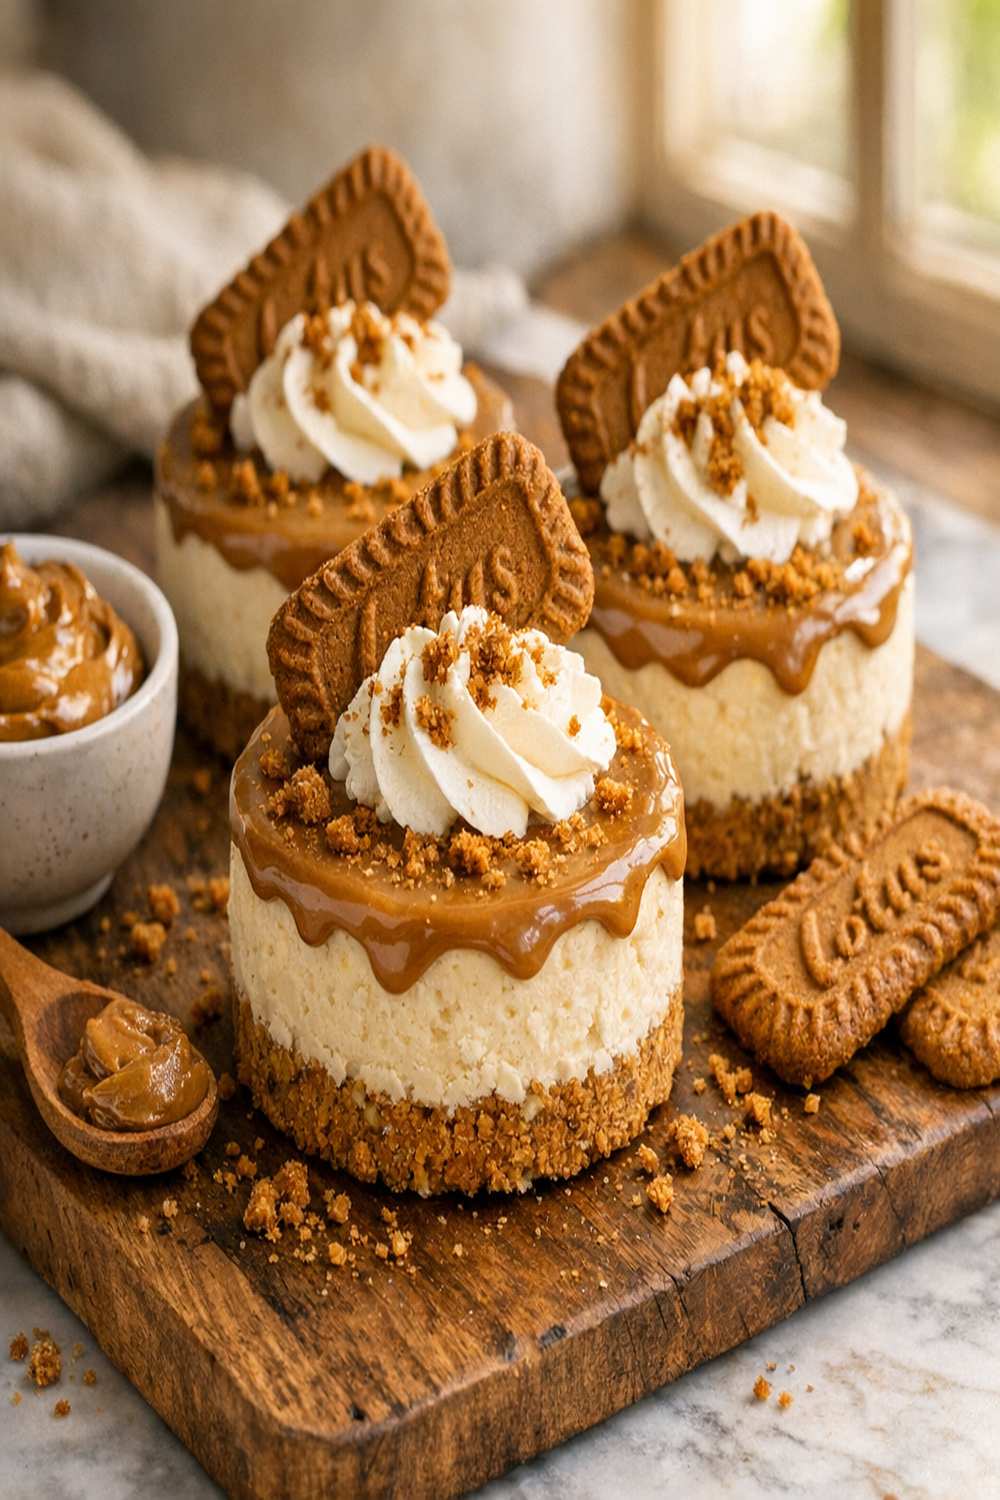
There’s something magical about serving individual cheesecakes at a dinner party—they feel fancy, they look impressive, and your guests think you spent hours in the kitchen. These Biscoff mini cheesecakes pair beautifully with a warm cup of coffee after dinner or alongside kiwi chocolate for an elegant dessert board. The cookie butter layer brings that beloved caramel-spiced flavor everyone adores, and I’m going to show you how to make them stress-free on standard kitchen equipment.
How My Family Recipe Collection Led Me to Mini Cheesecakes
Back in 2019, I started recording my grandmother’s recipes in a little leather notebook. One afternoon, she handed me a tin of those iconic golden-brown Biscoff cookies and said, “These remind me of the spiced treats my mother made.” That moment sparked something in me—the realization that food connects generations, and sometimes the simplest ingredients tell the biggest stories.
Years later, when I was testing creamy, no-bake dessert recipes in my own kitchen, I wondered: what if I combined that nostalgic Biscoff flavor with the elegance of a mini cheesecake? The result? A dessert that tastes like a five-star bakery creation but comes together in about 20 minutes of hands-on time. These little bites have become my signature dish when I want to impress without the stress.
What is Biscoff Mini Cheesecake Recipe?
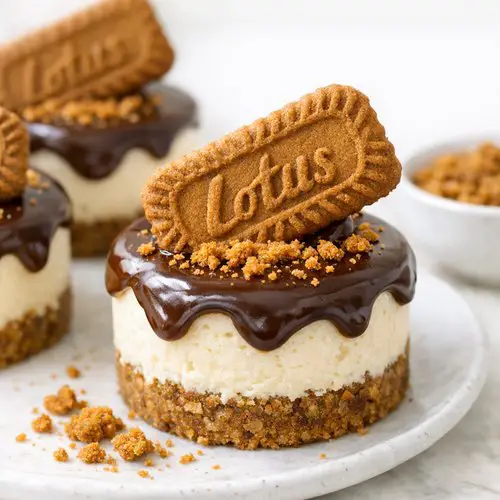
Biscoff mini cheesecakes are individual-sized no-bake desserts with three distinct layers: a spiced cookie crust on the bottom, a silky-smooth cookie butter cheesecake filling in the middle, and a glossy cookie butter ganache on top. They’re inspired by the beloved Belgian Biscoff cookie, which has that distinctive caramel-cinnamon flavor that makes people close their eyes and smile.
What makes this version special is the use of whipped cream folded into the filling. Instead of a heavy, dense cheesecake, you get something lighter and more mousse-like—elegant enough for a dinner party but easy enough for a weeknight treat. The recipe yields 24 mini cheesecakes, making it perfect for meal prep or feeding a small crowd.
Why You’ll Love This Biscoff Mini Cheesecake Recipe
- No baking required – Everything comes together with a mixer and some patience in the refrigerator. Perfect for warm days when you don’t want to heat up the kitchen.
- Make-ahead friendly – Assemble these up to 24 hours before serving. They actually taste better the next day when flavors have melded together.
- Perfectly portioned – Individual servings mean no slicing, no mess, and everyone gets an equal share of that creamy filling.
- Impressive presentation – These look like they came from a professional bakery, but you made them at home with ingredients from your pantry.
- Cookie butter flavor throughout – This recipe uses cookie butter both in the filling and the topping, so every bite delivers that signature caramel-spice taste.
- Naturally dairy-forward – As a registered dietitian, I appreciate recipes where quality ingredients shine. Full-fat cream cheese and real butter create richness without any weird additives.
The Ingredients
I’ve tested these mini cheesecakes in my home kitchen probably 15 times, and I’ve learned exactly which ingredients matter most. Here’s what you’ll need—nothing fancy, nothing hard to find. Most items are probably in your kitchen right now.
For the Crust
- 250 grams (about 8.8 ounces) Biscoff spiced cookies (or similar caramel-cinnamon sandwich cookies)
- ½ cup unsalted butter (melted and slightly cooled)
For the Filling
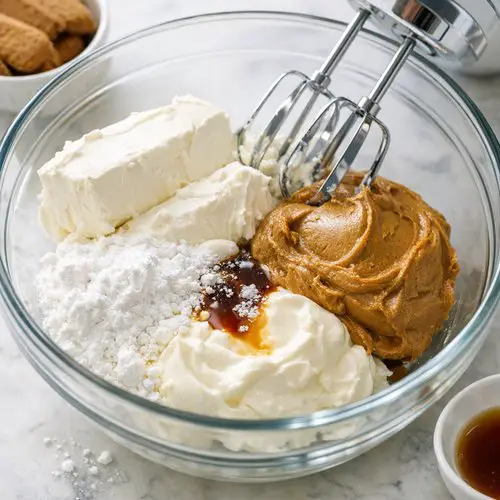
- 1 cup creamy Biscoff cookie butter (or similar caramel cookie butter spread)
- 24 ounces cream cheese (three 8-ounce blocks, softened to room temperature)
- 1 cup powdered sugar (sifted to remove lumps)
- 2 teaspoons pure vanilla extract (not imitation)
- ⅓ cup full-fat sour cream (at room temperature)
- 1 cup heavy cream (very cold, straight from the refrigerator)
- ¼ teaspoon fine sea salt
For the Topping
- Whipped cream (store-bought or homemade, optional)
- ½ cup creamy Biscoff cookie butter (for the glossy ganache layer)
- Whole Biscoff cookies or crushed cookie pieces (for garnish)
Yield: Makes 24 mini cheesecakes (using two 12-count mini cheesecake pans or standard muffin tins with liners)
How to Make Biscoff Mini Cheesecake Recipe?
I’m going to walk you through each step with the kind of detail I’d give a close friend making this for the first time. Pay attention to temperatures and timing—these small things make the difference between a good cheesecake and one that’s absolutely silky and perfect.
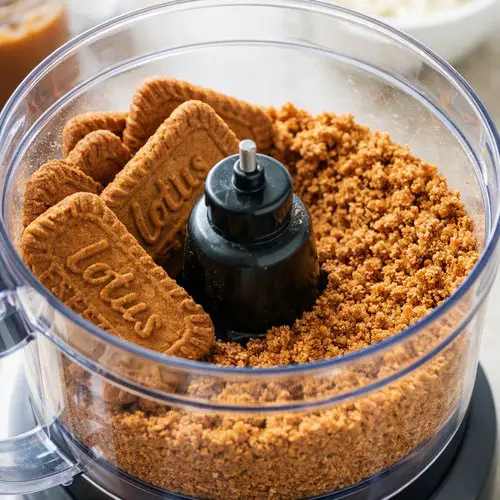
Step 1: Make the Cookie Crust Foundation
Pour your Biscoff cookies into a food processor and pulse until they resemble fine breadcrumbs. You want tiny, uniform pieces—if some crumbs are too chunky, they won’t press down evenly. This takes about 30 to 45 seconds of pulsing. Pour the melted butter into the processor while it’s running, and mix until the entire mixture looks like damp sand that holds together when you squeeze it.
Spray your mini cheesecake pans (or muffin tins with liners) generously with nonstick spray. Using the back of a measuring spoon or your fingers, press about 1 tablespoon of the crust mixture firmly into each cup. You want it compact but not rock-hard—think of the texture of packed brown sugar. Place the pans in the refrigerator or freezer while you prepare the filling. A chilled crust helps the filling set faster later on.
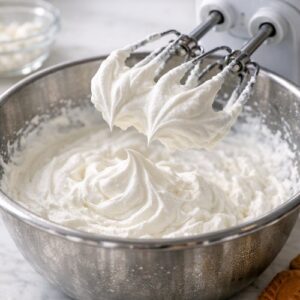
Step 2: Whip the Heavy Cream to Cloud-Like Peaks
Pour your cold heavy cream into a medium mixing bowl (a chilled bowl works even better—pop it in the freezer for 5 minutes). Using a hand mixer or stand mixer fitted with the whisk attachment, beat on medium-high speed. You’ll see it go from liquid to frothy to soft peaks in about 1 to 2 minutes. Keep going until stiff peaks form—that means when you lift the whisk, the cream stands straight up without drooping.
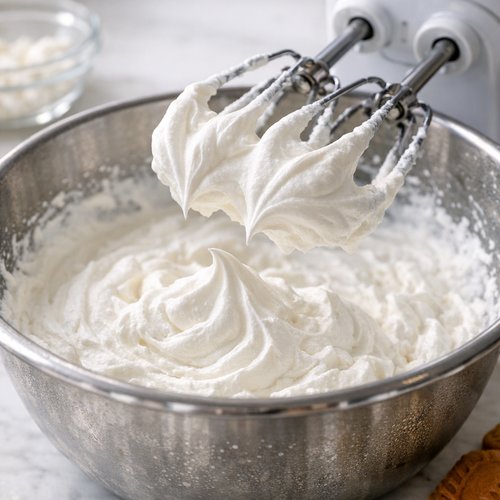
Here’s the tricky part: don’t overbeat, or you’ll end up with sweet butter. Once you reach stiff peaks, stop immediately. Transfer the whipped cream to a separate bowl and refrigerate it while you build the filling. This step is crucial because the whipped cream makes the final cheesecake mousse-like rather than dense.
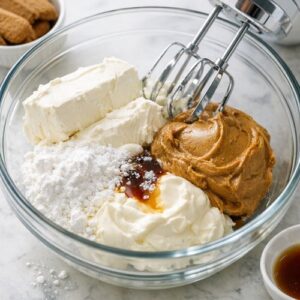
Step 3: Combine the Cream Cheese Base
In a separate medium-large mixing bowl, add your softened cream cheese, powdered sugar, cookie butter, sour cream, vanilla extract, and sea salt. Beat on medium speed with an electric mixer until everything is completely smooth and no streaks of cream cheese remain. This takes about 2 to 3 minutes. Scrape down the sides of the bowl halfway through to make sure you’re incorporating everything evenly.
The mixture should look pale, fluffy, and cloud-like—not thin or liquidy. If it seems too soft or warm, refrigerate the bowl for 10 minutes. The consistency matters because you’re about to fold in the whipped cream, and you need the base to be stable enough to hold those airy bubbles.
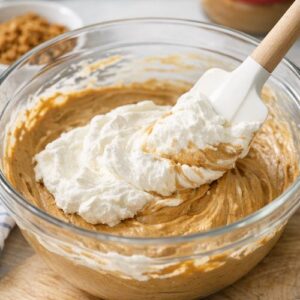
Step 4: The Gentle Fold
This is where patience pays off. Using a rubber spatula, gently fold the cold whipped cream into the cookie butter mixture in three additions. Start by spooning about one-third of the whipped cream onto the cream cheese base, then fold slowly and deliberately—slide the spatula down the center of the bowl, along the bottom, and bring it back up and over, rotating the bowl slightly after each motion.
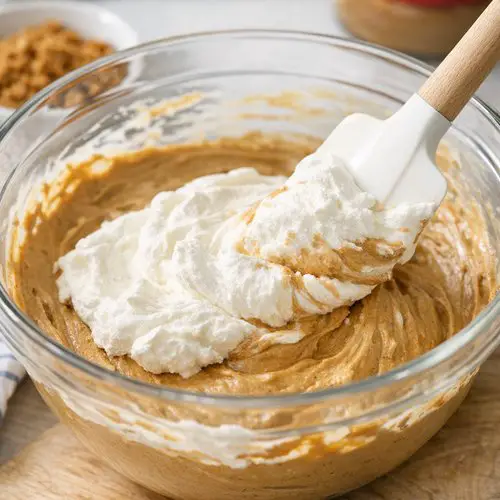
Keep folding until you see no white streaks remaining. This process takes about 1 to 2 minutes per addition. You’re trying to maintain those air bubbles you worked hard to create—aggressive stirring will deflate them and ruin the mousse-like texture. Once all the whipped cream is incorporated, you have your final filling.
Step 5: Fill the Crusts
Transfer your filling into a piping bag fitted with a round tip (a 1A tip creates a professional-looking swirl). Remove the chilled crusts from the refrigerator. Pipe the filling into each cup in a smooth, even spiral, starting from the outside and working toward the center. Fill until the filling reaches just about ¼ inch from the top of each liner.
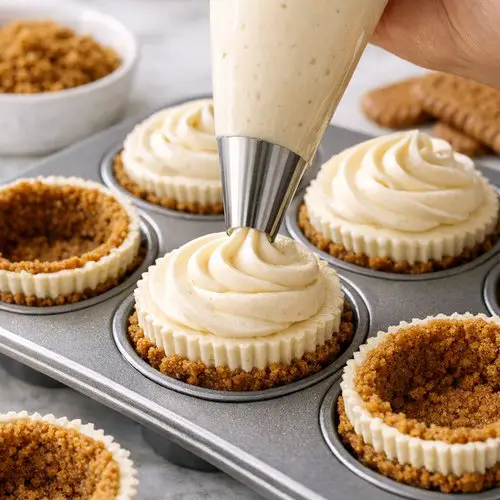
If you don’t have a piping bag, a spoon works too—just smooth the filling gently with an offset spatula or the back of a spoon for even coverage. The goal is neat, even tops so the ganache layer sits flat and looks intentional.
Step 6: Chill and Set the Filling
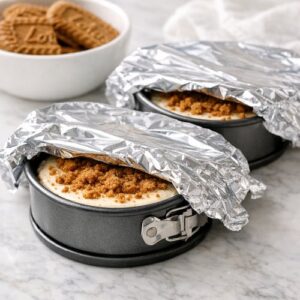
Cover the pans loosely with plastic wrap or aluminum foil (you don’t need an airtight seal; just protect them from absorbing flavors from the fridge). Place them in the refrigerator for at least 6 hours, but overnight is ideal. This resting time allows the filling to firm up and the flavors to meld together. I promise the wait is worth it.

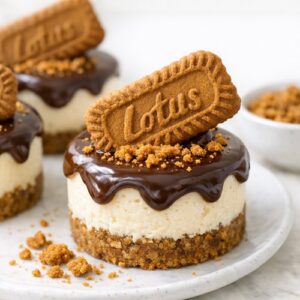
Step 7: Add the Cookie Butter Ganache Topping
Place your ½ cup of cookie butter in a microwave-safe bowl. Heat it in the microwave in 15-second intervals, stirring between each burst, until it’s completely melted and pourable. This usually takes 20 to 30 seconds total—cookie butter melts quickly, so watch it carefully to prevent burning. The mixture should be glossy and smooth like warm caramel.
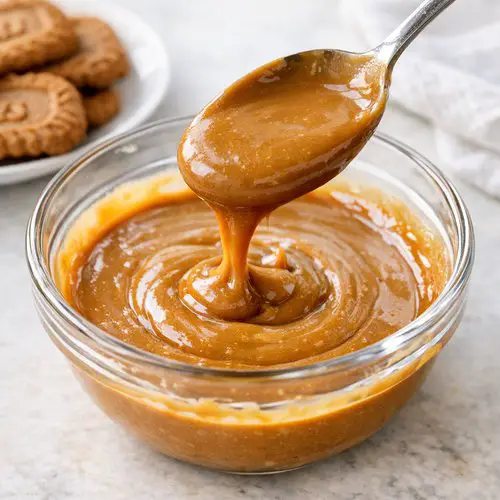
Spoon or drizzle the warm cookie butter ganache over each chilled cheesecake. It will naturally flow down the sides, creating that bakery-style look. Don’t stress about perfection here—slight drips look rustic and intentional. Place the pans back in the refrigerator for 15 to 20 minutes until the ganache sets completely.
Step 8: Garnish and Serve
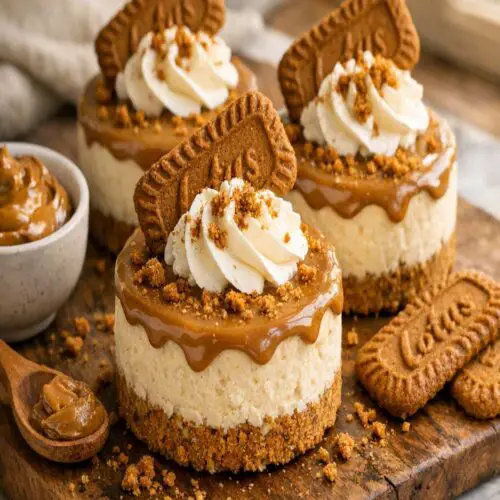
Once the ganache has set, it’s time to add the finishing touches. Press a whole Biscoff cookie onto the top of each cheesecake at a slight angle, or sprinkle crushed cookie pieces over the ganache. A small dollop of whipped cream on top adds an elegant touch if you’re serving these at a special occasion.
Remove the cheesecakes from their liners if you’re using muffin cups, or serve them directly in their mini pans for a more casual presentation. Keep them refrigerated until serving time. These are best enjoyed chilled and fresh from the fridge.
Tips and Tricks
- Room temperature matters more than you think – Cream cheese that’s truly soft beats more smoothly and creates a fluffier filling. Take it out of the fridge 30 minutes before mixing. Cold cream cheese leads to lumps no matter how much you beat it.
- Invest in a piping bag – These cost a few dollars and make filling the cups dramatically faster and neater. It’s one of my essential kitchen tools for any individual dessert project.
- Don’t skip the sour cream – It adds a subtle tang that balances the sweetness and creates a more sophisticated flavor profile. It’s not just filler; it’s intentional.
- Make the crumbs uniform – Uneven cookie pieces create gaps in your crust where filling can seep through. Spend an extra 30 seconds in the food processor to get consistent crumb size.
- Seal your pans while chilling – Even loose covering prevents the filling from absorbing fridge odors and keeps the tops from drying out.
- Serve straight from the fridge – These taste best when they’re properly chilled. Cold filling is creamy; room-temperature filling becomes greasy and loses its texture.
Expert’s Nutritional Tip: Understanding the Cookie Butter Component
As a registered dietitian, I want to address the elephant in the room: cookie butter is undeniably indulgent, and these cheesecakes are a treat, not an everyday food. However, here’s what I appreciate about this recipe: it uses whole, recognizable ingredients without emulsifiers or stabilizers you can’t pronounce. The full-fat cream cheese and real butter provide satiety, meaning you’ll feel satisfied with a smaller portion.
The key to enjoying these mindfully is portion control. One mini cheesecake (without additional toppings) contains approximately 320 calories and 24 grams of fat, with about 18 grams coming from saturated sources. That’s significant, but when shared as a special occasion dessert after dinner, it fits reasonably into a balanced diet. Pair it with herbal tea or espresso to slow down consumption and enhance enjoyment.
Common Mistakes to Avoid
- Using cold cream cheese – I cannot stress this enough. If your cream cheese is cold, it will have visible lumps and chunks no matter how much you beat it. Set it out for 30 minutes minimum.
- Overbeating the heavy cream – The moment you see stiff peaks, stop. Another 10 seconds of beating turns it into sweet butter. Keep a close eye on the mixer.
- Skipping the crust chilling step – A room-temperature crust absorbs moisture from the filling and becomes mushy instead of crispy. Always refrigerate the crust before adding the filling.
- Not folding the whipped cream gently enough – Vigorous mixing deflates all those air bubbles and makes the filling dense and heavy instead of mousse-like and light.
Make-Ahead Guide: Perfect Meal Prep for Entertaining
These mini cheesecakes are one of my favorite make-ahead desserts because they actually improve with time. Here’s my professional breakdown for planning ahead:
Up to 3 days before your event: Prepare the cookie crusts in their pans. Wrap tightly and refrigerate. The crust won’t absorb moisture or dry out during this time.
1 day before: Complete steps 1 through 6 (up through the initial chilling). Let them sit overnight in the fridge. The flavors deepen and the filling becomes perfectly set.
Morning of serving: Add the cookie butter ganache topping (Step 7) and garnish (Step 8). Let them chill for 30 minutes and you’re done.
Serving day: Keep them refrigerated in a covered container until 10 minutes before serving. They taste best cold, and the cold temperature helps the ganache layer stay glossy and defined.
Storage note: Once made, these keep beautifully in an airtight container in the refrigerator for up to 5 days. I don’t recommend freezing the finished product because the whipped cream layer can become grainy when thawed. However, you can freeze the unfilled, chilled filling in a piping bag for up to 2 weeks and thaw it overnight in the fridge before piping and setting.
Seasonal Variations
I love how adaptable this recipe is. Here are my favorite seasonal tweaks:
Fall: Add ¼ teaspoon of pumpkin pie spice to the filling for a subtle autumnal undertone. Garnish with a light dusting of cinnamon instead of whole cookies.
Winter: Fold 2 tablespoons of crushed candy canes into the filling or drizzle the ganache with melted white chocolate for a festive look.
Spring: Replace the heavy cream with coconut cream for a lighter coconut-cookie flavor. Add ½ teaspoon of lemon zest to brighten the filling.
Summer: Keep them as-is but serve alongside fresh berries or a berry compote for contrast and a lighter feel.
Can I Store Biscoff Mini Cheesecake Recipe?
Yes, and they store beautifully when you follow these guidelines. Keep your finished cheesecakes in an airtight container in the refrigerator for up to 5 days. The flavors actually become more pronounced on day 2 or 3, so don’t hesitate to make them ahead of time.
If you need to store them longer, you can freeze the chilled filling (before adding the ganache topping) in a piping bag for up to 2 weeks. Thaw overnight in the refrigerator, pipe into crusts, and proceed with the ganache step. I do not recommend freezing the fully assembled cheesecakes because the whipped cream component can become grainy or separated when thawed.
Layer parchment paper between each cheesecake if stacking them in a container to prevent the ganache from sticking to the one above. Keep them as far from strong-smelling foods (like onions or fish) as possible—the filling absorbs odors easily.
Nutrition Information
Based on USDA Food Data Central analysis, one mini Biscoff cheesecake (without the optional whipped cream garnish) contains approximately 320 calories, 24 grams of total fat (18 grams saturated), 28 grams of carbohydrates, 6 grams of protein, and 150 milligrams of sodium. The recipe yields 24 servings.
These are rich, indulgent treats best enjoyed as part of a balanced diet and shared with others. The protein content comes from the cream cheese and eggs (if you consider the binding proteins), while the carbs come from both the cookies and powdered sugar. This is definitely a special occasion dessert rather than an everyday food, and that’s perfectly okay.
What Can I Serve With Biscoff Mini Cheesecake Recipe?
I love creating a dessert board around these cheesecakes, especially when entertaining. They pair beautifully with other complementary flavors and textures. Here are my favorite serving ideas:
- Espresso or strong coffee – The bitterness of coffee cuts through the richness of the cheesecake and balances the sweetness. I always brew a fresh pot when serving these.
- Fresh berries – Raspberries, blackberries, or strawberries add brightness and tartness that contrasts perfectly with the caramel-cookie flavor.
- Whipped cream and chocolate drizzle – A small dollop of homemade whipped cream on top with a drizzle of melted dark chocolate elevates the presentation and adds sophistication.
- Herbal tea – Chamomile, peppermint, or vanilla rooibos tea pairs unexpectedly well with these cheesecakes, allowing the spiced cookie flavors to shine.
- A cheese board – Serve alongside key lime pie with Biscoff crust or other similar baked goods for a dessert board that impresses guests at a wine night or dinner party.
Substitutes
- Other spiced sandwich cookies for Biscoff – Lotus Biscoff is the classic choice, but you can substitute with similar caramel-cinnamon cookies if you can’t find the original brand. The flavor profile should be similar.
- Salted butter for unsalted – If using salted butter, reduce the salt in the filling to ⅛ teaspoon. I always prefer unsalted so I can control the exact salt level.
- Greek yogurt for sour cream – Use the same measurement of plain, full-fat Greek yogurt. It creates a slightly tangier filling with a bit more protein. Strain it first if it seems too thick.
- Mascarpone for half the cream cheese – Replace 4 ounces of cream cheese with 4 ounces of mascarpone for an even silkier, less tangy filling. Mascarpone is more delicate, so fold it in gently at the end.
- Almond or coconut butter for cookie butter – If you need a nut-free or dairy-free topping, use the same amount of almond or coconut butter as your ganache layer. The flavor will differ, but the texture will be similar.
- Whipped coconut cream for heavy cream – For a dairy-free version, chill a can of full-fat coconut cream overnight, scoop out the thick layer on top, and whip it exactly as you would heavy cream. Add 1 extra teaspoon of vanilla to compensate for the dairy-free base.
Biscoff Mini Cheesecake Recipe
Ingredients
For the Crust
- 250 gram Biscoff spiced cookies about 8.8 ounces
- ½ cup unsalted butter melted and slightly cooled
For the Filling
- 1 cup creamy Biscoff cookie butter or similar caramel cookie butter spread
- 24 ounce cream cheese three 8-ounce blocks, softened to room temperature
- 1 cup powdered sugar sifted to remove lumps
- 2 teaspoon pure vanilla extract not imitation
- ⅓ cup full-fat sour cream at room temperature
- 1 cup heavy cream very cold, straight from the refrigerator
- ¼ teaspoon fine sea salt
For the Topping
- Whipped cream store-bought or homemade, optional
- ½ cup creamy Biscoff cookie butter for the glossy ganache layer
- Whole Biscoff cookies or crushed cookie pieces for garnish
Instructions
Step 1: Make the Cookie Crust Foundation
- Pour your Biscoff cookies into a food processor and pulse until they resemble fine breadcrumbs. You want tiny, uniform pieces—if some crumbs are too chunky, they won't press down evenly. This takes about 30 to 45 seconds of pulsing. Pour the melted butter into the processor while it's running, and mix until the entire mixture looks like damp sand that holds together when you squeeze it. Spray your mini cheesecake pans (or muffin tins with liners) generously with nonstick spray. Using the back of a measuring spoon or your fingers, press about 1 tablespoon of the crust mixture firmly into each cup. You want it compact but not rock-hard—think of the texture of packed brown sugar. Place the pans in the refrigerator or freezer while you prepare the filling. A chilled crust helps the filling set faster later on.

Step 2: Whip the Heavy Cream to Cloud-Like Peaks
- Pour your cold heavy cream into a medium mixing bowl (a chilled bowl works even better—pop it in the freezer for 5 minutes). Using a hand mixer or stand mixer fitted with the whisk attachment, beat on medium-high speed. You'll see it go from liquid to frothy to soft peaks in about 1 to 2 minutes. Keep going until stiff peaks form—that means when you lift the whisk, the cream stands straight up without drooping. Here's the tricky part: don't overbeat, or you'll end up with sweet butter. Once you reach stiff peaks, stop immediately. Transfer the whipped cream to a separate bowl and refrigerate it while you build the filling. This step is crucial because the whipped cream makes the final cheesecake mousse-like rather than dense.
Step 3: Combine the Cream Cheese Base
- In a separate medium-large mixing bowl, add your softened cream cheese, powdered sugar, cookie butter, sour cream, vanilla extract, and sea salt. Beat on medium speed with an electric mixer until everything is completely smooth and no streaks of cream cheese remain. This takes about 2 to 3 minutes. Scrape down the sides of the bowl halfway through to make sure you're incorporating everything evenly. The mixture should look pale, fluffy, and cloud-like—not thin or liquidy. If it seems too soft or warm, refrigerate the bowl for 10 minutes. The consistency matters because you're about to fold in the whipped cream, and you need the base to be stable enough to hold those airy bubbles.
Step 4: The Gentle Fold
- This is where patience pays off. Using a rubber spatula, gently fold the cold whipped cream into the cookie butter mixture in three additions. Start by spooning about one-third of the whipped cream onto the cream cheese base, then fold slowly and deliberately—slide the spatula down the center of the bowl, along the bottom, and bring it back up and over, rotating the bowl slightly after each motion. Keep folding until you see no white streaks remaining. This process takes about 1 to 2 minutes per addition. You're trying to maintain those air bubbles you worked hard to create—aggressive stirring will deflate them and ruin the mousse-like texture. Once all the whipped cream is incorporated, you have your final filling.
Step 5: Fill the Crusts
- Transfer your filling into a piping bag fitted with a round tip (a 1A tip creates a professional-looking swirl). Remove the chilled crusts from the refrigerator. Pipe the filling into each cup in a smooth, even spiral, starting from the outside and working toward the center. Fill until the filling reaches just about ¼ inch from the top of each liner. If you don't have a piping bag, a spoon works too—just smooth the filling gently with an offset spatula or the back of a spoon for even coverage. The goal is neat, even tops so the ganache layer sits flat and looks intentional.

Step 6: Chill and Set the Filling
- Cover the pans loosely with plastic wrap or aluminum foil (you don't need an airtight seal; just protect them from absorbing flavors from the fridge). Place them in the refrigerator for at least 6 hours, but overnight is ideal. This resting time allows the filling to firm up and the flavors to meld together. I promise the wait is worth it.
Step 7: Add the Cookie Butter Ganache Topping
- Place your ½ cup of cookie butter in a microwave-safe bowl. Heat it in the microwave in 15-second intervals, stirring between each burst, until it's completely melted and pourable. This usually takes 20 to 30 seconds total—cookie butter melts quickly, so watch it carefully to prevent burning. The mixture should be glossy and smooth like warm caramel. Spoon or drizzle the warm cookie butter ganache over each chilled cheesecake. It will naturally flow down the sides, creating that bakery-style look. Don't stress about perfection here—slight drips look rustic and intentional. Place the pans back in the refrigerator for 15 to 20 minutes until the ganache sets completely.

Step 8: Garnish and Serve
- Once the ganache has set, it's time to add the finishing touches. Press a whole Biscoff cookie onto the top of each cheesecake at a slight angle, or sprinkle crushed cookie pieces over the ganache. A small dollop of whipped cream on top adds an elegant touch if you're serving these at a special occasion. Remove the cheesecakes from their liners if you're using muffin cups, or serve them directly in their mini pans for a more casual presentation. Keep them refrigerated until serving time. These are best enjoyed chilled and fresh from the fridge.
Notes
FAQs
Can I make these without a mini cheesecake pan?
Absolutely! I’ve made these in regular muffin tins lined with paper liners, and they work perfectly. The yield will be the same (24 mini cheesecakes), and the cooking process is identical. The main advantage of a specialized mini cheesecake pan is that it comes with removable bottoms, making it easier to remove the finished product. With muffin liners, just serve them in the liner or carefully peel it away once everything is set. Either way, they taste amazing.
What if my cookie butter is too thick to drizzle?
Cookie butter varies in consistency depending on the brand. If yours is too thick to pour smoothly, warm it in the microwave in 10-second bursts, stirring between each burst. A few seconds usually softens it enough to drizzle without thinning it excessively. You want it melted but not thin like oil—it should be pourable but still glossy when it sets.
Can I make these without whipped cream folded in?
Yes, but the texture will be different. Without the whipped cream, you’ll have a denser, more traditional cheesecake filling. Increase the cream cheese to 32 ounces (four 8-ounce blocks) and skip the heavy cream step. The filling will be richer and creamier but less mousse-like. Both versions are delicious—this one is just lighter and more elegant.
How do I know when the ganache is set enough to serve?
The ganache should feel firm to the touch but still slightly glossy, not hard like chocolate. It usually takes 15 to 20 minutes in the refrigerator. If you press gently with your finger and it doesn’t leave an indent, it’s ready. If it still feels soft or oily, give it another 5 to 10 minutes. Patience here ensures that beautiful glossy finish stays intact when you serve them.
Can I use store-bought whipped cream instead of making my own?
You can, but I recommend thawing and draining any excess liquid first. Store-bought whipped cream often contains stabilizers that keep it fluffy when folded into filling. You’ll need about 2 cups of the airy product to equal the whipped cream from 1 cup of heavy cream. Use it straight from the container—don’t rebeat it. The filling will still be delicious, though it may be slightly less fluffy than homemade whipped cream.
More Recipes You’ll Love
- Key Lime Pie With Biscoff Crust – A bright, tangy dessert with that signature spiced cookie crust you’ll recognize from this recipe
- these homemade cookies – Layer-by-layer cookie magic that makes an excellent gift alongside these mini cheesecakes
- Kiwi Chocolate – An elegant flavor combination for a dessert board featuring these mini cheesecakes
- This Homemade Carrot Cake – Worth adding to your recipe collection.
- My Favorite No-Fuss Cheesecake – Worth adding to your recipe collection.
- This Easy Lemon Recipe – Worth adding to your recipe collection.
Making these Biscoff mini cheesecakes transformed the way I think about entertaining. There’s no stress, no complicated techniques, just quality ingredients and a little patience. Every time I set these on the table, I watch my guests’ faces light up—that moment when they taste that silky filling and realize you made them from scratch. That’s the magic I chase in the kitchen every single day. These little cheesecakes prove that elegant desserts don’t require fancy equipment or hours of work. They just require love, good ingredients, and the willingness to take your time. Good food is a good mood!

My name is Lori Walker. I’m a registered dietitian, food blogger and food enthusiast. I share easy healthy, delicious recipes on my blog and review necessary kitchen items. The recipes I share take less… Read more