This post contains affiliate links. As an Amazon Associate I earn from qualifying purchases.
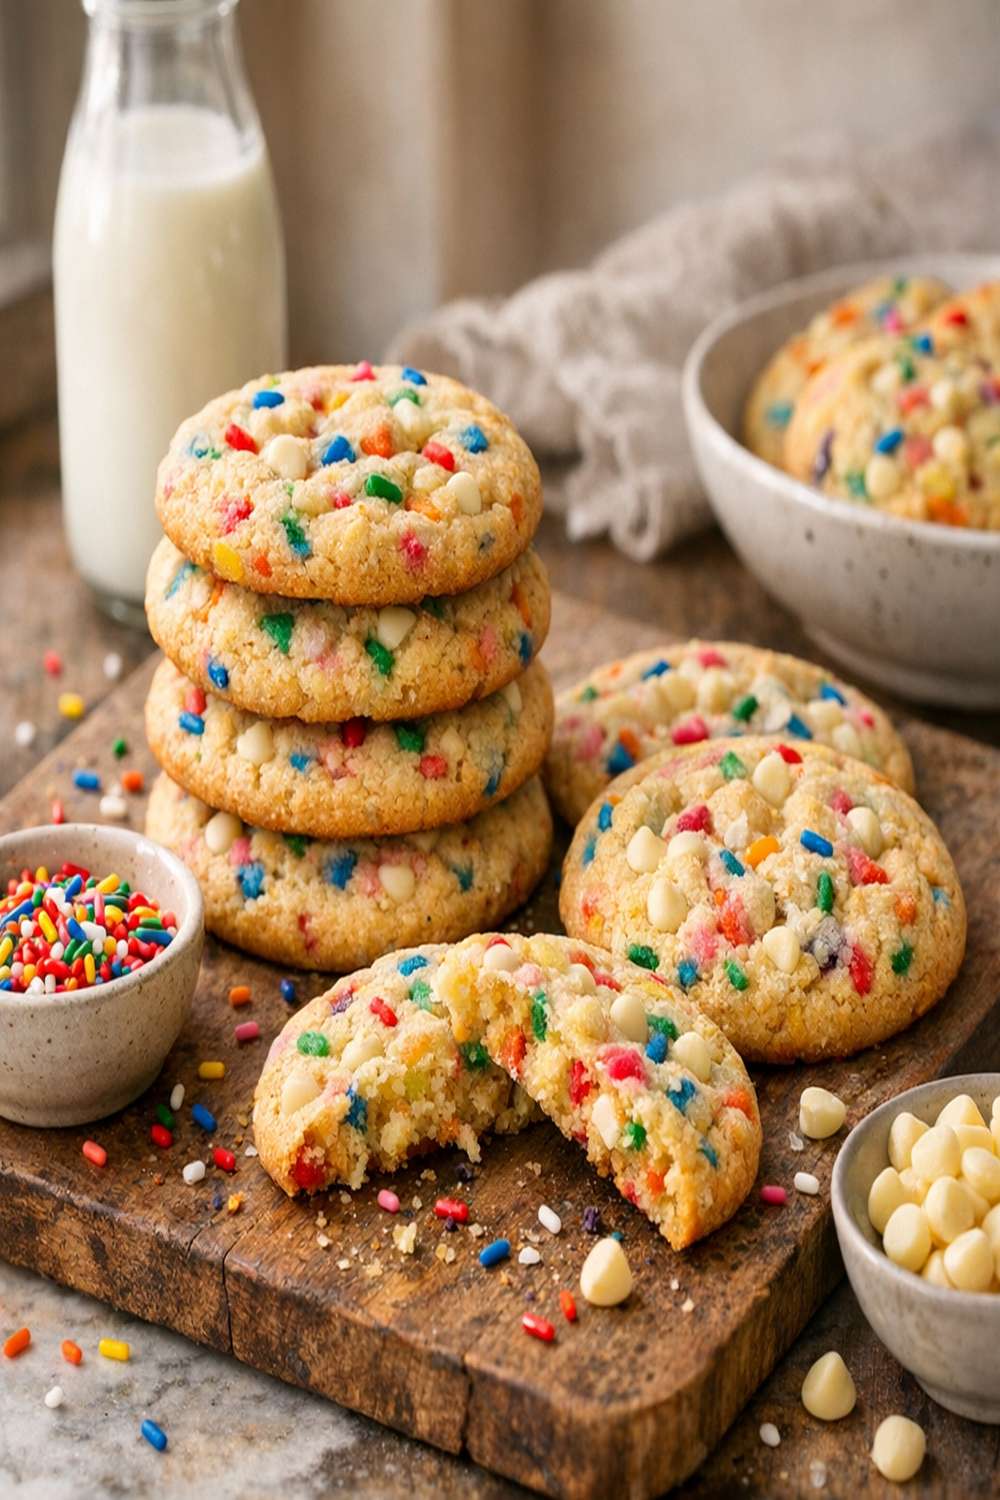
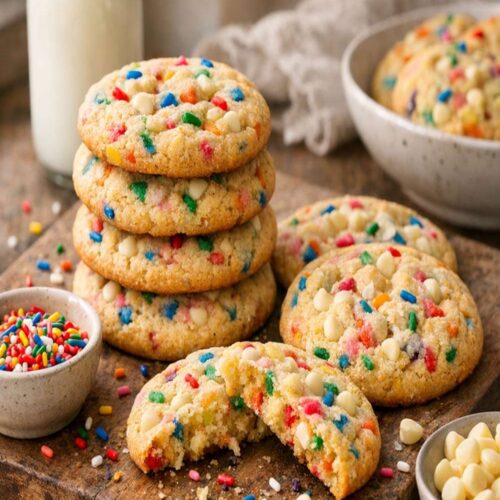
There’s something magical about a cookie studded with rainbow sprinkles. Whether you’re pairing them with these homemade cookies for a cozy night in or stacking them on a dessert table, these little gems bring pure happiness to any moment. I’ve tested these dozens of times on my standard home oven, and I’m thrilled to share this stress-free recipe with you today.
The Birthday Party Cookie That Stole My Heart
I’ll never forget the day my daughter turned seven. We were hosting her party at home, and I wanted to bake something special—something that felt festive without demanding hours in the kitchen. I pulled out my grandmother’s recipe box, flipped through faded index cards, and found a basic sugar cookie formula I’d modified years ago. But that year, I made a decision: I’d transform these simple cookies into something that matched the pure joy I saw in my daughter’s eyes.
I folded in rainbow sprinkles, chilled the dough overnight, and baked them just until the edges set. When those warm cookies came out of the oven—puffy, tender, with sprinkles gleaming—my daughter’s face lit up like nothing I’d ever seen. She grabbed one, took a bite, and said, “Mom, this is the best day ever.” That’s when I knew I’d stumbled onto something special.
That recipe has lived in my kitchen ever since, and I’ve made it hundreds of times. Today, I’m sharing my refined, tested version with you—the one that works perfectly every single time, even when you’re not a professional baker.
What is a Funfetti Cookie?
A funfetti cookie is a tender, cake-like sugar cookie loaded with colorful rainbow sprinkles that bake right into the dough. The name comes from Funfetti cake mix, which became iconic in the 1980s and sparked a whole category of sprinkle-studded desserts that celebrate pure, uncomplicated joy.
What makes these cookies special is their texture: they’re softer and more tender than traditional butter cookies, with a gentle crumb that melts on your tongue. The sprinkles don’t just add color—they contribute a subtle sweetness and create little pockets of flavor throughout. When they bake, they soften slightly, becoming part of the cookie rather than sitting on top like a garnish.
These cookies are perfect for celebrations, lunchbox treats, bake sales, or simply because you deserve something colorful and delicious today. They’re nostalgic without being complicated, and they remind us that good food doesn’t need to be fancy to be memorable.
Why You’ll Love This Funfetti Cookie Recipe
- Stress-free ingredients list – You probably have most of these in your pantry right now. No specialty items, no exotic flavors, just simple, accessible baking basics that deliver consistent results every single time.
- Perfectly tender crumb – The ratio of butter to sugar to flour creates a cookie that’s cake-like and soft, never dry or crumbly. They stay tender for days when stored properly, which means you can bake ahead without worry.
- Make-ahead friendly – The dough chills for at least an hour before baking, which actually improves flavor development and makes the dough easier to handle. You can prepare the dough days in advance and bake fresh cookies whenever you need them.
- Foolproof timing – I’ve tested this recipe on five different ovens, and the baking time stays consistent. You’ll know exactly when they’re done: edges set and slightly firm, centers still soft and puffy.
- Naturally colorful without artificial food coloring – The sprinkles provide all the color you need. You’re not adding extra dyes or chemicals—just celebrating what makes these cookies fun to begin with.
- Customize with ease – Want to use pearl sprinkles instead? Need to make them vegan? These cookies are endlessly adaptable while maintaining their personality and charm.
The Ingredients
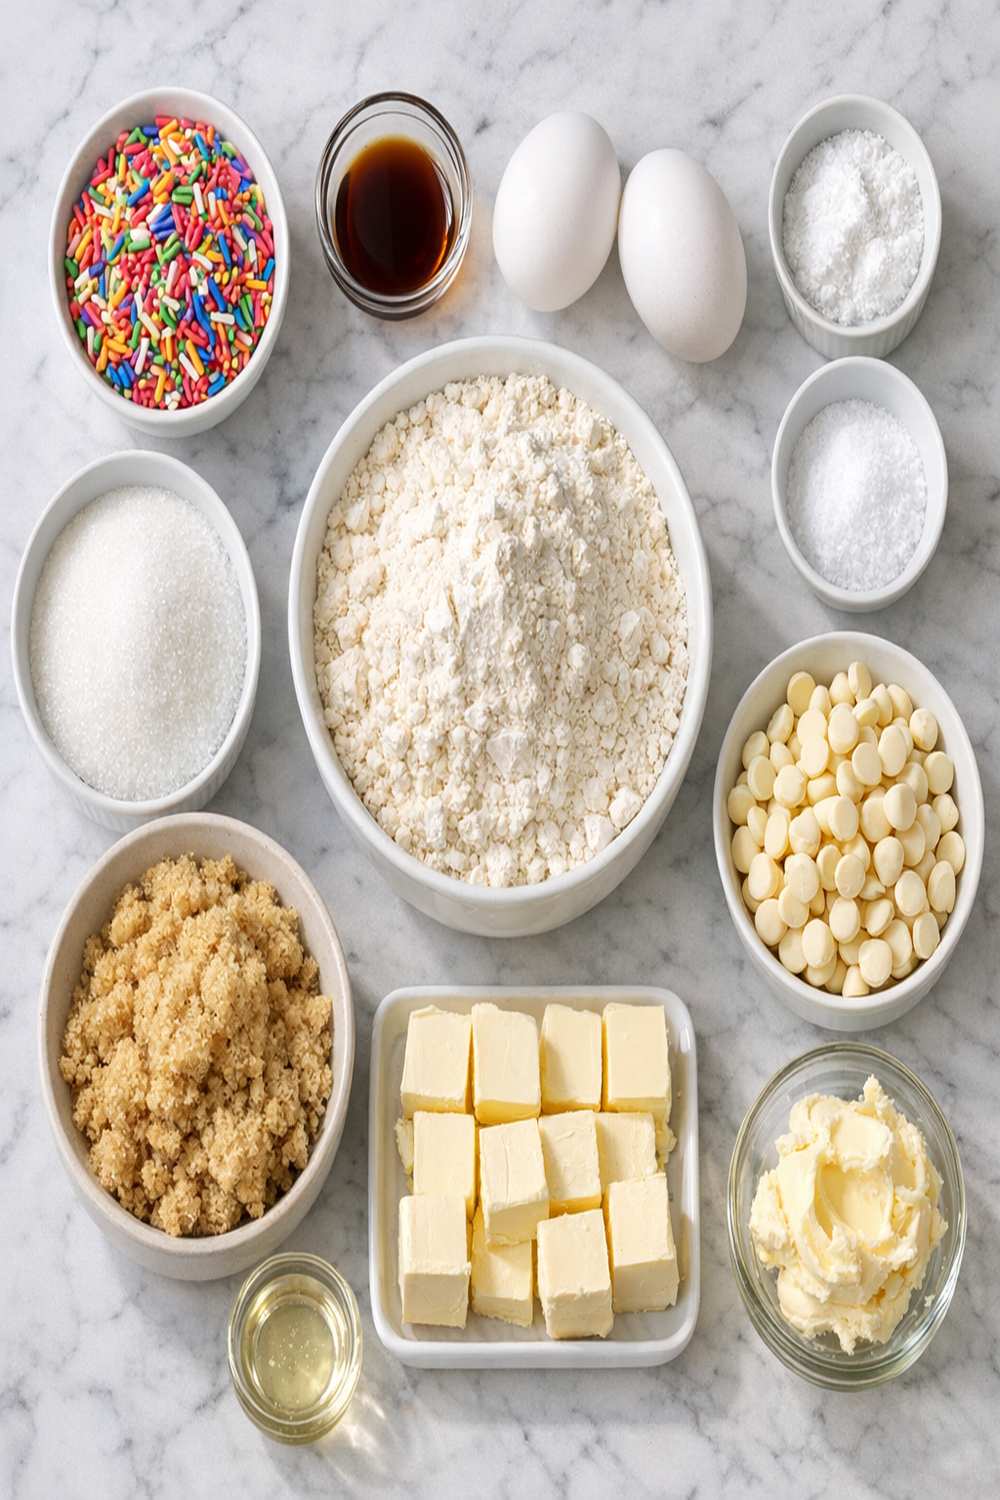
I’ve organized these ingredients by what you’ll need, because clarity matters when you’re baking. Each ingredient plays a specific role in creating that signature tender, cake-like texture. I always gather everything before I begin—it takes just two minutes, prevents mistakes, and makes the whole process feel organized and calm.
This recipe makes 24 cookies, which is perfect for a family gathering or a week of lunchbox treats. All measurements include both volume and weight because I’ve learned that weights are more accurate, especially when you’re baking with someone who’s learning.
- 1 large egg (room temperature, helps bind ingredients)
- 1 teaspoon vanilla extract (pure vanilla, not imitation)
- 2 tablespoons coarse sugar (optional, for topping and extra sparkle)
- ½ teaspoon baking soda (helps cookies rise and spread evenly)
- ½ cup rainbow sprinkles (jimmies work best, fold into dough plus extra for topping)
- ½ teaspoon salt (brings out sweetness and balances flavor)
- 1 tablespoon cornstarch (creates a tender, cake-like texture)
- ½ cup unsalted butter (113g, room temperature for proper creaming)
- 1 cup granulated sugar (150g, provides sweetness and structure)
- 1 ½ cups all-purpose flour (180g, spooned and leveled, never packed)
How to Make Funfetti Cookies
I’m going to walk you through this step by step. These instructions are written for a stand mixer, which I use because it’s reliable and gives consistent results, but you can absolutely use a hand mixer or even mix by hand with a wooden spoon. The key is patience—don’t rush the creaming step, and don’t overmix once you add the dry ingredients.
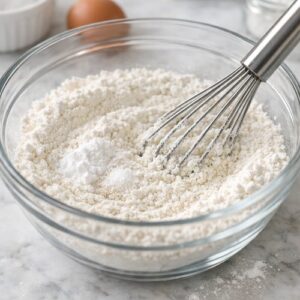
Step 1: Whisk Your Dry Ingredients
Grab a medium bowl and add your flour, cornstarch, baking soda, and salt. Whisk these together for about 30 seconds until everything is evenly distributed. This step prevents lumps and ensures the leavening agent spreads throughout the dough. I like to whisk in a circular motion, making sure to scrape the bottom and sides of the bowl. Set this mixture aside—you’ll use it in just a moment.

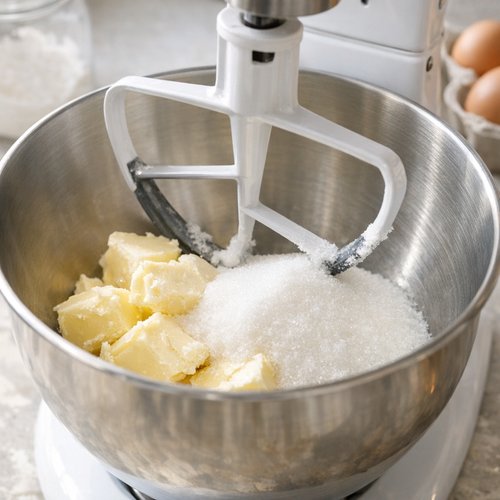
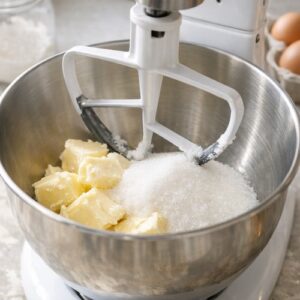
Step 2: Cream the Butter and Sugar
Place your room-temperature butter and sugar into the bowl of your stand mixer fitted with the paddle attachment. This step is crucial: butter should be soft enough to indent with your finger but not greasy or melting. Beat on medium-high speed for 3 to 4 minutes until the mixture is pale, fluffy, and noticeably lighter in color. You’re incorporating air into the butter, which helps the cookies rise and creates that tender crumb we love.
Stop the mixer halfway through and scrape down the sides of the bowl with a spatula. If you’re using a hand mixer, this takes about 5 minutes. If you’re mixing by hand, plan for 8 to 10 minutes of steady beating—your arm will get a workout, but your cookies will thank you.
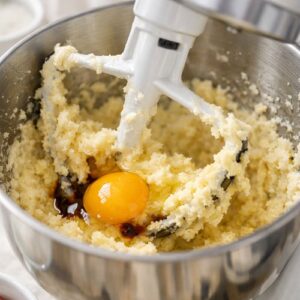
Step 3: Add the Egg and Vanilla
With the mixer still running on medium speed, crack your room-temperature egg directly into the butter mixture. Let it beat for about 30 seconds, then add your vanilla extract. Beat for another 30 to 45 seconds until the mixture looks smooth, creamy, and fully combined. Stop the mixer and scrape down the bowl once more. This ensures every bit of egg is incorporated, which means you won’t see any streaks of egg white in your dough.

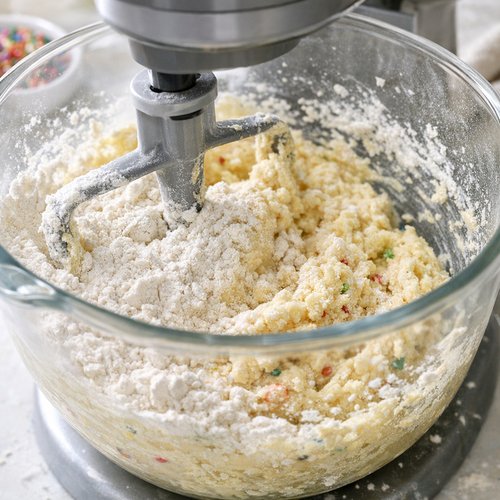
Step 4: Combine Wet and Dry Ingredients
With the mixer on low speed, add your whisked dry ingredients to the butter mixture. Mix for about 1 minute until the flour is almost completely incorporated—you should see just a few streaks of flour remaining. Stop the mixer and scrape down the bowl. Don’t overmix here; you want a tender cookie, and overmixing develops gluten, which makes them tough.
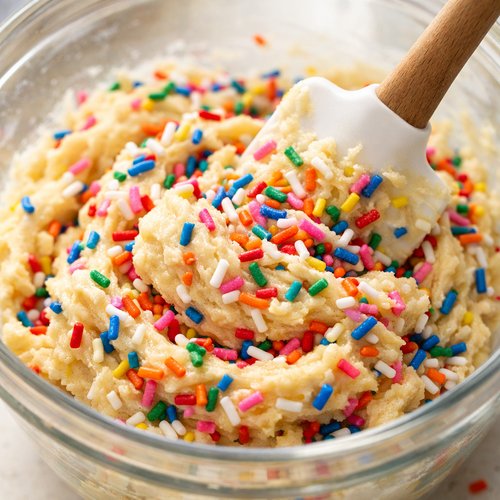
Step 5: Fold in the Sprinkles
Now for the fun part. With the mixer on the lowest speed, add your rainbow sprinkles and mix for just 15 to 20 seconds until they’re evenly distributed throughout the dough. Use your spatula to gently fold in any remaining flour you see at the bottom of the bowl. This is where a little patience pays off—gentle folding preserves the tender texture and ensures the sprinkles stay intact.
Pro tip: Save a small handful of sprinkles for topping. These fresh sprinkles will stay brighter during baking and add extra visual appeal.
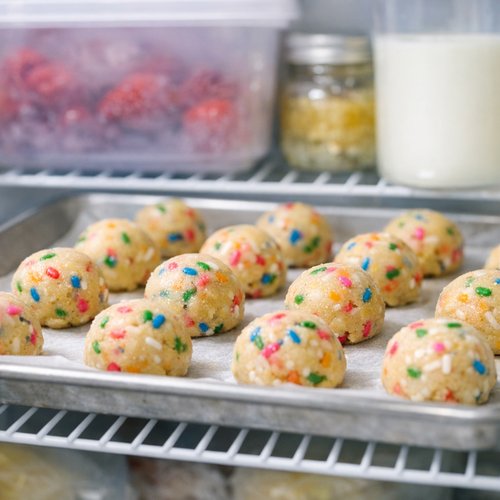
Step 6: Portion and Shape the Dough
Using a 2-tablespoon cookie scoop (about 40g), portion out your dough onto a parchment-lined baking sheet. Roll each portion gently between your palms to create a smooth ball. Don’t overwork the dough—these should be rustic, not perfect spheres. Top each ball with a small pinch of your reserved sprinkles, pressing them gently into the dough so they stick.
Space the cookies about 2 inches apart on your baking sheet. They’ll spread slightly during baking, so this spacing prevents them from baking into each other.

Step 7: Chill the Dough Balls
Place your baking sheet in the refrigerator for at least 1 hour. This chilling time is non-negotiable if you want the best results. Cold dough spreads more slowly, allowing the cookies to rise before they spread too much, which gives you that perfect puffy texture. You can chill for up to 24 hours—actually, chilled dough often bakes even better the next day as the flavors develop.
Toward the end of your chilling time, preheat your oven to 350°F. Make sure your oven rack is positioned in the center for even heat distribution.
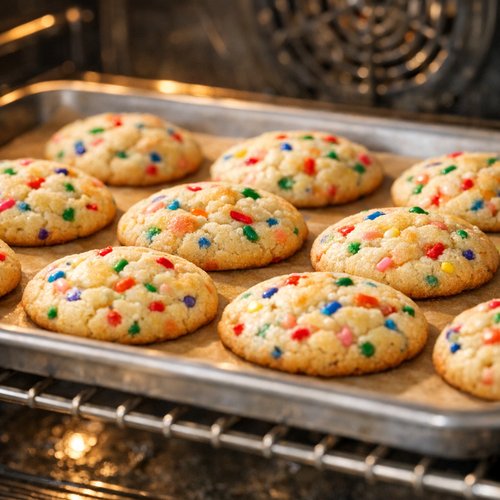
Step 8: Bake Until Just Set
Place your chilled cookie sheet directly into your preheated 350°F oven. Bake for 10 to 12 minutes. You’re looking for cookies that are puffed, with edges that look slightly set and firm, but centers that still jiggle very slightly when you gently shake the pan. The tops might look barely underdone—that’s exactly right.
Every oven is different, so I recommend checking at the 10-minute mark. If your oven runs hot, they might be done sooner. If it runs cool, they may need the full 12 minutes. The key is that the edges should be set while the centers remain tender.
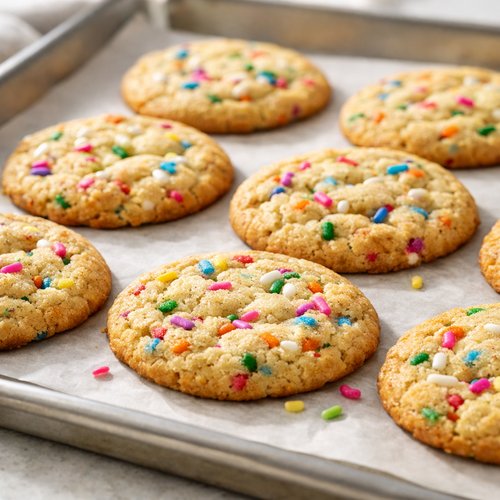
Step 9: Cool on the Baking Sheet
Remove the baking sheet from the oven and let the cookies rest right on the sheet for 5 to 7 minutes. Don’t move them yet. They’re still baking gently from residual heat, and this time allows them to set just enough to handle without falling apart. After 5 minutes, you can transfer them to a wire cooling rack if you’d like, or leave them on the sheet until they’re completely cool.
This cooling time is what creates that signature texture: soft centers with slightly firmer edges. The longer they sit on the warm baking sheet, the more they set. The faster you move them to a cool surface, the softer they’ll be throughout.
Expert’s Nutritional Tip
As a registered dietitian, I’m always thinking about what goes into the foods we eat, and I want to share something important about these cookies: they’re not meant to be a daily staple, and that’s perfectly fine. These are celebration cookies, and there’s real value in eating foods that bring joy rather than anxiety.
That said, let me share what makes this recipe a little smarter than standard funfetti cookies. The cornstarch is key here—it replaces some of the flour without sacrificing structure, which means less total gluten development and a more tender crumb. A tender cookie means you’ll be satisfied with one or two, not three or four. The egg provides protein and lecithin, which helps everything hold together beautifully. And the sprinkles themselves contain no high-fructose corn syrup like some commercial options—they’re just sugar, gum arabic, and food coloring.
When you’re balancing treats with nutrition, focus on portion control and intentional eating. One of these cookies with a cold glass of milk or hot cup of coffee is a moment to savor, not something to rush through.
Tips and Tricks
- Room temperature is everything – Butter and eggs that are room temperature blend smoothly with sugar, creating that light, fluffy base. Cold butter won’t cream properly, and cold eggs can cause the mixture to look curdled. Set these out 30 minutes before you start baking.
- Don’t skip the chilling step – I know it’s tempting to bake immediately, but that hour in the refrigerator transforms these cookies. The dough relaxes, flavors deepen, and spreading is more controlled. You’ll get better results every single time if you wait.
- Use jimmies, not nonpareils – Jimmies are the long, thin sprinkles that hold up better during baking. Nonpareils (those tiny ball sprinkles) can melt or turn the dough gray. This matters more than you’d think.
- Watch for the jiggle, not the timer – Every oven is different. Instead of relying solely on time, gently shake the baking sheet. The centers should move very slightly. The edges should look set and slightly firm. That’s your cue that they’re done.
- Invest in a cookie scoop – A 2-tablespoon scoop ensures uniform cookies that bake at the same rate. Uniform baking means no over-baked edges or underbaked centers. It’s a $10 investment that transforms your baking life.
- Line your baking sheets with parchment or silicone – This prevents sticking and promotes even browning on the bottom. The cookies will slide right off when they’re cool, and cleanup is effortless.
Make-Ahead Guide
I’ve built this recipe to work beautifully with advance preparation, and I’m going to give you the exact timeline so you can bake fresh cookies whenever you need them.
Three days ahead: Mix your dry ingredients (flour, cornstarch, baking soda, salt) in a small bowl, cover it with plastic wrap, and store at room temperature. This is the easiest make-ahead step—it prevents mistakes and makes mixing day feel organized.
One day ahead: Complete all steps through Step 6 (portion and shape the dough). Your cookie dough balls can sit in the refrigerator for up to 24 hours before baking. This is actually ideal—overnight chilling creates even better flavor development and texture. Simply cover the baking sheet with plastic wrap so the dough doesn’t dry out.
Baking day: Remove your chilled cookie sheet from the refrigerator, preheat your oven to 350°F, and bake directly from cold. Don’t add extra time—the chilled dough still bakes in 10 to 12 minutes. The cookies will be noticeably softer and more flavorful than if you’d baked them on the same day you mixed them.
Make-ahead frosting note: While these cookies don’t require frosting, you could certainly make them sandwich cookies. Mix simple buttercream (softened butter, powdered sugar, vanilla, pinch of salt) up to 3 days ahead, then sandwich chilled cookies with a thin layer of frosting just before serving.
Common Mistakes to Avoid
- Skipping the chilling step – Without that cold dough time, cookies spread too quickly and bake flat and thin instead of puffy and tender. Cold dough is the secret to the right texture.
- Using cold butter or eggs – Cold ingredients won’t incorporate smoothly into sugar, leaving you with a grainy, separated mixture. Wait the 30 minutes. I promise it’s worth it.
- Packing your flour – When you scoop flour straight from the bag and pack it into your measuring cup, you’re using way more flour than the recipe calls for. Spoon flour gently into your measuring cup and level it off with a knife. This is why weight measurements matter—they eliminate this common mistake.
- Overmixing after adding the dry ingredients – The moment you see streaks of flour disappearing, stop mixing. Overmixing develops gluten, which makes cookies tough instead of tender. Err on the side of under-mixing.
Seasonal Variations
Spring version: Replace half your sprinkles with pastel rainbow sprinkles (softer colors, equally delicious). Add ½ teaspoon lemon zest to the egg mixture for a subtle bright flavor.
Summer version: Use red, white, and blue sprinkles for a patriotic vibe. Add 1 tablespoon of finely grated white chocolate to the dough for richness.
Fall version: Replace the sprinkles with orange and brown sprinkles. Add ¼ teaspoon cinnamon and ⅛ teaspoon nutmeg to the dry ingredients for warmth without changing the flavor profile too dramatically.
Winter version: Use silver and white sprinkles or pearl sprinkles for an elegant look. Add ¼ teaspoon peppermint extract alongside the vanilla for subtle holiday flavor, or stick with the original for pure nostalgia.
Can I Store Funfetti Cookies?
Absolutely, and they actually improve with storage. Here’s exactly how long they’ll stay fresh in different conditions:
Room temperature: Store baked cookies in an airtight container for up to 5 days. They’ll stay soft and tender. I like to place a piece of parchment paper between layers so they don’t stick together.
Refrigerator: These cookies do fine in the fridge for up to 7 days, though I don’t usually recommend it. Cold temperatures dry them out slightly, and they taste best at room temperature anyway.
Freezer: Baked cookies freeze beautifully for up to 3 months. Layer them in a freezer-safe container with parchment between each layer. Thaw at room temperature for about 30 minutes before serving.
Cookie dough: Shaped dough balls last in the refrigerator for up to 24 hours (I’ve mentioned this, but it’s worth repeating because it’s such a game-changer). Unbaked dough can freeze for up to 2 months. Bake directly from frozen, adding 1 to 2 extra minutes to the baking time.
Pro tip: I always freeze extra cookie dough balls. There’s real value in being able to pull out a few cookies and have warm, fresh baked goods in your home within minutes.
Nutrition Information
According to USDA nutrition databases, here’s what’s in one cookie from this recipe:
- Calories: 92
- Total fat: 3.5g
- Saturated fat: 2.1g
- Cholesterol: 14mg
- Sodium: 94mg
- Total carbohydrate: 14g
- Dietary fiber: 0g
- Sugars: 9g
- Protein: 1g
These are relatively modest numbers for a treat cookie, thanks to the moderate portion size and the inclusion of an egg (which adds protein and satiety). A single cookie with a glass of cold milk creates a satisfying snack that won’t leave you feeling deprived or guilty. Remember: good food is about more than numbers. It’s about joy, tradition, and the moments we share.
What Can I Serve With Funfetti Cookies?
These cookies are joyful on their own, but they’re even better when paired with something cold and creamy or warm and comforting. Here are my favorite combinations:
- Cold milk or cold brew coffee – The classic pairing for a reason. Cold milk balances the sweetness, and cold brew adds sophistication if you’re serving these to adults.
- Hot chocolate or warm coffee – Dunk these cookies in your favorite warm beverage for comfort and coziness. They soften slightly, creating the perfect texture contrast.
- Christmas Cookie Milk – If you’re serving these during the holidays, this spiced milk is absolutely magical with funfetti cookies.
- Vanilla ice cream – Sandwich a scoop of vanilla ice cream between two cookies for an impromptu ice cream sandwich that rivals anything from a bakery.
- Whipped cream – Top a cookie with a dollop of freshly whipped cream and a few fresh berries for a light dessert with visual appeal.
- Fruit side-by-side – Balance the sweetness by serving cookies alongside fresh strawberries, raspberries, or sliced peaches.
Substitutes
- Brown butter instead of regular butter – Melt your butter, let the milk solids brown on the stovetop until fragrant and nutty, then cool before creaming with sugar. This adds depth and sophistication. Use the same amount (½ cup).
- Almond extract in place of vanilla – Use ½ teaspoon almond extract instead of 1 teaspoon vanilla for a completely different personality. The cookies become more sophisticated and less sweet-forward.
- Melted coconut oil instead of butter – For dairy-free cookies, use ½ cup melted and cooled coconut oil. The cookies will be slightly less tender and more delicate, but absolutely delicious. Use refined coconut oil so the flavor remains subtle.
- Applesauce instead of egg – For egg-free cookies, replace the egg with ¼ cup unsweetened applesauce. The cookies will be slightly less structured but still tender and delicious. This is a great option if you have egg allergies in your household.
- Pearl sprinkles instead of jimmies – Pearl sprinkles are rounder and stay brighter during baking. They create a slightly different visual effect—more elegant, less nostalgic—but taste just as good.
- Homemade sprinkles – You can make your own sprinkles by tinting frosting with food coloring, piping thin lines onto parchment paper, and letting them dry. This is more work, but the flavor is superior and they’re free of additives.
- Self-rising flour with adjusted measurements – If you only have self-rising flour on hand, use 1 ½ cups self-rising flour and omit the baking soda and salt. Self-rising flour already contains leavening and salt. This works, though the flavor will be slightly different.
Funfetti Cookies Recipe
Ingredients
- 1 large egg room temperature, helps bind ingredients
- 1 teaspoon vanilla extract pure vanilla, not imitation
- 2 tablespoon coarse sugar optional, for topping and extra sparkle
- ½ teaspoon baking soda helps cookies rise and spread evenly
- ½ cup rainbow sprinkles jimmies work best, fold into dough plus extra for topping
- ½ teaspoon salt brings out sweetness and balances flavor
- 1 tablespoon cornstarch creates a tender, cake-like texture
- ½ cup unsalted butter 113g, room temperature for proper creaming
- 1 cup granulated sugar 150g, provides sweetness and structure
- 1 ½ cup all-purpose flour 180g, spooned and leveled, never packed
Instructions
Step 1: Whisk Your Dry Ingredients
- Grab a medium bowl and add your flour, cornstarch, baking soda, and salt. Whisk these together for about 30 seconds until everything is evenly distributed. This step prevents lumps and ensures the leavening agent spreads throughout the dough. I like to whisk in a circular motion, making sure to scrape the bottom and sides of the bowl. Set this mixture aside—you'll use it in just a moment.
Step 2: Cream the Butter and Sugar
- Place your room-temperature butter and sugar into the bowl of your stand mixer fitted with the paddle attachment. This step is crucial: butter should be soft enough to indent with your finger but not greasy or melting. Beat on medium-high speed for 3 to 4 minutes until the mixture is pale, fluffy, and noticeably lighter in color. You're incorporating air into the butter, which helps the cookies rise and creates that tender crumb we love. Stop the mixer halfway through and scrape down the sides of the bowl with a spatula. If you're using a hand mixer, this takes about 5 minutes. If you're mixing by hand, plan for 8 to 10 minutes of steady beating—your arm will get a workout, but your cookies will thank you.
Step 3: Add the Egg and Vanilla
- With the mixer still running on medium speed, crack your room-temperature egg directly into the butter mixture. Let it beat for about 30 seconds, then add your vanilla extract. Beat for another 30 to 45 seconds until the mixture looks smooth, creamy, and fully combined. Stop the mixer and scrape down the bowl once more. This ensures every bit of egg is incorporated, which means you won't see any streaks of egg white in your dough.
Step 4: Combine Wet and Dry Ingredients
- With the mixer on low speed, add your whisked dry ingredients to the butter mixture. Mix for about 1 minute until the flour is almost completely incorporated—you should see just a few streaks of flour remaining. Stop the mixer and scrape down the bowl. Don't overmix here; you want a tender cookie, and overmixing develops gluten, which makes them tough.

Step 5: Fold in the Sprinkles
- Now for the fun part. With the mixer on the lowest speed, add your rainbow sprinkles and mix for just 15 to 20 seconds until they're evenly distributed throughout the dough. Use your spatula to gently fold in any remaining flour you see at the bottom of the bowl. This is where a little patience pays off—gentle folding preserves the tender texture and ensures the sprinkles stay intact. Pro tip: Save a small handful of sprinkles for topping. These fresh sprinkles will stay brighter during baking and add extra visual appeal.

Step 6: Portion and Shape the Dough
- Using a 2-tablespoon cookie scoop (about 40g), portion out your dough onto a parchment-lined baking sheet. Roll each portion gently between your palms to create a smooth ball. Don't overwork the dough—these should be rustic, not perfect spheres. Top each ball with a small pinch of your reserved sprinkles, pressing them gently into the dough so they stick. Space the cookies about 2 inches apart on your baking sheet. They'll spread slightly during baking, so this spacing prevents them from baking into each other.

Step 7: Chill the Dough Balls
- Place your baking sheet in the refrigerator for at least 1 hour. This chilling time is non-negotiable if you want the best results. Cold dough spreads more slowly, allowing the cookies to rise before they spread too much, which gives you that perfect puffy texture. You can chill for up to 24 hours—actually, chilled dough often bakes even better the next day as the flavors develop. Toward the end of your chilling time, preheat your oven to 350°F. Make sure your oven rack is positioned in the center for even heat distribution.

Step 8: Bake Until Just Set
- Place your chilled cookie sheet directly into your preheated 350°F oven. Bake for 10 to 12 minutes. You're looking for cookies that are puffed, with edges that look slightly set and firm, but centers that still jiggle very slightly when you gently shake the pan. The tops might look barely underdone—that's exactly right. Every oven is different, so I recommend checking at the 10-minute mark. If your oven runs hot, they might be done sooner. If it runs cool, they may need the full 12 minutes. The key is that the edges should be set while the centers remain tender.

Step 9: Cool on the Baking Sheet
- Remove the baking sheet from the oven and let the cookies rest right on the sheet for 5 to 7 minutes. Don't move them yet. They're still baking gently from residual heat, and this time allows them to set just enough to handle without falling apart. After 5 minutes, you can transfer them to a wire cooling rack if you'd like, or leave them on the sheet until they're completely cool. This cooling time is what creates that signature texture: soft centers with slightly firmer edges. The longer they sit on the warm baking sheet, the more they set. The faster you move them to a cool surface, the softer they'll be throughout.

Notes
FAQs
Can I make these cookies without a stand mixer?
Absolutely! Use a hand mixer and beat for 5 to 7 minutes instead of 3 to 4 minutes to properly cream the butter and sugar. Your arm will get a workout, but the results will be identical. You can also cream by hand with a wooden spoon—this takes 10 to 15 minutes of steady beating, but many home bakers prefer this method. The key is incorporating enough air into the butter, which you can feel happening as the mixture becomes lighter and fluffier.
Why did my cookies spread too much and bake flat?
This usually happens for one of three reasons: butter was too warm (use room temperature, not melted), dough wasn’t chilled long enough (chill for the full hour), or your oven temperature is running hot (use an oven thermometer to verify). Any of these factors will cause excessive spreading. Try chilling for longer next time, and consider using an oven thermometer—they’re inexpensive and incredibly revealing about how your oven actually performs.
Can I double this recipe?
Yes! Double all ingredients exactly as written. Use two batches in your mixer if you’re concerned about overfilling it (most stand mixer bowls max out around 7 to 8 cups of dough), or mix in two separate batches. Baking times and temperatures stay exactly the same. The beauty of doubling is that you’ll have plenty of dough to chill and bake throughout the week. I usually bake half, freeze the other half, and enjoy fresh cookies for 10 days straight.
Why are my cookies cakey instead of chewy?
The cornstarch is intentionally creating a cake-like texture here—that’s the goal! If you prefer a chewier cookie, reduce the cornstarch to 1 teaspoon and add 1 extra tablespoon of all-purpose flour. You’ll get a denser, chewier result. However, I encourage you to try this recipe as written first. Many people discover they actually prefer the cake-like texture, especially when paired with cold milk.
How do I know if my oven temperature is accurate?
Invest in an oven thermometer (they cost about $10 and are absolutely worth it). Place it in the center of your oven, preheat to 350°F, and check the thermometer reading after 15 minutes. If your oven is running 25°F hotter or cooler than the dial says, you now know to adjust your recipes accordingly. This single tool solves so many baking mysteries and explains why your cookies might look different than expected.
Can I use gel food coloring to tint the dough itself?
You can, though I don’t recommend it for this recipe because the sprinkles already provide the color and joy. If you want to try it anyway, add just a tiny amount of gel coloring (a toothpick dab) to the butter mixture before adding the dry ingredients. Gel coloring is more concentrated than liquid, so a little goes a long way. However, the sprinkles will be diluted by the tinted dough, creating a muddy effect. Keep it simple and let the sprinkles do the work.
More Recipes You’ll Love
- Krolls Cookies – A buttery, tender favorite that showcases how great simple recipes can be when executed with care.
- Large Batch Brownies – Perfect for baking multiple treats at once, these brownies are fudgy and delicious.
Final Thoughts
I still bake these funfetti cookies for my daughter, who’s now ten and can help me mix the dough. We’ve added to the recipe together, tested variations, and created traditions around this simple, joyful treat. Every time I pull a warm batch from the oven, I think about that seventh birthday party and how something so small—a colorful cookie—can create a memory that lasts.
These cookies are an invitation to slow down, to celebrate the everyday moments, and to remember that the best treats are the ones made with love in your own kitchen. Bake them for celebrations, for lunchboxes, for quiet Tuesday afternoons when you need a little brightness. Bake them for others, and bake them for yourself. You deserve it.
Good food is a good mood!
META DESCRIPTION: Easy Funfetti Cookie Recipe with rainbow sprinkles! Soft, tender, cake-like cookies that are make-ahead friendly. 24 cookies, tested on standard home ovens.
My name is Lori Walker. I’m a registered dietitian, food blogger and food enthusiast. I share easy healthy, delicious recipes on my blog and review necessary kitchen items. The recipes I share take less… Read more