This post contains affiliate links. As an Amazon Associate I earn from qualifying purchases.
There’s something magical about pairing bright citrus with rich, creamy white chocolate. These lemon brownies are the kind of dessert that makes everyone pause mid-conversation and ask for the recipe. I love serving them alongside a cold glass of milk or alongside lighter desserts like these homemade cookies for a citrus-themed dessert table.
How a Family Recipe Sparked My Love for Citrus Desserts
I’ll never forget the summer my grandmother taught me to make her famous lemon bars. I was maybe ten years old, standing on a kitchen stool, my hands covered in sticky lemon juice while she hummed old songs. She always said, “Lori, sunshine tastes better when you make it yourself.” Those words stuck with me through culinary school and into my career as a registered dietitian.
Years later, I wanted to reimagine that lemon magic in brownie form. I tested this recipe dozens of times on my standard home equipment, tweaking the white chocolate ratio and lemon zest amount until I got that perfect balance of tartness and sweetness. The result? These lemon brownies with white chocolate became an instant family favorite that I’ve recorded in my collection of cherished recipes.
What is Lemon Brownies With White Chocolate Recipe?
Lemon brownies with white chocolate are a modern twist on traditional fudgy brownies. Instead of deep cocoa flavor, these bars feature a tender, cake-like crumb infused with bright lemon zest and fresh lemon juice. Creamy melted white chocolate adds richness and a subtle vanilla note that plays beautifully against the citrus.
The origins of this combination are rooted in the farm-to-table movement, where bakers started incorporating fresh citrus into unexpected desserts. White chocolate, once considered “not real chocolate” by purists, has earned its place in refined desserts over the past two decades. What makes this recipe special is the technique of rubbing lemon zest with sugar first—this releases the essential oils and infuses deeper lemon flavor throughout every single bite.
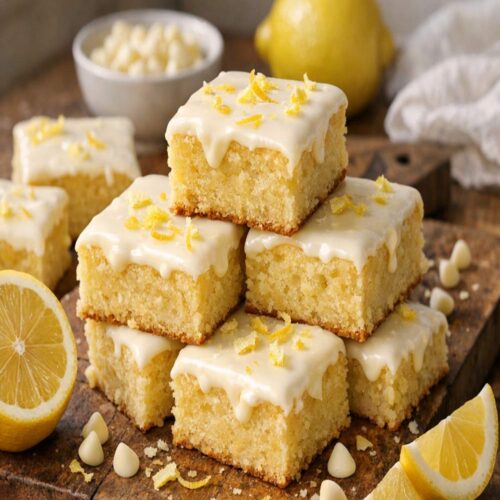
The result is something between a brownie and a lemon bar—dense enough to satisfy chocolate lovers, bright enough to delight citrus fans, and elegant enough to serve at dinner parties.
Why You’ll Love This Lemon Brownies With White Chocolate Recipe
- Bright, refreshing flavor – The combination of tart lemon and creamy white chocolate creates a perfectly balanced dessert that doesn’t feel heavy, even though it’s rich and satisfying.
- Stress-free technique – I’ve simplified the process to work with standard home equipment. No special skills needed, just clear steps and honest timing from someone who’s tested this hundreds of times.
- Make-ahead friendly – These brownies actually taste better the next day as flavors meld and the crumb sets. Perfect for meal prep or bringing to gatherings.
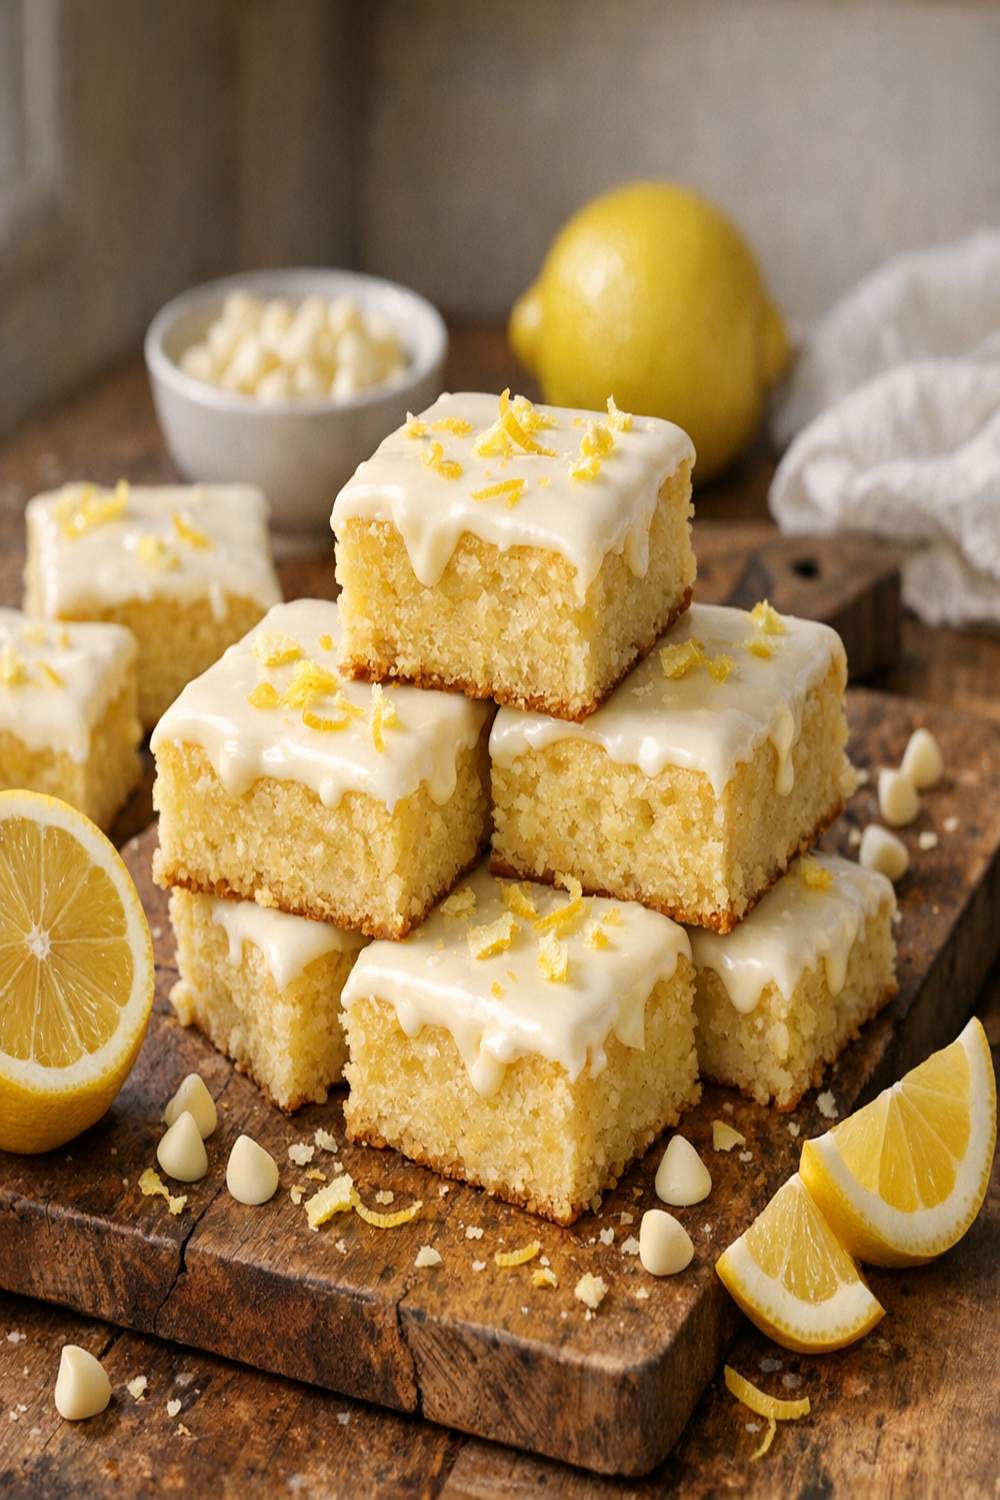
- Impressive presentation – The lemon glaze and optional zest garnish make these look bakery-worthy, but they’re genuinely easy to execute.
- Naturally nutrient-dense ingredients – Fresh lemon juice provides vitamin C and natural acidity, while eggs contribute choline for brain health. As a dietitian, I appreciate desserts built on whole-food foundations.
The Ingredients
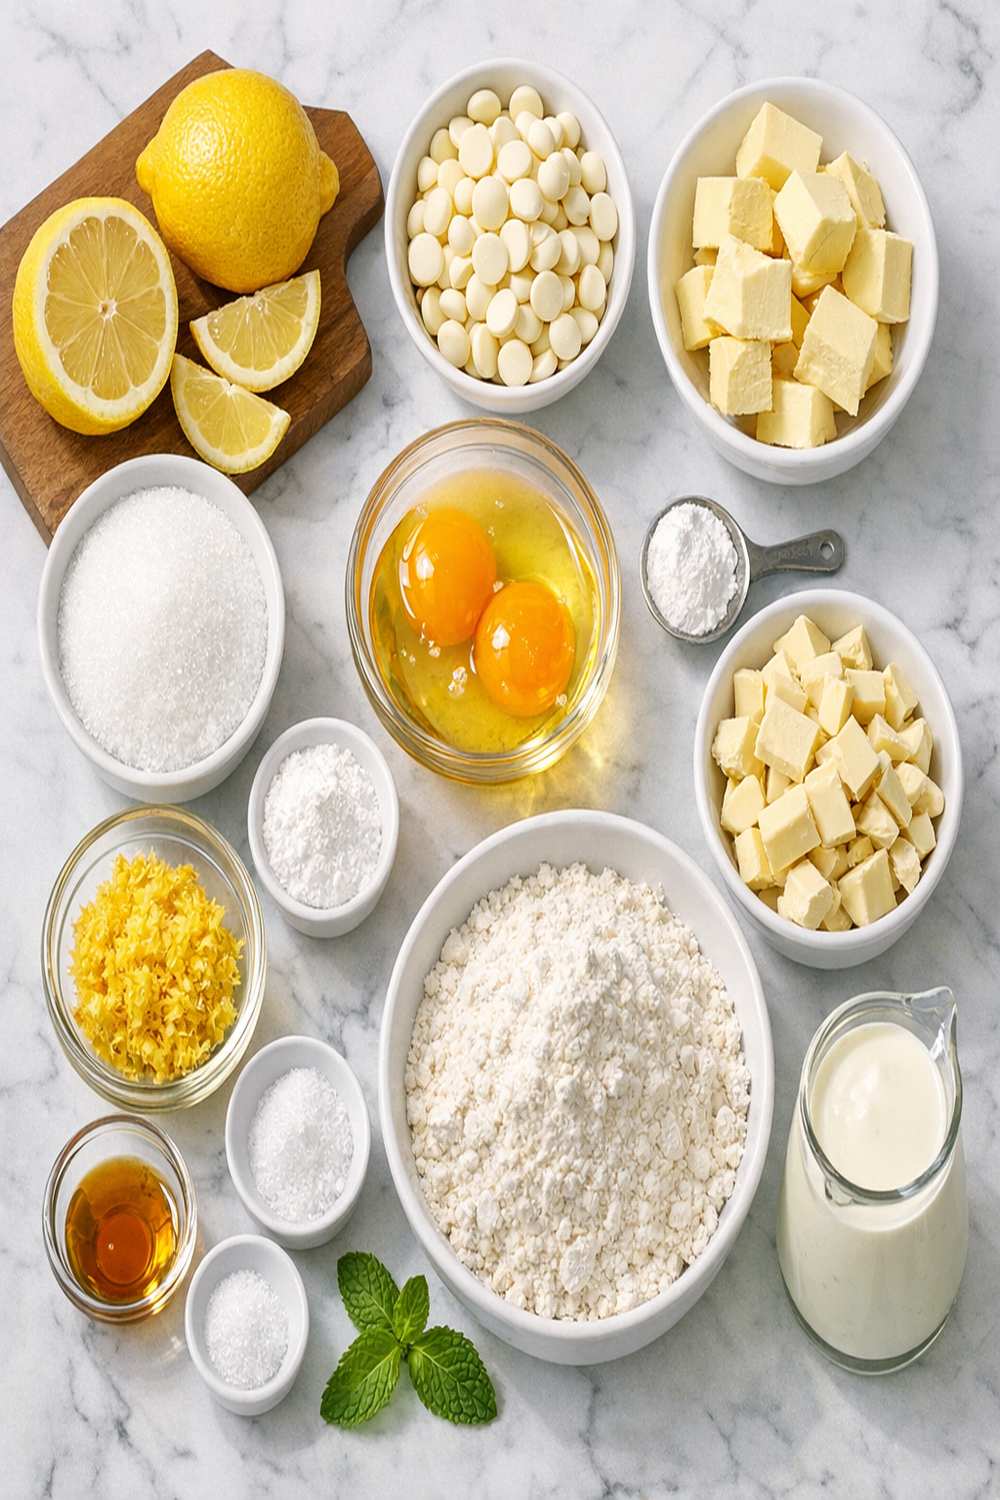
I’ve organized these ingredients into two sections to make prep super clear. The cake uses classic baking foundations with fresh citrus, while the glaze is simple enough to whisk together in under a minute. This recipe makes 16 brownies (one 8×8 pan).
For the Cake
- 1 large egg yolk (room temperature)
- 1 white chocolate bar, 4 ounces (I use Ghirardelli for reliable quality)
- ½ cup white chocolate chips, optional (for studding the batter)
- ¾ cup granulated sugar
- 1 cup plus 2 tablespoons all-purpose flour (spooned and leveled, never packed)
- ⅛ teaspoon baking powder (provides gentle lift)
- 1 teaspoon pure lemon extract (concentrated flavor boost)
- 2 tablespoons lemon zest (from 2 large fresh lemons, measured before zesting)
- 2 large eggs (room temperature, this matters for proper incorporation)
- ½ teaspoon fine sea salt (enhances sweetness perception)
- ½ cup unsalted butter (melted and slightly cooled)
- 2 tablespoons fresh lemon juice (added last to prevent curdling)
- 1 teaspoon pure vanilla extract (balances the lemon intensity)
For the Glaze
- 2 tablespoons fresh lemon juice (creates pourable consistency)
- Lemon zest for garnish, optional (adds visual appeal and fresh flavor)
- 1 cup powdered sugar (sifted if lumpy)
How to Make Lemon Brownies With White Chocolate Recipe?
I’m walking you through this step-by-step exactly as I test recipes in my own kitchen. The timing is honest, the temperatures are realistic, and I’ve included sensory cues so you’ll know exactly when something is ready. Take your time with the folding steps—that’s where many home bakers rush and end up with dense, tough brownies.
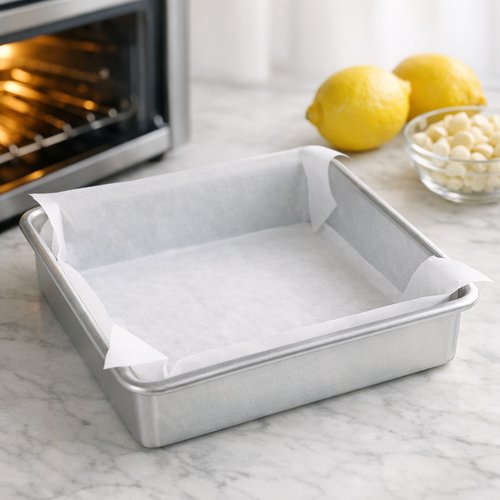
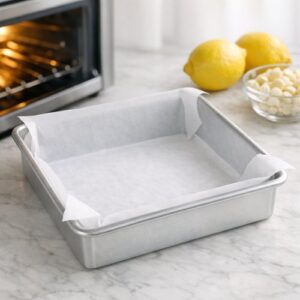
Step 1: Prepare Your Baking Pan and Oven
Start by preheating your oven to 350°F. While it heats, line an 8×8-inch light-colored aluminum baking pan with parchment paper, letting the edges overhang slightly. This makes removal and cooling so much easier. If you’re using a dark pan, reduce the oven temperature to 325°F to prevent over-browning the edges.
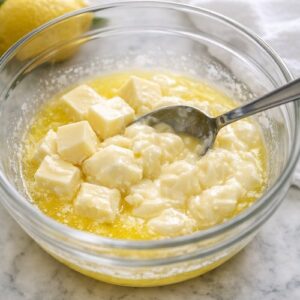
Step 2: Melt Butter and White Chocolate Together
Place the butter and white chocolate in a microwave-safe bowl. Microwave for 1 minute, then stir. The heat carries over, so you’ll see significant melting already happening. Continue heating in 15 to 30-second increments, stirring between each interval, until the mixture is completely smooth and glossy. This usually takes 2 to 3 minutes total.
Stop as soon as the white chocolate looks melted—over-microwaving causes it to seize and become grainy. Cover the bowl with a paper towel before microwaving to prevent splatters. When you remove it from the microwave, let it cool for about 2 minutes while you move to the next step.
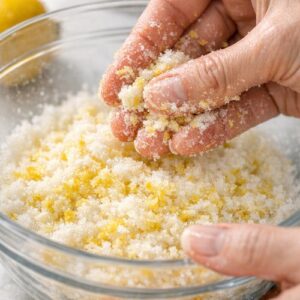
Step 3: Create Lemon Sugar by Rubbing Zest With Granulated Sugar
This step is where the magic happens. Add the sugar and lemon zest to a large mixing bowl. Using your fingertips, rub the zest and sugar together vigorously for about 1 to 2 minutes. You’ll see the sugar become slightly damp and fragrant as the essential oils from the zest release. This technique infuses lemon flavor throughout the brownies at a molecular level.
Stop when the mixture smells intensely lemony and the zest is evenly distributed. This isn’t optional—it’s the foundation of the lemon flavor you’ll taste in every bite.

Step 4: Add Eggs and Flavor Extracts
Crack both whole eggs and the single egg yolk into the lemon sugar mixture. Add the lemon extract and vanilla extract. Using a whisk, beat this combination for about 1 minute. The mixture should become slightly lighter in color and texture, indicating the eggs are incorporating oxygen.
You’re building structure here that will support the brownies as they bake. Room-temperature eggs incorporate more smoothly, so if yours came straight from the fridge, let them sit in warm water for 5 minutes before using.

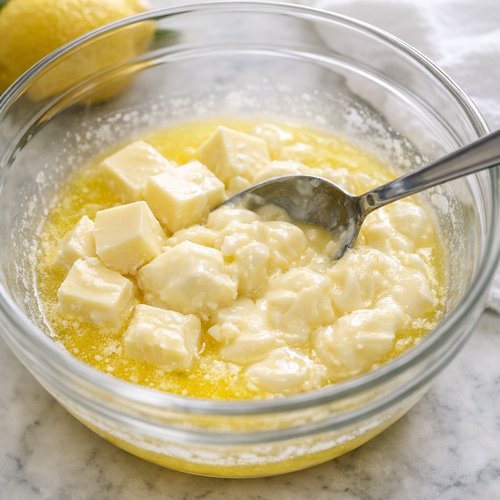
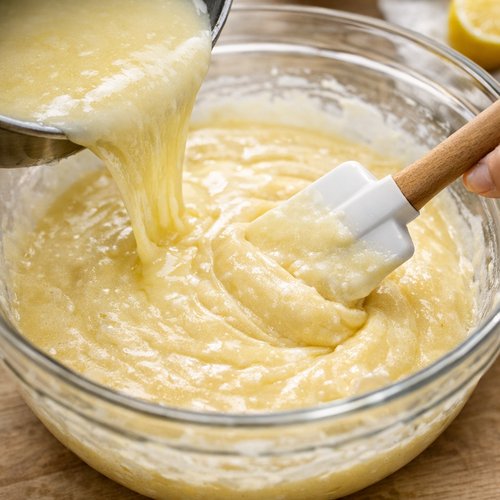
Step 5: Fold In the Cooled Butter and White Chocolate Mixture
Pour the slightly cooled butter and white chocolate mixture into the egg mixture. Using a rubber spatula, fold gently until you see no visible streaks of butter or white chocolate. This takes 8 to 10 folds depending on your technique. The batter should come together smoothly without being overworked.
Folding (rather than stirring vigorously) keeps the air bubbles you created in the egg mixture intact. This produces a more tender crumb than aggressive mixing.
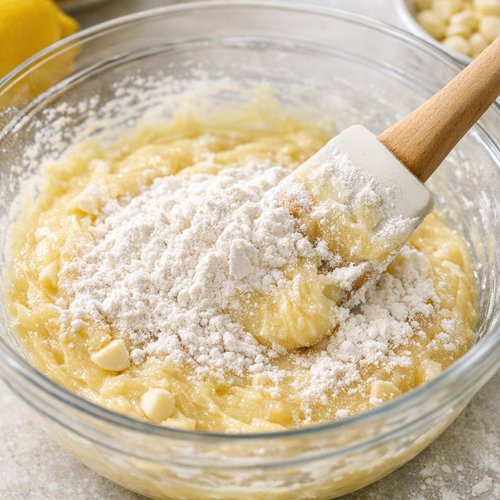
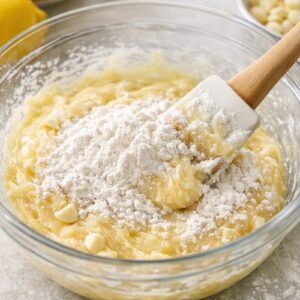
Step 6: Add Dry Ingredients
Sprinkle the flour, salt, and baking powder over the batter. Fold gently until you see just a few streaks of flour remaining—about 5 to 6 folds. The batter should look slightly lumpy at this point. This is completely normal.
Under-mixing at this stage is your friend. Over-developed gluten creates tough, cake-like brownies instead of fudgy ones. The lumps will smooth out as the batter hydrates while resting.
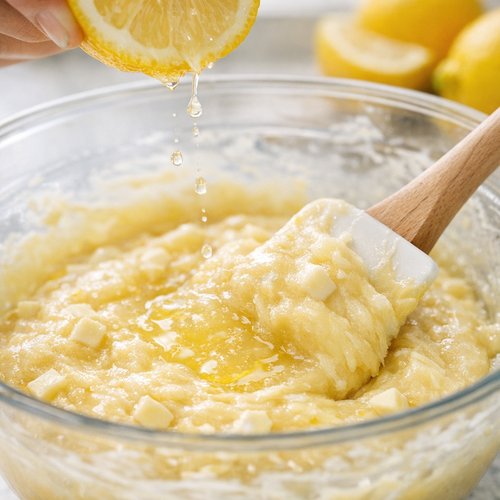
Step 7: Add Fresh Lemon Juice Last
Drizzle the fresh lemon juice over the batter and fold 2 to 3 times until fully incorporated. Adding the juice last prevents the acid from curdling the eggs. At this point, if you’re using white chocolate chips, fold them in gently. The finished batter should look smooth, glossy, and pourable.
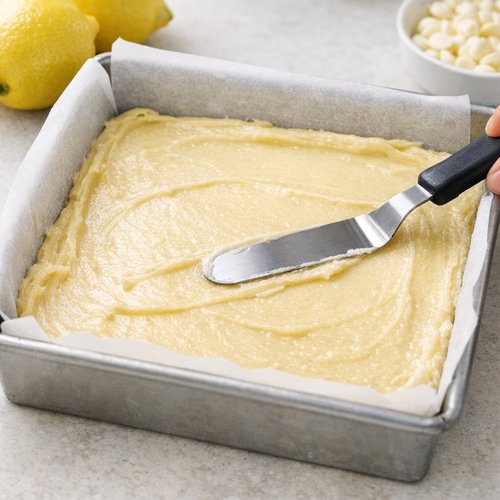
Step 8: Transfer to Prepared Pan and Smooth
Pour the batter into the prepared pan. Use an offset spatula or the back of a spoon to smooth the surface into an even layer. Tap the pan on the counter once or twice to release any air pockets. The batter should fill the pan evenly without any high spots.
Step 9: Bake Until Edges are Golden
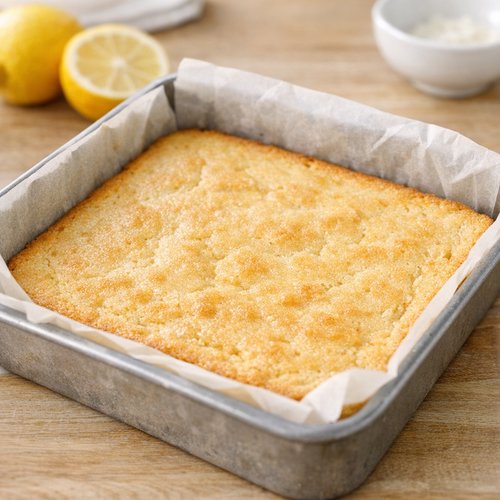
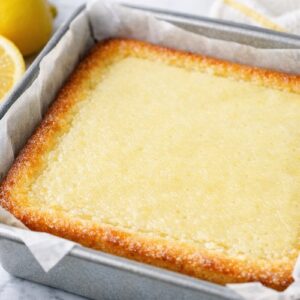
Bake for 25 to 30 minutes. The edges will turn a beautiful golden brown while the top may look pale or light yellow—this is exactly what you want. The center should look just set, not jiggly. To test for doneness, insert a toothpick into the very center. It should come out mostly clean with a few moist crumbs clinging to it.
Do not over-bake. Every oven runs differently, so start checking at 24 minutes. Overbaked lemon brownies turn dry and lose their tender texture. If you’re unsure, pull them out slightly under-done—they’ll continue cooking as they cool and firm up.

Step 10: Cool Completely Before Glazing
Remove the brownies from the oven and let them cool in the pan at room temperature for at least 1 hour. This is important. The structure continues to set as they cool, and the flavors deepen. Trying to glaze warm brownies will cause the glaze to melt and run off.
Once completely cooled, you can gently lift the brownies from the pan using the parchment overhang.
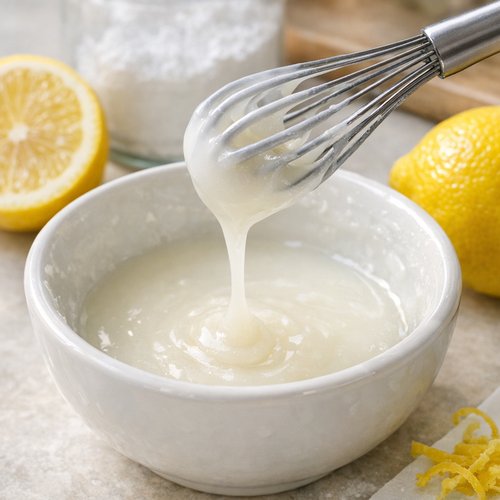
Step 11: Make the Lemon Glaze
In a small bowl, whisk together the powdered sugar and fresh lemon juice. Start with the juice and add the sugar gradually, whisking until smooth. The consistency should be thick but pourable—similar to honey. If it’s too thick, add a few drops of lemon juice. If it’s too thin, add more powdered sugar.
This glaze sets up beautifully, creating a thin, tangy shell that contrasts perfectly with the tender cake underneath.
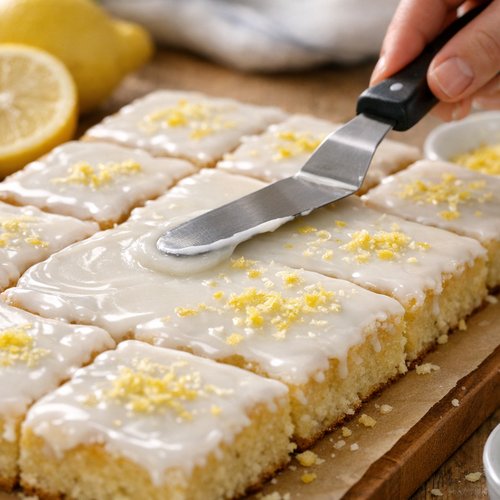
Step 12: Spread Glaze and Garnish
Using an offset spatula or the back of a spoon, spread the glaze evenly over the cooled brownies. Work quickly but gently—you want a thin, even layer. If desired, sprinkle fresh lemon zest over the glaze while it’s still wet so it adheres. Let the glaze set for 15 to 30 minutes before slicing.
Cut into 16 squares using a sharp, dry knife. Wipe the knife between cuts for clean edges. If you have trouble with the glaze cracking, dip your knife in hot water and wipe it dry before cutting.
Expert’s Nutritional Tip: The Power of Fresh Citrus in Desserts
As a registered dietitian, I’m passionate about what fresh lemon brings beyond flavor. The vitamin C in fresh lemon juice acts as a natural preservative while supporting immune function. More importantly, the citric acid in lemon juice helps our bodies absorb the iron in the eggs—a perfect example of how thoughtful ingredient pairing creates nutrition synergy.
The white chocolate provides fat-soluble vitamin D absorption (especially if you’ve used vitamin D-enriched butter), and the whole eggs contribute choline, essential for cognitive function. This isn’t health food pretending to be dessert—it’s genuinely satisfying dessert built on a nutritious foundation. Good food is a good mood, and that starts with knowing what you’re eating.
Tips and Tricks
- Use room-temperature eggs – They incorporate more evenly into the batter and create a more uniform crumb. Take eggs out of the fridge 30 minutes before baking.
- Invest in a microplane zester – It creates fine, fluffy zest that distributes evenly through the sugar. Box graters tend to create thicker pieces that clump together.
- Fresh lemon juice only – Bottled juice lacks the bright flavor and aromatic oils of fresh lemons. One lemon yields roughly 3 tablespoons of juice.
- Don’t skip the cooling step – Completely cooled brownies slice cleanly and hold their shape. Warm brownies will crumble and fall apart.
- Double-check your baking powder – Old baking powder (over 6 months old) loses potency. Replace it yearly for reliable rise and texture.
- Fold gently, always – This is the number-one difference between fudgy and cake-like brownies. Gentle folding preserves the tender crumb.
Common Mistakes to Avoid
- Over-mixing the batter – The moment you see the dry ingredients incorporated, stop folding. Continued mixing develops gluten, creating a dense, tough texture instead of fudgy brownies.
- Using cold eggs – Cold eggs don’t incorporate smoothly and create uneven texture throughout the brownies. The 30-minute room-temperature wait makes a measurable difference.
- Baking too long – This is the most common mistake I see from home bakers. The center should look barely set when you pull them out. They’ll continue setting as they cool, and you want that fudgy texture.
- Glazing warm brownies – Warm brownies will melt the glaze, causing it to slide off and creating a greasy appearance. Always wait for complete cooling.
Can I Store Lemon Brownies With White Chocolate Recipe?
I love the staying power of these brownies. Store them at room temperature in an airtight container for 2 to 3 days. The flavors actually deepen as they sit, so day two often tastes better than day one.
For longer storage, wrap individual brownies in plastic wrap and freeze in an airtight container for up to 1 month. Thaw at room temperature for 1 to 2 hours before serving. The glaze maintains its texture beautifully when frozen.
I actually prefer these brownies served cold straight from the refrigerator on hot summer days. The cold temperature makes the white chocolate more pronounced and the lemon flavor more refreshing. Store them in the fridge for up to 5 days in an airtight container.
Make-Ahead Guide: Meal Prep for Entertaining
These brownies are perfect for advance preparation, which is why I make them regularly for gatherings. Two days ahead: Bake the brownies completely, cool fully, and store in an airtight container at room temperature. One day ahead: Make the glaze and apply it to the cooled brownies. Let the glaze set fully before covering. Day of event: Simply cut and arrange on a serving platter. They’re ready to go.
Alternatively, you can prepare the dry ingredients in a small bowl the night before, cover with plastic wrap, and combine with the wet ingredients the morning of baking. This saves about 10 minutes of prep time and ensures accurate measurements even when you’re rushed.
Nutrition Information
Based on USDA nutrition data, one brownie (1 of 16 servings) contains approximately 185 calories, 9 grams of fat, 24 grams of carbohydrates, and 2 grams of protein. The sodium content is 95 milligrams, making these suitable for most sodium-restricted diets when consumed in moderation.
The fresh lemon juice provides 8% of your daily vitamin C per brownie, while the eggs contribute 35 micrograms of choline, supporting memory and cognitive function. White chocolate contains no flavonoids like dark chocolate, but it provides 120 milligrams of calcium per ounce, supporting bone health.
Seasonal Variations
- Summer version – Add ½ teaspoon of fresh mint extract to the batter and garnish the glaze with finely chopped fresh mint leaves. The herbal note complements the brightness beautifully.
- Spring version – Substitute ¼ teaspoon of edible lavender extract for the vanilla extract, creating a floral-citrus combination. Garnish with candied lemon peel.
- Fall version – Add ¼ teaspoon of ground cardamom to the dry ingredients. Cardamom’s warmth plays unexpectedly well with lemon and white chocolate.
- Winter version – Incorporate ¼ teaspoon of white pepper into the dry ingredients for subtle spice. White pepper adds warmth without the color or heaviness of black pepper.
What Can I Serve With Lemon Brownies With White Chocolate Recipe?
The bright citrus and white chocolate make these brownies surprisingly versatile for pairing. I love serving them alongside lighter desserts like these homemade cookies for a dessert variety platter. They’re also wonderful with cold beverages and simple accompaniments that let the lemon shine.
- Cold milk or buttermilk – The fat and slight acidity in buttermilk balances the sweetness and bright lemon perfectly.
- Herbal tea – Serve with chamomile, lemon verbena, or peppermint tea. The herbal notes complement without competing.
- Whipped cream – A dollop of lightly sweetened whipped cream adds richness and creaminess that frames the tartness.
- Lemon curd – For an over-the-top presentation, add a spoonful of lemon curd on top just before serving. Intense for serious lemon lovers.
- Vanilla ice cream – The cool creaminess plays beautifully against the warm brownie, while the vanilla doesn’t compete with the delicate white chocolate flavor.
Substitutes
- White chocolate alternative – If you can’t find quality white chocolate, substitute with the same weight of white baking chips. The result will be slightly less creamy but still delicious. Alternatively, use ¼ cup heavy cream mixed with 2 tablespoons of soft butter if you have neither.
- Lemon extract substitute – If you don’t have lemon extract, skip it entirely and increase fresh lemon juice to 3 tablespoons. The flavor will be slightly less intense but still bright and delicious.
- All-purpose flour alternative – Whole wheat pastry flour works well here, though the brownies will be slightly denser and nuttier. Use the exact same amount by volume.
- Fresh lemon juice alternative – In a pinch, use juice from quality bottled lemons, though the aromatic brightness will be diminished. Never use artificial lemon flavoring as a substitute for fresh juice.
- Powdered sugar alternative – For the glaze, blend granulated sugar in a food processor with 1 tablespoon of cornstarch per cup of sugar until powdery. It creates a glaze with slightly less shine but the same taste.
Lemon Brownies With White Chocolate Recipe
Ingredients
For the Cake
- 1 large egg yolk room temperature
- 1 white chocolate bar, 4 ounces I use Ghirardelli for reliable quality
- ½ cup white chocolate chips, optional for studding the batter
- ¾ cup granulated sugar
- 1 cup plus 2 tablespoons all-purpose flour spooned and leveled, never packed
- ⅛ teaspoon baking powder provides gentle lift
- 1 teaspoon pure lemon extract concentrated flavor boost
- 2 tablespoon lemon zest from 2 large fresh lemons, measured before zesting
- 2 large eggs room temperature, this matters for proper incorporation
- ½ teaspoon fine sea salt enhances sweetness perception
- ½ cup unsalted butter melted and slightly cooled
- 2 tablespoon fresh lemon juice added last to prevent curdling
- 1 teaspoon pure vanilla extract balances the lemon intensity
For the Glaze
- 2 tablespoon fresh lemon juice creates pourable consistency
- Lemon zest for garnish, optional adds visual appeal and fresh flavor
- 1 cup powdered sugar sifted if lumpy
Instructions
Step 1: Prepare Your Baking Pan and Oven
- Start by preheating your oven to 350°F. While it heats, line an 8x8-inch light-colored aluminum baking pan with parchment paper, letting the edges overhang slightly. This makes removal and cooling so much easier. If you're using a dark pan, reduce the oven temperature to 325°F to prevent over-browning the edges.
Step 2: Melt Butter and White Chocolate Together
- Place the butter and white chocolate in a microwave-safe bowl. Microwave for 1 minute, then stir. The heat carries over, so you'll see significant melting already happening. Continue heating in 15 to 30-second increments, stirring between each interval, until the mixture is completely smooth and glossy. This usually takes 2 to 3 minutes total. Stop as soon as the white chocolate looks melted—over-microwaving causes it to seize and become grainy. Cover the bowl with a paper towel before microwaving to prevent splatters. When you remove it from the microwave, let it cool for about 2 minutes while you move to the next step.
Step 3: Create Lemon Sugar by Rubbing Zest With Granulated Sugar
- This step is where the magic happens. Add the sugar and lemon zest to a large mixing bowl. Using your fingertips, rub the zest and sugar together vigorously for about 1 to 2 minutes. You'll see the sugar become slightly damp and fragrant as the essential oils from the zest release. This technique infuses lemon flavor throughout the brownies at a molecular level. Stop when the mixture smells intensely lemony and the zest is evenly distributed. This isn't optional—it's the foundation of the lemon flavor you'll taste in every bite.
Step 4: Add Eggs and Flavor Extracts
- Crack both whole eggs and the single egg yolk into the lemon sugar mixture. Add the lemon extract and vanilla extract. Using a whisk, beat this combination for about 1 minute. The mixture should become slightly lighter in color and texture, indicating the eggs are incorporating oxygen. You're building structure here that will support the brownies as they bake. Room-temperature eggs incorporate more smoothly, so if yours came straight from the fridge, let them sit in warm water for 5 minutes before using.

Step 5: Fold In the Cooled Butter and White Chocolate Mixture
- Pour the slightly cooled butter and white chocolate mixture into the egg mixture. Using a rubber spatula, fold gently until you see no visible streaks of butter or white chocolate. This takes 8 to 10 folds depending on your technique. The batter should come together smoothly without being overworked. Folding (rather than stirring vigorously) keeps the air bubbles you created in the egg mixture intact. This produces a more tender crumb than aggressive mixing.

Step 6: Add Dry Ingredients
- Sprinkle the flour, salt, and baking powder over the batter. Fold gently until you see just a few streaks of flour remaining—about 5 to 6 folds. The batter should look slightly lumpy at this point. This is completely normal. Under-mixing at this stage is your friend. Over-developed gluten creates tough, cake-like brownies instead of fudgy ones. The lumps will smooth out as the batter hydrates while resting.
Step 7: Add Fresh Lemon Juice Last
- Drizzle the fresh lemon juice over the batter and fold 2 to 3 times until fully incorporated. Adding the juice last prevents the acid from curdling the eggs. At this point, if you're using white chocolate chips, fold them in gently. The finished batter should look smooth, glossy, and pourable.

Step 8: Transfer to Prepared Pan and Smooth
- Pour the batter into the prepared pan. Use an offset spatula or the back of a spoon to smooth the surface into an even layer. Tap the pan on the counter once or twice to release any air pockets. The batter should fill the pan evenly without any high spots.

Step 9: Bake Until Edges are Golden
- Bake for 25 to 30 minutes. The edges will turn a beautiful golden brown while the top may look pale or light yellow—this is exactly what you want. The center should look just set, not jiggly. To test for doneness, insert a toothpick into the very center. It should come out mostly clean with a few moist crumbs clinging to it. Do not over-bake. Every oven runs differently, so start checking at 24 minutes. Overbaked lemon brownies turn dry and lose their tender texture. If you're unsure, pull them out slightly under-done—they'll continue cooking as they cool and firm up.
Step 10: Cool Completely Before Glazing
- Remove the brownies from the oven and let them cool in the pan at room temperature for at least 1 hour. This is important. The structure continues to set as they cool, and the flavors deepen. Trying to glaze warm brownies will cause the glaze to melt and run off. Once completely cooled, you can gently lift the brownies from the pan using the parchment overhang.

Step 11: Make the Lemon Glaze
- In a small bowl, whisk together the powdered sugar and fresh lemon juice. Start with the juice and add the sugar gradually, whisking until smooth. The consistency should be thick but pourable—similar to honey. If it's too thick, add a few drops of lemon juice. If it's too thin, add more powdered sugar. This glaze sets up beautifully, creating a thin, tangy shell that contrasts perfectly with the tender cake underneath.

Step 12: Spread Glaze and Garnish
- Using an offset spatula or the back of a spoon, spread the glaze evenly over the cooled brownies. Work quickly but gently—you want a thin, even layer. If desired, sprinkle fresh lemon zest over the glaze while it's still wet so it adheres. Let the glaze set for 15 to 30 minutes before slicing. Cut into 16 squares using a sharp, dry knife. Wipe the knife between cuts for clean edges. If you have trouble with the glaze cracking, dip your knife in hot water and wipe it dry before cutting.

Notes
FAQs
Can I use Meyer lemons instead of regular lemons?
Absolutely! Meyer lemons are actually my first choice when they’re in season (fall through spring). They’re slightly sweeter and less acidic than regular Lisbon or Eureka lemons, so the final brownies will be a touch less tart. Use the same amount of zest and juice—the sweetness of the Meyer lemons naturally balances the white chocolate. If Meyer lemons are very small, you might need 3 instead of 2.
Why did my brownies turn out dry and cake-like?
This is almost always caused by over-baking. Set your timer for 24 minutes instead of the full 30, and check at that point with a toothpick. The toothpick should come out with moist crumbs—not clean, not fudgy, but in between. Dry brownies can also result from over-folding the batter, which develops too much gluten. Remember: gentle folding, under-mixing. When in doubt, under-bake.
Can I make these in a 9×9 pan instead of 8×8?
Yes, but increase your baking time to 28 to 32 minutes. The brownies will be slightly thinner and more cake-like with a higher bake-to-brownie ratio. If you have a 9×13 pan, double the entire recipe and bake for 30 to 35 minutes. The beauty of this recipe is its flexibility with standard pans.
What if I don’t have lemon extract?
Lemon extract is concentrated flavoring, so you can’t simply replace it with more fresh juice (the acidity will throw off the balance). You have two options: skip it entirely and increase fresh lemon juice to 2.5 tablespoons, or use ½ teaspoon of lemon zest plus ¼ teaspoon of vanilla extract instead. The resulting brownies will be slightly less intensely lemon-flavored but still delicious.
How far in advance can I prepare the batter?
You can prepare all dry ingredients the night before and store in an airtight container. Keep wet ingredients separate and combine just before baking. Don’t mix the batter ahead of time—it’s best used immediately after combining wet and dry ingredients. The baking powder will begin activating once liquids are introduced, and you want that leavening power to work during baking, not in your mixing bowl.
More Recipes You’ll Love
- Key Lime Cookie Bars – If you love the bright citrus in these brownies, these tangy cookie bars are your next kitchen project.
- Large Batch Brownies – When you’re hosting a crowd, this scaled-up recipe uses the same reliable technique with double or triple batches.
- this simple cake – For a cool summer pairing with these warm brownies, homemade ice cream is a total game-changer.
I hope these lemon brownies with white chocolate become a staple in your kitchen the way they’ve become one in mine. There’s something deeply satisfying about pulling a pan of these golden-edged treasures from the oven, knowing you’ve created something from scratch that tastes like memory and care. Whether you’re baking for a special occasion or simply because Tuesday deserves something joyful, I promise this recipe will deliver.
Take your time with the technique, trust the timing, and remember that every oven is unique. The first batch teaches you how your kitchen works, and by the second batch, you’ll be making these with confidence. Share them with people you love, watch their faces light up with that first bite of bright lemon and creamy white chocolate, and bask in the simple joy of good food made with your own hands.
Good food is a good mood!
- Double Chocolate Muffins Recipe
- Lemon Curd Cookies Recipe
- Grandma’s Lemon Meringue Pie Recipe
- Jumbo Chocolate Muffins

My name is Lori Walker. I’m a registered dietitian, food blogger and food enthusiast. I share easy healthy, delicious recipes on my blog and review necessary kitchen items. The recipes I share take less… Read more