This post contains affiliate links. As an Amazon Associate I earn from qualifying purchases.
There’s nothing quite like a warm, cheesy bowl of hamburger and pasta to bring everyone to the dinner table—and fast. This dish pairs beautifully with a fresh side salad or some crusty bread. If you’re looking for other satisfying beef pasta options, I also love making my weeknight pasta, which brings elegance to weeknight cooking.
How This Recipe Became My Family’s Go-To Dinner
Back in 2019, when I first started collecting my family’s recipes, my grandmother handed me a worn index card with this exact dish scribbled in her handwriting. She called it “Grandpa’s Friday Night Special,” and honestly, I had no idea how important it would become to our family’s story.
I remember watching her make it countless times—the way she’d brown the beef with such patience, how she’d taste the sauce and adjust the seasonings with her eyes closed, as if she were listening to what the food needed. When I became a registered dietitian, I was thrilled to realize this comfort classic could actually be made healthier with whole wheat pasta and quality ingredients, without losing a single ounce of that nostalgic magic.
Now, I make this for my own family at least twice a month. It’s proof that good food truly is a good mood, and the best recipes are the ones that bring people together—no stress, no fuss.

What is Hamburger and Pasta?
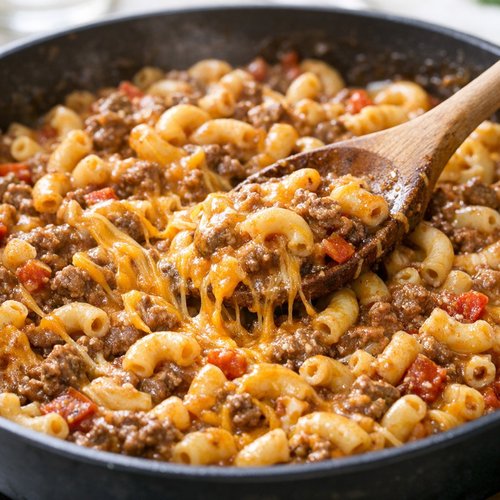
Hamburger and pasta is a classic one-pot comfort dish that combines ground beef, tender pasta, and a savory cheese sauce all in one skillet. It’s the kind of meal that tastes like home, no matter where you’re from.
This dish emerged from American comfort food traditions, where practicality met love in the kitchen. It became especially popular in the mid-20th century when one-pot meals helped busy families get dinner on the table without spending hours cleaning up. What makes this version special is the way the pasta absorbs the rich, tomato-spiced beef broth while the cheese melts into every crevice—creating a cohesive, deeply satisfying meal rather than separate components on a plate.
Unlike traditional mac and cheese, this recipe builds flavor complexity through the beef, aromatic spices, and tomato paste, making it feel more like a complete dinner than a side dish.
Why You’ll Love This Hamburger and Pasta Recipe
- Truly One-Pot Magic – Everything cooks in a single large skillet, which means minimal cleanup and maximum weeknight sanity. I’m talking about washing just one pan when dinner is done.
- Ready in Under 30 Minutes – From raw ingredients to table, this meal happens fast. Perfect for nights when you didn’t plan ahead but still want something homemade and nourishing.
- Budget-Friendly Without Feeling Cheap – Ground beef, whole wheat pasta, and cheese create a filling, satisfying meal that costs pennies per serving. As a dietitian, I appreciate that you’re getting real nutrition for your food dollar.
- Naturally Kid-Approved – The mild spice blend and creamy cheese sauce appeal to younger palates, while the depth of flavor keeps adults happy. This is the rare dish that doesn’t require cooking two separate dinners.
- Works for Make-Ahead Meals – This recipe stores beautifully and reheats without texture loss, making it perfect for meal prep or freezing portions for future busy nights.
- Customizable for Any Diet – Swap the pasta for gluten-free, use ground turkey, or add vegetables—this recipe is flexible enough to adapt to what your family needs.
The Ingredients
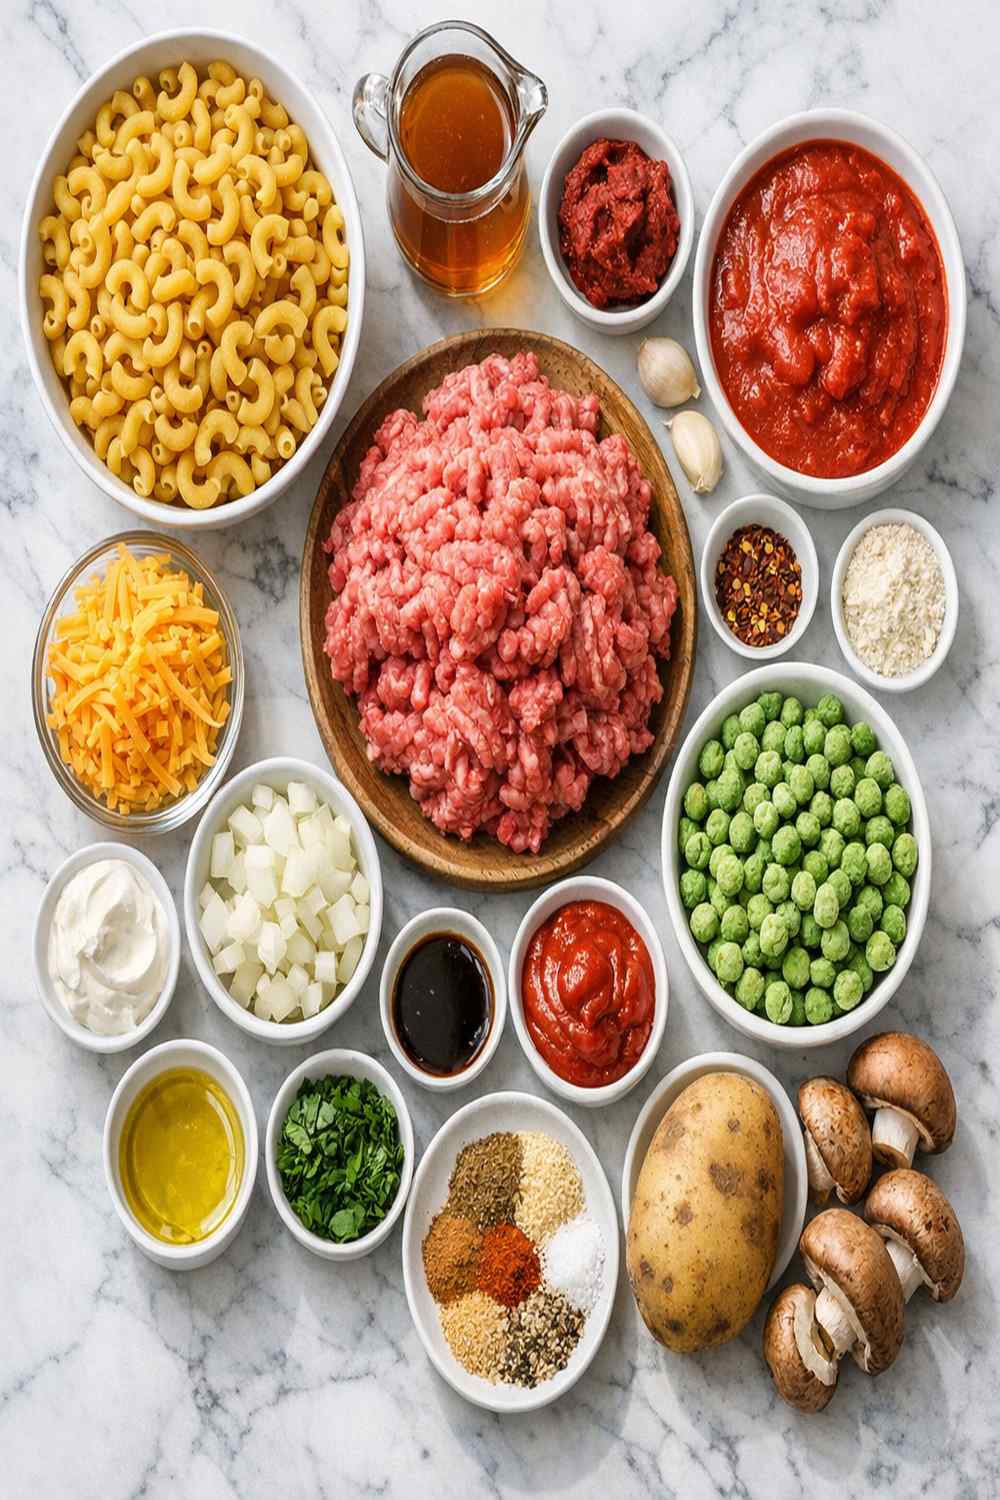
I’ve chosen each ingredient with care, focusing on quality basics that deliver maximum flavor and nutrition. You’ll notice I’m using whole wheat pasta and real beef broth—these choices matter more than you’d think for taste and nutritional value. Makes 4 generous servings.
- 2 tablespoons all-purpose flour (creates silky sauce texture; or 1 tablespoon cornstarch dissolved in beef broth for gluten-free)
- 2 cups dried whole wheat elbow pasta (or gluten-free pasta if needed)
- 2 cups whole milk (full-fat or 2% gives creamiest results)
- 1 teaspoon sugar (balances acidity from tomato paste)
- ½ teaspoon freshly ground black pepper (always freshly cracked, never pre-ground)
- 1 pound ground beef (80/20 blend works beautifully, gives you flavor without excess grease)
- 1 teaspoon fine sea salt (adjust to taste at the end)
- 1 teaspoon garlic powder (distributed flavor, works better than fresh here)
- 3 tablespoons tomato paste (concentrated umami, transforms the sauce)
- 1¾ cups quality beef broth (homemade or low-sodium store-bought)
- 1 teaspoon onion powder (deepens savory notes throughout)
- 2 cups shredded sharp Cheddar cheese (freshly shredded if possible, melts more smoothly than pre-shredded)
- ½ teaspoon chili powder (subtle depth, not spicy)
- 1½ teaspoons sweet paprika (adds warmth and color without heat)
- 1 tablespoon avocado oil (neutral heat stability, mild flavor that won’t overpower)
- 1 small onion (finely chopped, roughly ½ cup)
How to Make Hamburger and Pasta?
This recipe comes together in straightforward steps. I’ve tested this on standard home equipment—a regular stovetop and everyday skillet—so you know it’ll work in your kitchen. Read through the entire recipe once before starting, and gather your ingredients nearby. This is what we call mise en place, and it changes everything about the cooking experience.
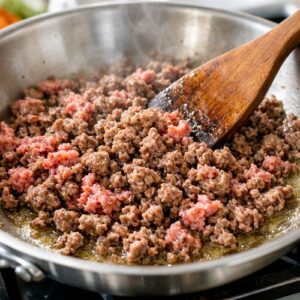
Step 1: Brown the Ground Beef
Heat your avocado oil in a large skillet (I use a 12-inch) over medium-high heat until you see a shimmer across the surface, about 1 minute. Add your ground beef, breaking it into small pieces with a wooden spoon or spatula as it cooks.
Let it sit undisturbed for about 2 minutes first—this develops a nice brown crust instead of gray, steamed meat. Then continue breaking it apart and stirring occasionally until no pink remains, roughly 5-6 minutes total. You should smell that savory, beefy aroma filling your kitchen.

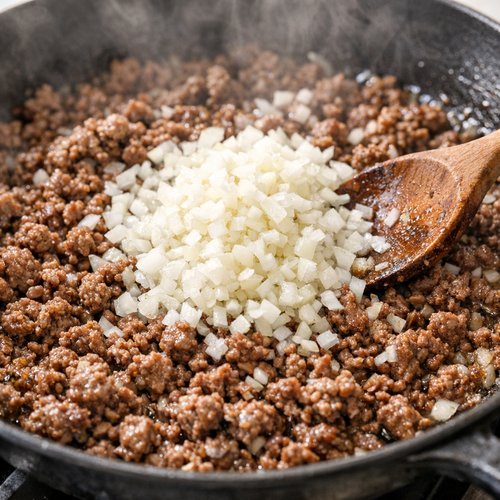
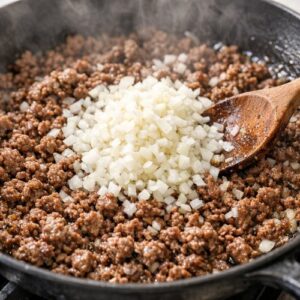
Step 2: Soften the Onions
Once the beef is fully cooked, add your finely chopped onion directly to the skillet. Stir everything together and let it cook, stirring occasionally, for about 5 minutes until the onion pieces become translucent and soft. They should release their sweetness into the beef—you’ll notice the mixture smells less raw and more developed.
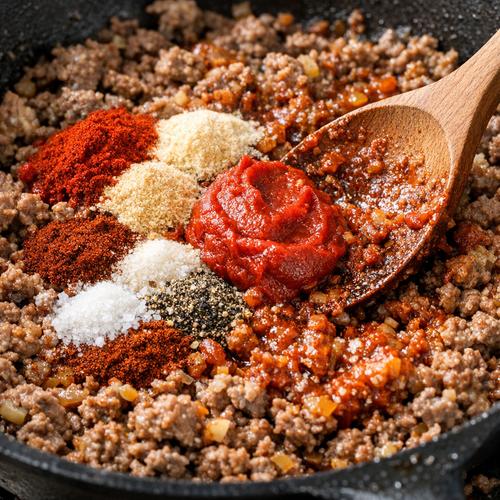
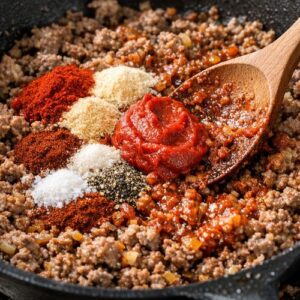
Step 3: Build the Flavor Base
Add the tomato paste, sweet paprika, onion powder, garlic powder, chili powder, salt, sugar, and black pepper all at once. Stir constantly for about 1-2 minutes. This is called “blooming” the spices, and it’s the secret to deep flavor. You’ll see the mixture become more fragrant and the tomato paste darken slightly as it toasts.
Don’t skip this step—it transforms simple spices into a cohesive, complex base.
Step 4: Create the Creamy Sauce
Sprinkle the flour over everything and stir for about 1 minute until the flour is completely incorporated and no dry bits remain. (If you’re making this gluten-free, dissolve 1 tablespoon cornstarch in ¼ cup of the beef broth first, then add that mixture instead.)
Pour in the whole milk and beef broth slowly, stirring constantly to prevent lumps from forming. The mixture should come together smoothly—this is your sauce base.

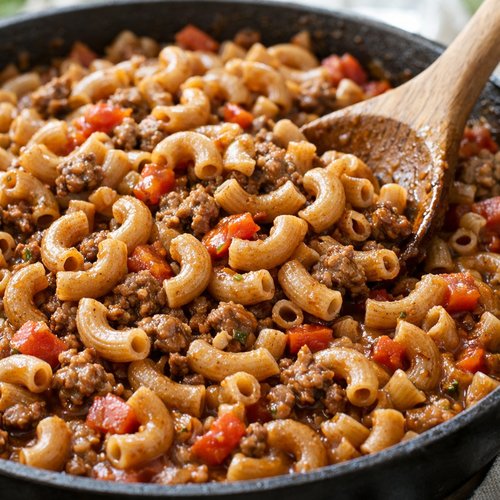
Step 5: Add the Pasta and Cook
Stir in the dried whole wheat elbow pasta, making sure each piece gets coated with the liquid. The skillet will look quite full, but that’s perfect—the pasta will absorb the liquid as it cooks.
Bring everything to a boil over medium-high heat, stirring frequently to prevent sticking, about 2-3 minutes. You’ll see larger bubbles breaking the surface.
Once boiling, reduce heat to medium-low, cover with a lid (or even a baking sheet in a pinch), and simmer for 10-12 minutes9 minutes. The pasta should be tender but still have a slight bite, and the sauce should have thickened slightly.
Step 6: Finish With Cheese and Serve
Remove from heat and immediately stir in your shredded Cheddar cheese until completely melted and incorporated, about 1 minute. The residual heat will melt the cheese beautifully without breaking the sauce.
Serve immediately while hot and creamy. A light sprinkle of fresh parsley adds color and freshness if you have it on hand, but it’s completely optional.
Expert’s Nutritional Tip
Here’s what I discovered as a registered dietitian: whole wheat pasta isn’t just about fiber (though that matters for digestion). It has a lower glycemic index than regular white pasta, meaning it releases energy more slowly into your bloodstream. This helps prevent that post-dinner energy crash, especially important for kids doing homework or adults working evening hours.
The ground beef provides 25 grams of protein per 3-ounce serving, making this a complete meal that actually keeps you satisfied for hours. I’ve tested this on myself and my family—you genuinely feel fuller longer compared to pasta dishes without protein. That’s the nutrition science working in your favor.
Tips and Tricks
- Don’t Skip Browning the Meat Properly – Take time to let the beef develop a brown crust before stirring. This creates what chefs call “fond,” those flavorful browned bits that taste incredible. They’re not a mess to clean up—they’re liquid gold for your sauce.
- Stir Frequently During the Simmer – Pasta has a tendency to stick to the bottom of the pan, especially in a creamy sauce. Stir every couple minutes to prevent a burnt layer from forming. This only takes 10 seconds per stir but makes all the difference.
- Taste Before Adding Salt at the End – The beef broth and cheese already contain salt. I always taste the finished dish before adding extra salt. Most people find they don’t need the full teaspoon listed—personal preference and broth saltiness varies.
- Use Fresh-Shredded Cheese if Possible – Pre-shredded cheese has anti-caking agents that prevent it from melting as smoothly. Fresh-shredded melts into a silkier sauce. If you only have pre-shredded, it still works fine—just expect slightly less smooth results.
- Cover While Simmering – A lid traps steam and helps the pasta cook evenly while preventing the sauce from drying out. Even a baking sheet works in a pinch!
- Don’t Overcook the Pasta – Check at 9 minutes, not 12. Overcooked pasta becomes mushy and absorbs too much liquid, making the final dish gluey. Al dente is the sweet spot.
Make-Ahead Guide
I use this recipe constantly for meal prep, and I’ve figured out exactly how to handle it so it reheats perfectly. Here’s my professional approach:
Refrigerator Storage: Divide into airtight containers and store for up to 4 days. The pasta will continue absorbing liquid as it sits, so the first day is creamiest. By day 3-4, you may need to add a splash of milk when reheating.
Freezing for Later: This freezes beautifully for up to 3 months. Let it cool completely first, then freeze in individual portions or a large container. Thaw overnight in the refrigerator before reheating.
Reheating Instructions: For refrigerated portions, warm gently on the stovetop over medium heat, stirring occasionally and adding a splash of milk if needed, about 5-7 minutes. For frozen portions, thaw completely first, then reheat the same way. Microwave works too—use 50% power in 2-minute intervals to prevent scorching the bottom.
Pro Tip: Don’t freeze this dish longer than 2-3 months because the cheese sauce can separate slightly over extended freezing. It still tastes great, but the texture changes. For best results, enjoy frozen portions within 8-10 weeks.
Common Mistakes to Avoid
- Cooking Beef Without Proper Browning – If you stir the ground beef constantly from the start, it steams instead of browns. Let it sit for the first couple minutes to develop flavor and color. This is what separates “meh” from “delicious.”
- Adding Pasta Before Liquid Boils – Cold pasta added to cold liquid takes forever to cook and can get sticky. Always let your sauce come to a boil before adding pasta. This ensures even cooking and proper texture.
- Using Boiling Milk Directly From the Carton – Room temperature milk mixes into the sauce more smoothly without creating lumps. If your milk is cold, it can curdle when hitting hot ingredients. I usually let milk sit on the counter while I prep, or use it straight from the fridge since I’m stirring constantly anyway.
- Forgetting to Adjust Seasoning at the End – Taste the finished dish before serving. Beef broth saltiness varies by brand, and you might need less or slightly more salt. Trust your palate—it’s your best kitchen tool.
Can I Store Hamburger and Pasta?
Absolutely! This is one of the most storage-friendly recipes I know. In the refrigerator, it keeps for up to 4 days in an airtight container. I recommend dividing it into individual portions right after it cools—this makes weeknight reheating effortless.
For the freezer, this recipe performs beautifully for up to 3 months. Cool completely before freezing. The only minor change you’ll notice is the sauce becomes slightly less creamy as it thaws, but a splash of milk during reheating fixes this instantly.
Reheating is straightforward: stovetop over medium heat with occasional stirring takes about 5-7 minutes, or microwave at 50% power in 2-minute intervals. Some of the pasta will absorb additional liquid as it sits, so don’t be surprised if you need a bit of milk to restore the creamy consistency.
Nutrition Information
Per serving (based on 4 servings total): This dish provides approximately 620 calories, 28 grams of protein, 45 grams of carbohydrates, and 28 grams of fat. The whole wheat pasta contributes 8 grams of dietary fiber per serving, which supports healthy digestion (based on USDA nutritional database standards).
The ground beef delivers essential nutrients including iron, B vitamins, and zinc—nutrients that plant-based meals often require supplementation to match. The dairy cheese provides calcium and additional protein, making this a nutritionally complete meal. A single bowl provides approximately 35% of your daily calcium needs, supporting bone health.
This is legitimate comfort food that doesn’t compromise nutrition. You’re getting whole grains, lean protein, and dairy—three food groups working together in one bowl.
What Can I Serve With Hamburger and Pasta?
While this dish is satisfying enough to stand alone, I love pairing it with bright, fresh sides that balance the richness. A crisp salad cuts through the creaminess beautifully, and if you want something hearty, Hunters Salad makes an excellent pairing that adds vegetables and texture.
Here are my favorite accompaniments:
- Garden Salad with Lemon Vinaigrette – The acidity cleanses your palate between bites. Mix arugula, spinach, and cucumber with a simple lemon juice and olive oil dressing.
- Steamed Broccoli or Green Beans – A simple vegetable side adds color and nutrition without competing with the main dish. A light butter and garlic treatment is all you need.
- Crusty Bread or Garlic Bread – Perfect for soaking up any sauce left in the bowl. I make a quick garlic butter by mixing softened butter with minced garlic and brushing it on bread before toasting.
- Roasted Brussels Sprouts – Their nutty, slightly caramelized flavor contrasts beautifully with the creamy, savory pasta. Toss with olive oil, salt, and pepper, then roast at 400°F for 20 minutes.
- Sliced Tomatoes with Fresh Basil – If tomatoes are in season, this simple preparation is perfection. Drizzle with good olive oil and a pinch of salt.
Seasonal Variations
Spring: Add fresh peas and diced asparagus in the last 3 minutes of cooking. The bright green vegetables add color and freshness without overwhelming the dish.
Summer: Stir in fresh corn kernels and diced zucchini. These vegetables add sweetness and moisture. I also like finishing with fresh basil instead of parsley for an herbaceous twist.
Fall: Add diced mushrooms when you cook the onions, and use smoked paprika instead of sweet paprika. A touch of Worcestershire sauce (½ teaspoon) deepens the savory notes.
Winter: Stir in diced carrots and celery with the onions for a classic comfort profile. You can also use ground beef mixed with ground Italian sausage (half and half) for richer flavor during colder months.
Substitutes
- Ground Turkey or Chicken – These work beautifully and reduce fat content if that’s your preference. Cooking time stays the same. Turkey provides leaner protein while still delivering rich flavor.
- Gluten-Free Pasta – Use any gluten-free elbow pasta you prefer. Cooking time may vary slightly (read your package), so check for al dente texture a minute earlier than directed.
- Dairy-Free Cheese and Milk – Use unsweetened cashew milk or oat milk plus dairy-free shredded cheese. The sauce will be less creamy but still delicious. Add an extra tablespoon of cornstarch (dissolved in broth) for better thickening.
- Plant-Based Ground Meat – Modern plant-based options brown nicely. Use the same amount and cooking time. The flavor profile changes slightly but remains satisfying.
- Different Cheese Types – Sharp Cheddar is my choice, but Gruyere, Gouda, or even a Cheddar-Gruyere blend work wonderfully. Avoid American cheese—it’s too processed for this recipe.
- Low-Sodium or Homemade Broth – If you have homemade beef broth, that’s actually superior to store-bought. Use it 1:1 for the same richness but often better flavor.
- Half-and-Half Instead of Milk – This creates an even richer sauce, though fewer calories come from cream. Works especially well if you’re feeding people with hearty appetites.

Macaroni And Hamburger Recipe
Ingredients
- 2 tablespoon all-purpose flour creates silky sauce texture; or 1 tablespoon cornstarch dissolved in beef broth for gluten-free
- 2 cup dried whole wheat elbow pasta or gluten-free pasta if needed
- 2 cup whole milk full-fat or 2% gives creamiest results
- 1 teaspoon sugar balances acidity from tomato paste
- ½ teaspoon freshly ground black pepper always freshly cracked, never pre-ground
- 1 pound ground beef 80/20 blend works beautifully, gives you flavor without excess grease
- 1 teaspoon fine sea salt adjust to taste at the end
- 1 teaspoon garlic powder distributed flavor, works better than fresh here
- 3 tablespoon tomato paste concentrated umami, transforms the sauce
- 1¾ cup quality beef broth homemade or low-sodium store-bought
- 1 teaspoon onion powder deepens savory notes throughout
- 2 cup shredded sharp Cheddar cheese freshly shredded if possible, melts more smoothly than pre-shredded
- ½ teaspoon chili powder subtle depth, not spicy
- 1½ teaspoon sweet paprika adds warmth and color without heat
- 1 tablespoon avocado oil neutral heat stability, mild flavor that won't overpower
- 1 small onion finely chopped, roughly ½ cup
Instructions
Step 1: Brown the Ground Beef
- Heat your avocado oil in a large skillet (I use a 12-inch) over medium-high heat until you see a shimmer across the surface, about 1 minute. Add your ground beef, breaking it into small pieces with a wooden spoon or spatula as it cooks. Let it sit undisturbed for about 2 minutes first—this develops a nice brown crust instead of gray, steamed meat. Then continue breaking it apart and stirring occasionally until no pink remains, roughly 5-6 minutes total. You should smell that savory, beefy aroma filling your kitchen.
Step 2: Soften the Onions
- Once the beef is fully cooked, add your finely chopped onion directly to the skillet. Stir everything together and let it cook, stirring occasionally, for about 5 minutes until the onion pieces become translucent and soft. They should release their sweetness into the beef—you'll notice the mixture smells less raw and more developed.
Step 3: Build the Flavor Base
- Add the tomato paste, sweet paprika, onion powder, garlic powder, chili powder, salt, sugar, and black pepper all at once. Stir constantly for about 1-2 minutes. This is called "blooming" the spices, and it's the secret to deep flavor. You'll see the mixture become more fragrant and the tomato paste darken slightly as it toasts. Don't skip this step—it transforms simple spices into a cohesive, complex base.
Step 4: Create the Creamy Sauce
- Sprinkle the flour over everything and stir for about 1 minute until the flour is completely incorporated and no dry bits remain. (If you're making this gluten-free, dissolve 1 tablespoon cornstarch in ¼ cup of the beef broth first, then add that mixture instead.) Pour in the whole milk and beef broth slowly, stirring constantly to prevent lumps from forming. The mixture should come together smoothly—this is your sauce base.

Step 5: Add the Pasta and Cook
- Stir in the dried whole wheat elbow pasta, making sure each piece gets coated with the liquid. The skillet will look quite full, but that's perfect—the pasta will absorb the liquid as it cooks. Bring everything to a boil over medium-high heat, stirring frequently to prevent sticking, about 2-3 minutes. You'll see larger bubbles breaking the surface. Once boiling, reduce heat to medium-low, cover with a lid (or even a baking sheet in a pinch), and simmer for 10-12 minutes9 minutes. The pasta should be tender but still have a slight bite, and the sauce should have thickened slightly.

Step 6: Finish With Cheese and Serve
- Remove from heat and immediately stir in your shredded Cheddar cheese until completely melted and incorporated, about 1 minute. The residual heat will melt the cheese beautifully without breaking the sauce. Serve immediately while hot and creamy. A light sprinkle of fresh parsley adds color and freshness if you have it on hand, but it's completely optional.

Notes
FAQs
Can I make this without whole wheat pasta?
Absolutely! Regular all-purpose pasta works perfectly—the cooking time is usually 1-2 minutes shorter. Whole wheat is my preference for nutrition and texture, but this recipe is forgiving enough to work with whatever you have in your pantry. Just check for doneness a minute earlier since regular pasta cooks faster.
What if my sauce looks too thick or too thin?
Sauce thickness depends on several factors: how much your liquid reduced during cooking, the pasta you used, and how long it sat before serving. If it’s too thin, let it simmer uncovered for a few extra minutes to reduce. If it’s too thick, stir in a splash of milk or broth. Remember, the pasta continues absorbing liquid as it sits, so it will thicken more after cooking finishes.
Can I use fresh onion and garlic instead of powder?
Yes! Use ½ cup finely diced fresh onion (which you’re already doing) and replace the garlic powder with 3 minced fresh garlic cloves. Add the garlic when you add the onions and let it cook for 1-2 minutes before adding the other seasonings. Fresh garlic is more pungent, so use slightly less than the powder equivalent suggests.
Is this recipe kid-friendly?
Completely! This is one of the most kid-approved dishes I make. The mild spice blend, creamy cheese sauce, and familiar pasta shapes appeal to younger palates while being interesting enough for adults. I’ve served this to kids ranging from age 3 to 13, and it’s a rare dish that gets unanimous enthusiasm.
How can I add vegetables without changing the recipe?
Dice any vegetables finely and add them when you cook the onions—carrots, celery, mushrooms, bell peppers. They’ll cook alongside the onions in about 5 minutes. For faster-cooking vegetables like peas, zucchini, or spinach, add them in the last 2-3 minutes of simmering so they stay bright and tender. Each vegetable adds nutrition and fiber without requiring recipe changes.
More Recipes You’ll Love
- Steak Mac and Cheese Recipe – An elegant upgrade using tender steak instead of ground beef, perfect for special weeknight dinners.
- Cherry Pie with Graham Cracker Crust and Streusel Topping – A delightful dessert to follow your savory main course.
- Treasure Chest Bars Recipe – Sweet treats that store beautifully alongside this make-ahead friendly main dish.
- How To Make Lipton Sun Tea – The perfect refreshing beverage to serve alongside this comforting dinner.
I hope this recipe becomes part of your regular rotation the way it has for my family. There’s something magical about one-pot meals that bring everyone together without stress or fuss. When your kitchen smells like toasted beef and cheese, when dinner comes to the table in under 30 minutes, when people ask for seconds—that’s when you know you’ve created something special.
Good food really is a good mood, and meals like this prove it every single time.
Warmly,
Lori
- Ground Beef And Elbow Macaroni Recipe
- Franco American Macaroni and Cheese Recipe
- Bone Crusher Macaroni and Cheese Recipe
- Neelys Macaroni and Cheese Recipe

My name is Lori Walker. I’m a registered dietitian, food blogger and food enthusiast. I share easy healthy, delicious recipes on my blog and review necessary kitchen items. The recipes I share take less… Read more